Astrophotography is arguably one of the most complicated types of photography due to the number of variables impacting the image quality. We photograph dim distant objects, thousands of light-years away, moving around the sky. The best image, among many things, requires perfect polar alignment and compensation of the Earth rotation, millimeter-accuracy of back-focus distance, camera sensor must be perfectly flat against the focal plane, telescope focus must be perfect in variable temperature conditions, and many more things. Even if we get everything tuned in on the telescope, the Earth’s atmosphere has the final say. We don’t have the luxury of waiting for perfect conditions, nor can we photograph from space. As such, most hobbyists roll with the punches, collect the data they can, then pull the details in post-processing.
This post is about one aspect of image reconstruction that removes blur. Colloquially, folks refer to it as sharpening or deblurring. Scientifically, it is called deconvolution. There are different opinions on whether it is an acceptable tool or plain vanilla cheating. I am a fan of a reasonable amount of deconvolution in the image processing workflow. In this post, I will explain, in basic terms, what deconvolution is and cover a few popular apps. My hope is by revealing how the tools work, more people will gain confidence in using them.
Deconvolution is not unique to astrophotography. It applies to any image acquisition process, including microscopy and regular photography. Even your iPhone pictures can get sharper with deconvolution, I bet you didn’t know that. In this post, we will cover astrophotography only.
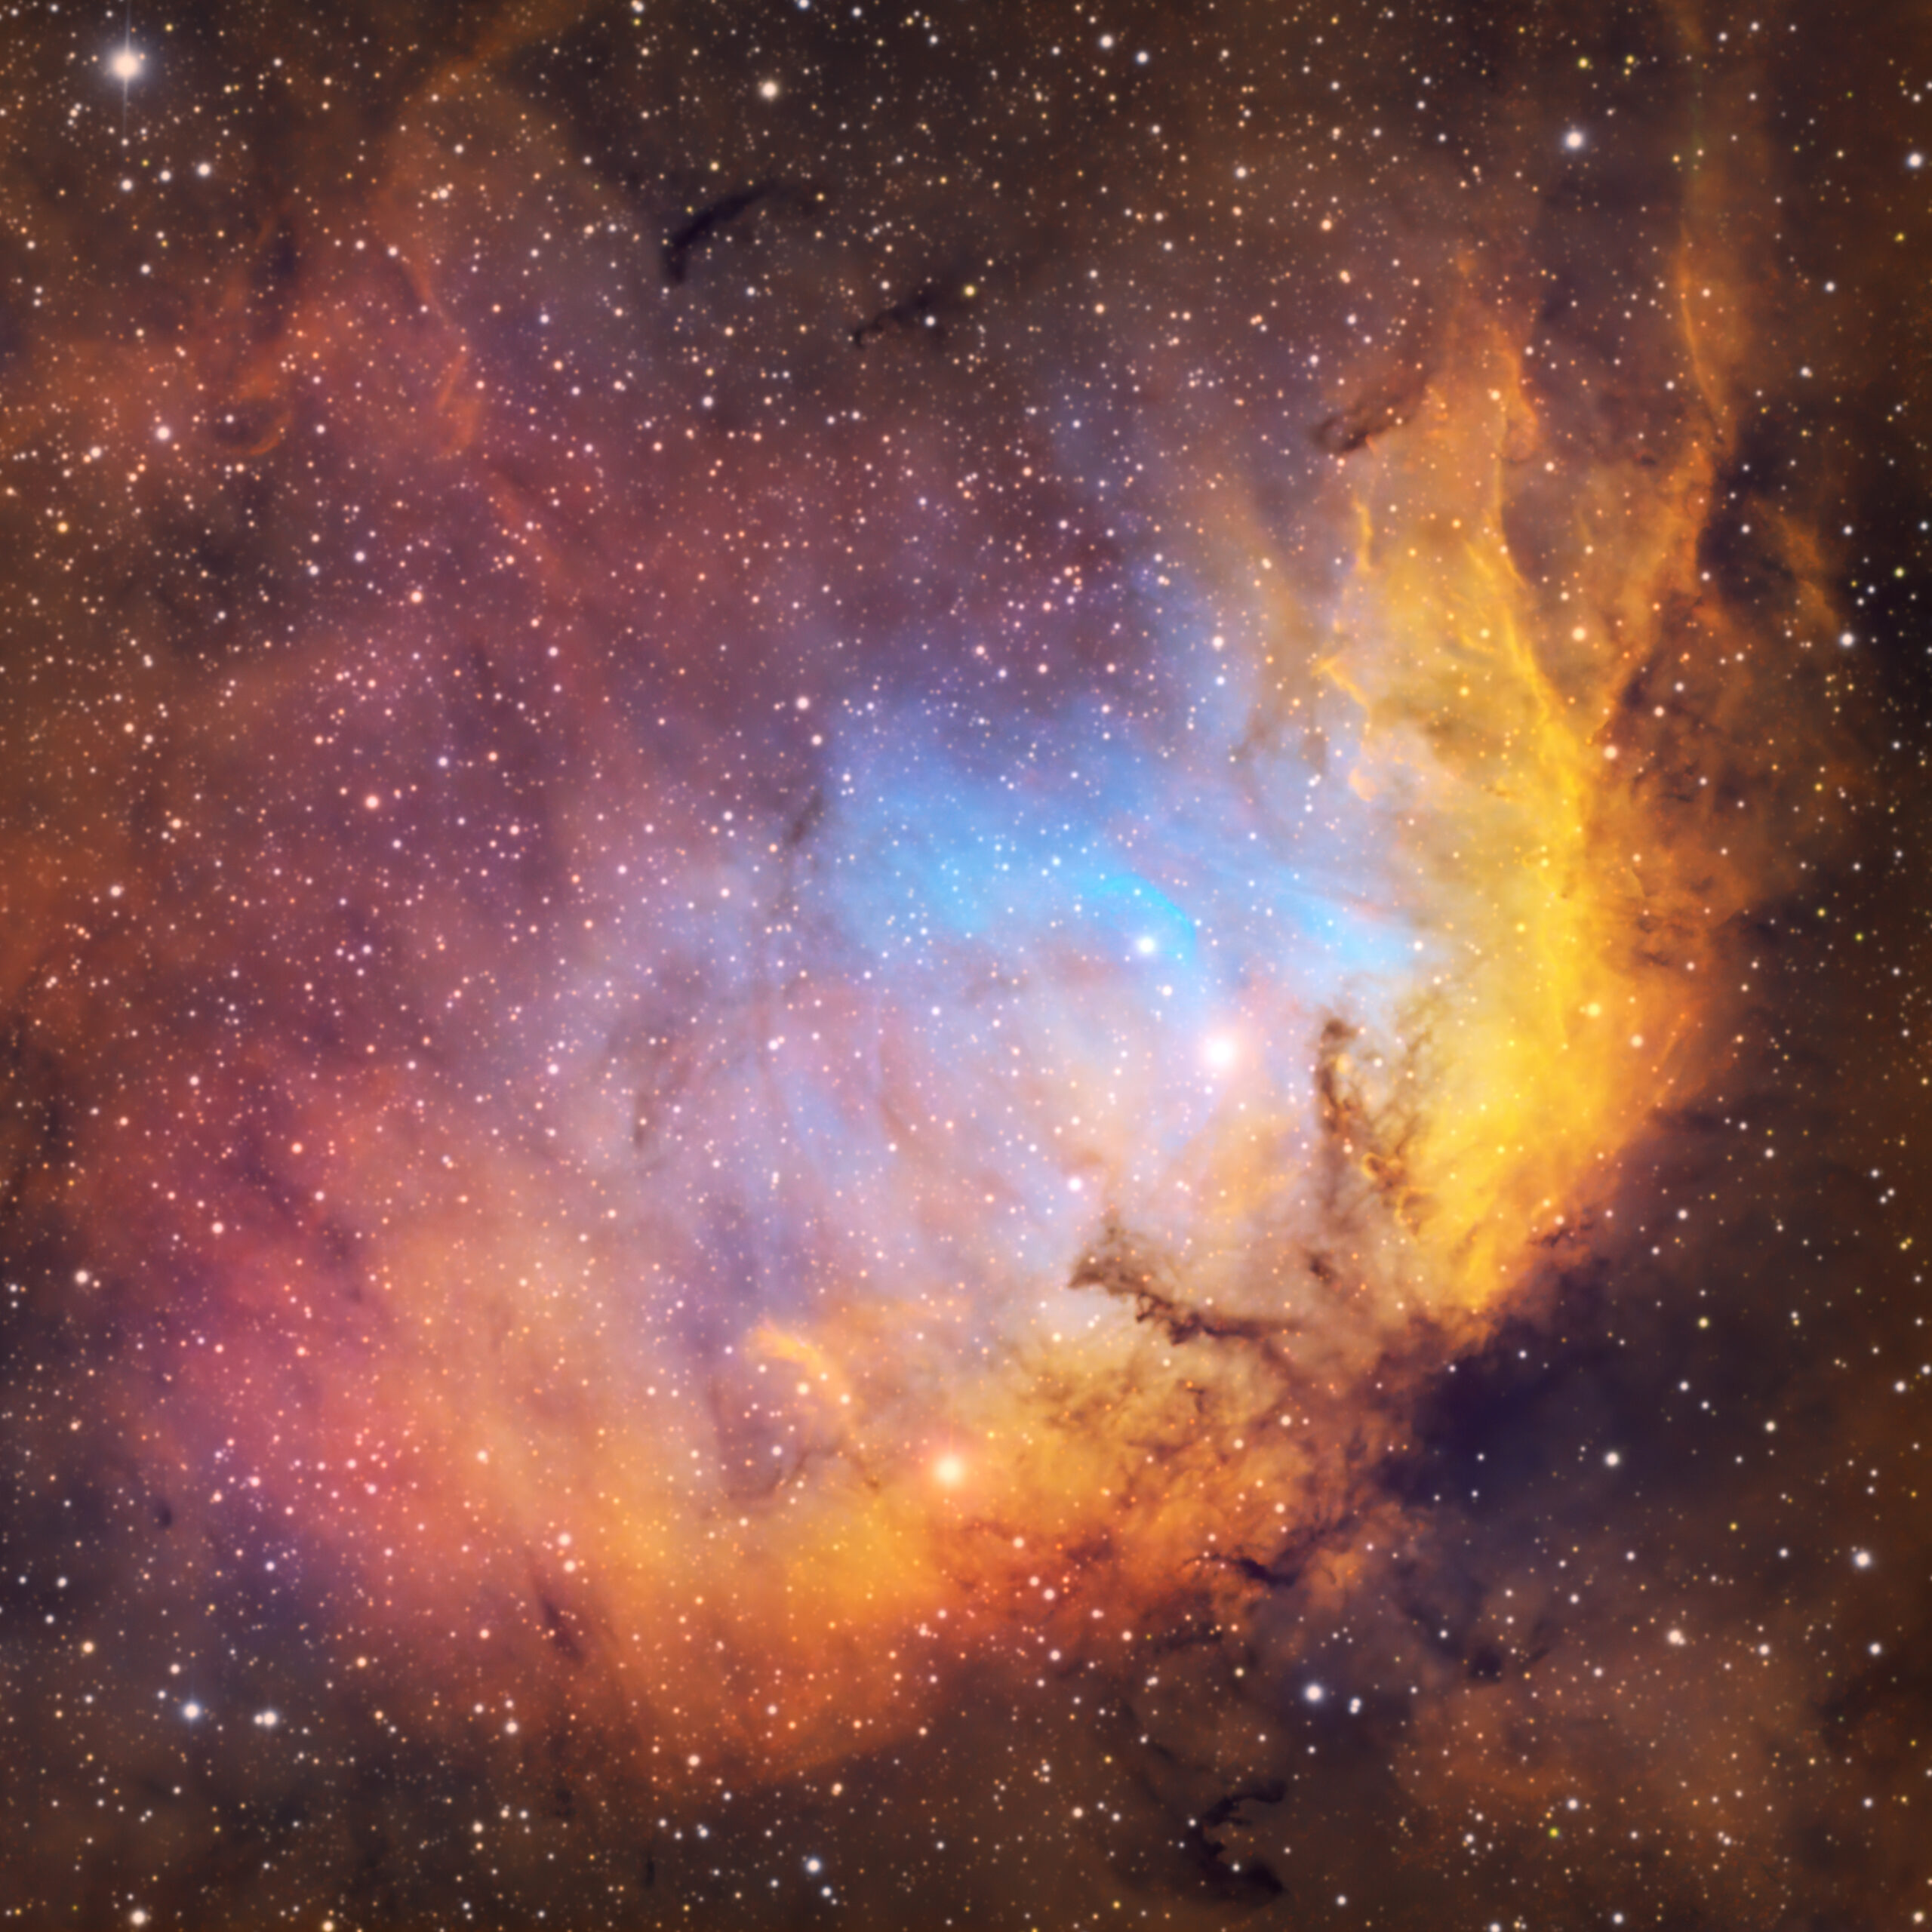
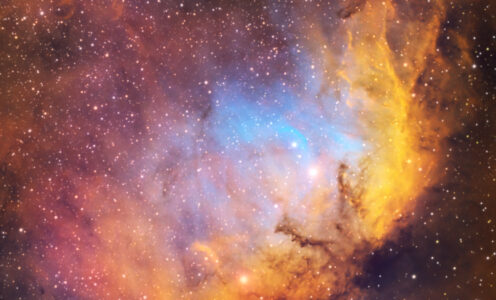
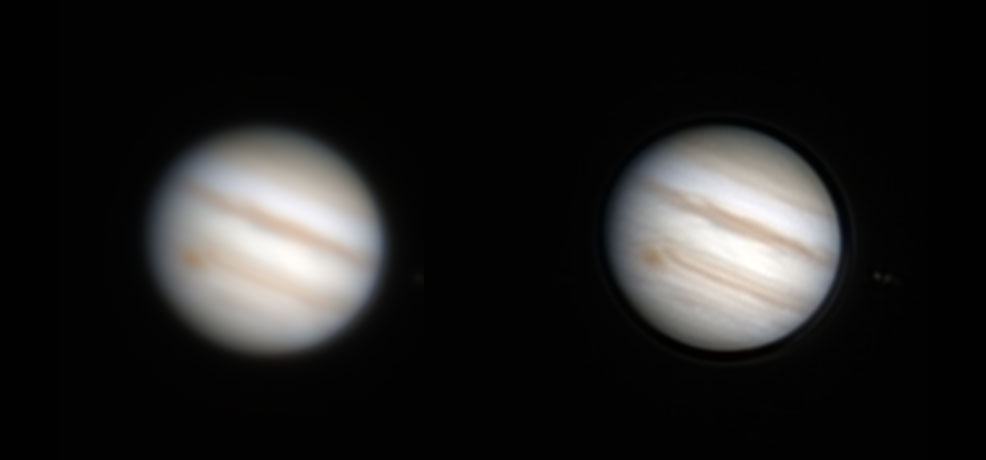
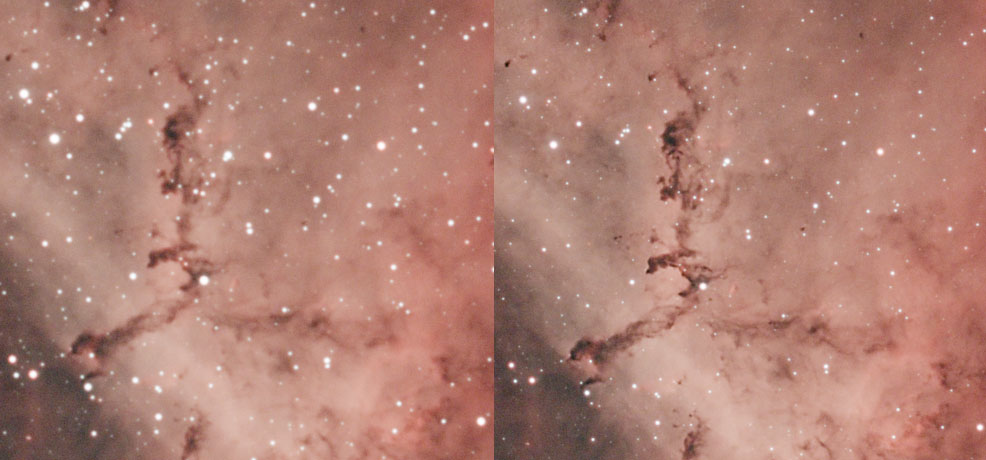
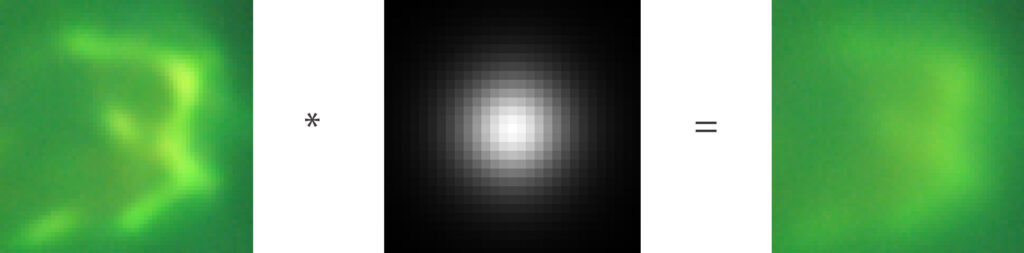
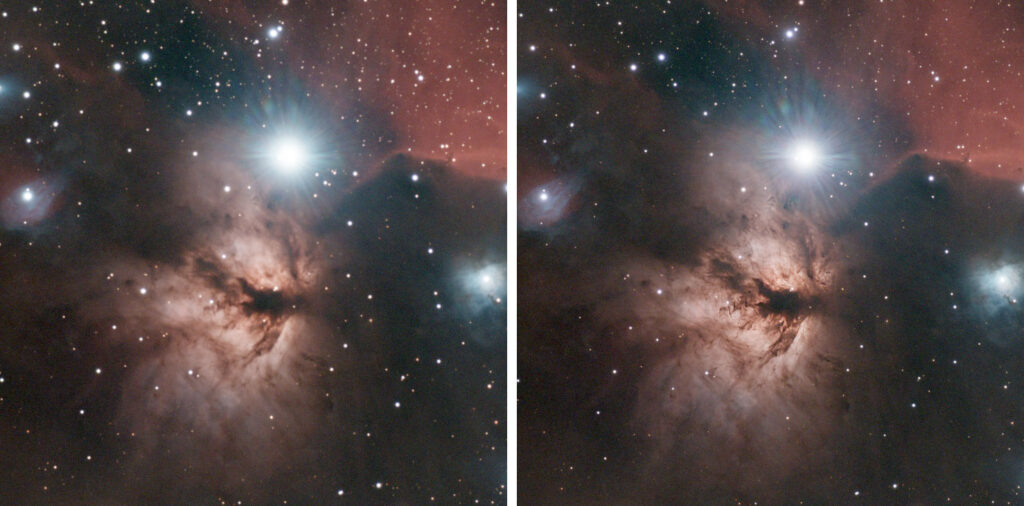
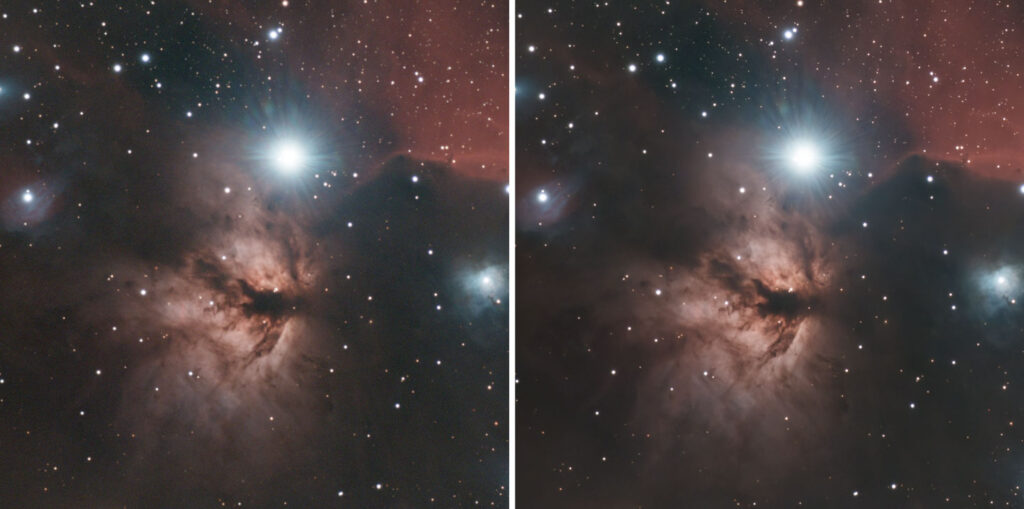
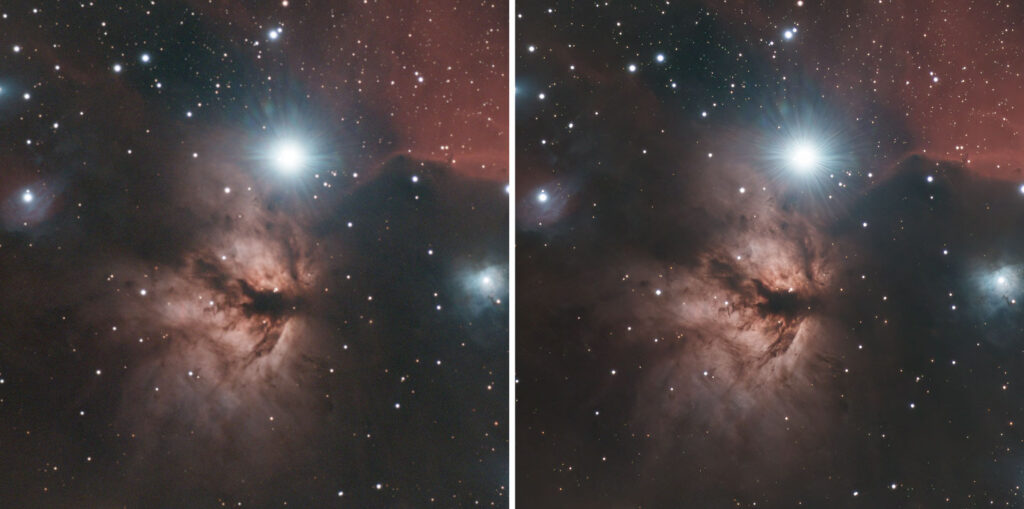
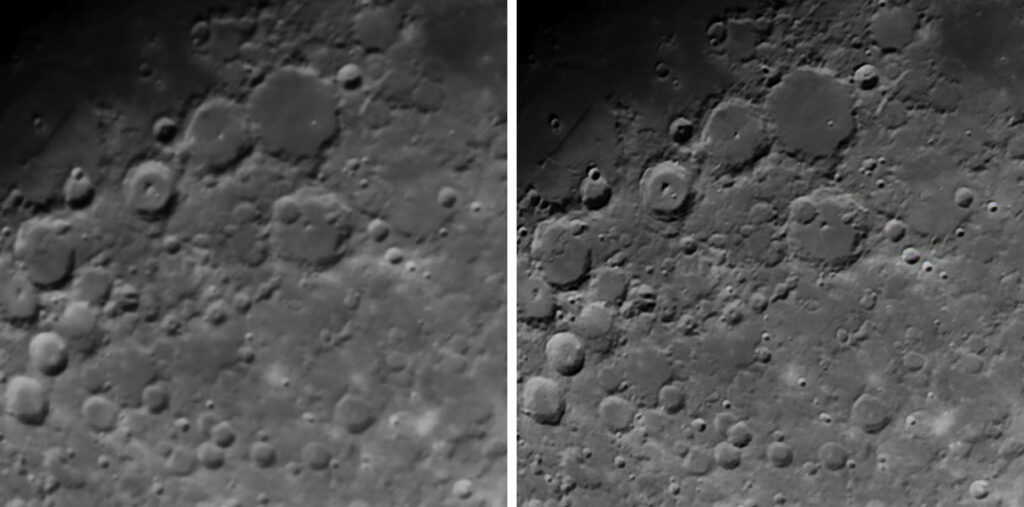
Below are two sets of images. Images on the left are the best frames straight out of the telescope after stacking. Images on the right are deconvolved, or “sharpened” to reveal the details.
Point Spread Function
When we point our telescopes to the sky, we expect photons to travel in a straight line from the distant object to our camera sensor. Unfortunately, it does not and I am not implying gravitational lensing by the black holes. If the light traveled straight and did not experience any interference, all stars on our images would appear as single-pixel dots. When we look closely at our photos, stars appear as bright discs covering multiple pixels. The light from each star is “spread” over an area. The mathematical function that describes how light is spread over an area is called the point spread function.
Atmosphere
The first hurdle the light needs to overcome is the Earth’s atmosphere. When we look up into the night sky we see stars twinkle. This twinkling comes from turbulent air that refracts light beams and disperses them over an area. You may have noticed that the lower the star to the horizon the more it twinkles. The closer to the zenith it is, the more stable it looks. This happens because there is less atmosphere straight above us than there is if we look toward the horizon.
Both videos above were recorded at 30 frames per second to demonstrate atmospheric turbulence. It is not possible to see on a static image but is very clear on the video. When I saw the star twinkle through the telescope I actually thought it was the star that changes shape. Later I learned that the Earth’s atmosphere distorts it like this.
The optical system inside the telescope
We see light inside the telescope tube because atoms of gas in the nebula emit photons themselves or reflect photons coming from other sources. Hence we have emission nebulae (those that emit light) and reflection nebulae (those that reflect light). We also have dark nebulae that absorb light, but that’s beside the point.
Light from the nebula is not polarized – it is sent into space in all directions. This light is coherent because it comes from a single source of light. A great example is the H-Alpha emission nebula that radiates light at 656.281 nm wavelength. Each atom of this nebula would emit the same wavelength and send in all directions in space.
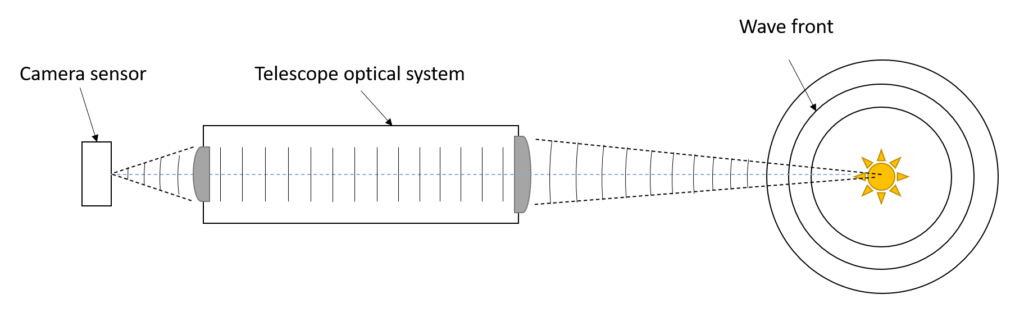
Waves of light pass through the telescope’s optical tube and converge on the focal plane. If there is a sensor right at that point, then the interference intensity peak will be at that point. If the sensor is slightly off (the image is out of focus) then the interference pattern will shift but will remain concentric. This rule applies not only to stars but to any source of light – the tiniest atoms in the nebula. It is worth noting that the size of the disc depends on the optical resolution of the telescope (Rayleigh limit).

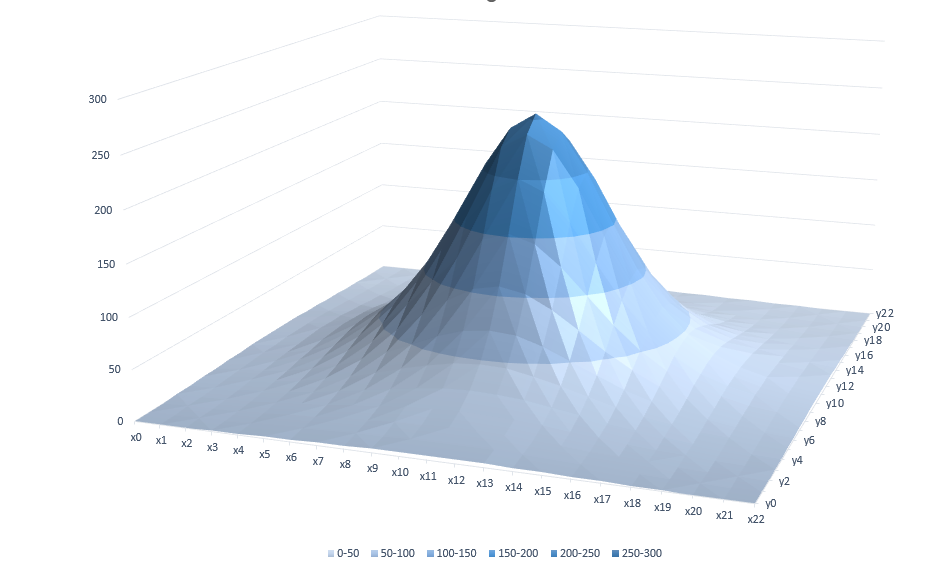
Stars are great specimens to study the distribution of light because they represent point light sources in space that become something else on the image. However, the same exact distribution applies to all light sources, not only stars. Turns out, mathematicians call this a Gaussian distribution. Spatially, it looks like the image below. Each value is in the range from 0 through 255 – the range of values for each color channel for an 8-bit image.
Optical aberrations
A single point spread function can approximate the distribution of light on the image if the optical train contains no defects. Most often than not, the point spread function changes for different parts of the image. It is excruciatingly hard to keep a single PSF because it requires tuning that only the most dedicated astrophotographers are willing to embark on.
- Back-focus: If the camera sensor is 1 mm too close or too far from the telescope focal plane then stars will be elongated as they get farther from the center towards the edges of the image
- Sensor tilt: If the camera sensor is not perfectly parallel to the focal plane of the telescope then the stars’ PSF will be elongated in the direction of the sensor tilt
- Coma: Newtonian telescopes can distort the field towards the edge of the camera sensor
- Collimation: Reflector telescopes must have their mirrors aligned perfectly or the PSF will be skewed
This is not an exhaustive list of issues that impact image PSF, but rather the most obvious and popular ones. There is also temperature difference inside and outside the telescope causing turbulence and many more fun ways to ruin your image.
Convolution
Mathematically speaking, convolution is an operation that defines how one function impacts the shape of another function. Since the camera has a finite number of pixels and each pixel has a specific size, we will be talking about discrete convolution in this section.
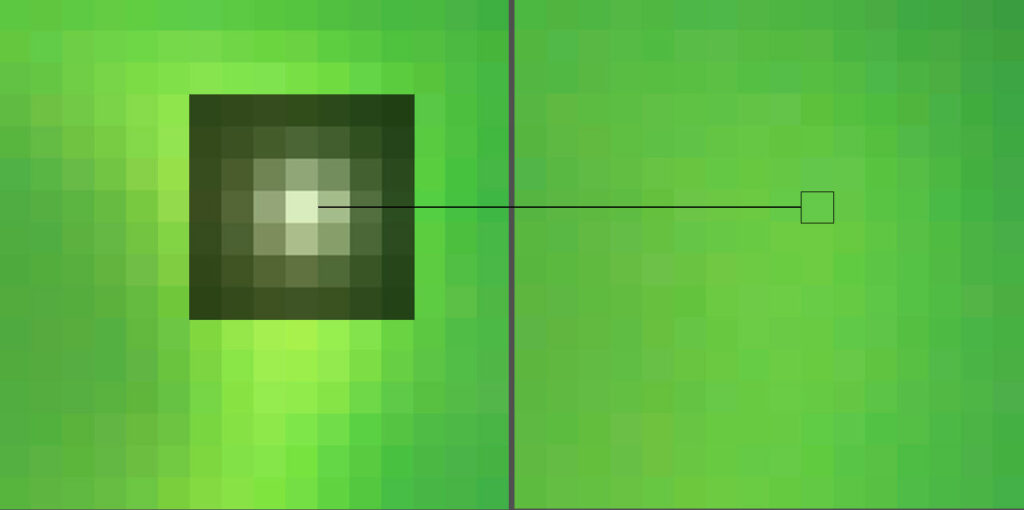
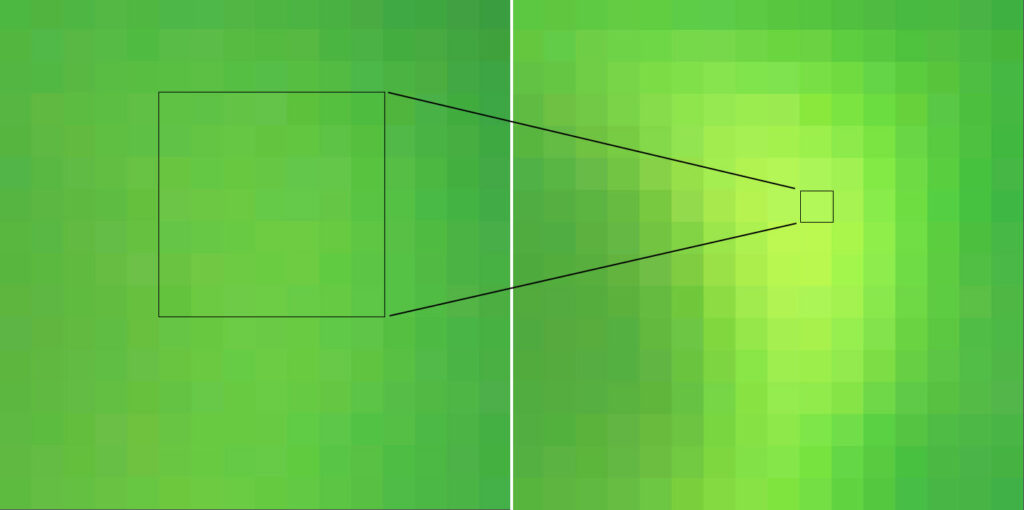
Convolution operation computes the final image pixel by pixel. To calculate the value of the pixel at coordinates (x, y) on the final image, it goes back to the original image position (x, y) and applies the kernel (PSF) at the center of that position. Then it goes pixel by pixel within the area covered by PSF and multiplies the color of the original image by the value inside PSF at the corresponding position. The sum of all multiplications is written into the pixel of the final image.
You may have heard the term Gaussian blur. Now you know how Photoshop and other tools calculate it – they apply PSF with Gaussian distribution to the sharp image to create a blurred one. Hang on a second, don’t we have a Gaussian distribution of PSF from the telescope? Yes, we do. Our astrophotography images come “pre-blurred” out of the telescope. The larger our PSF, the more data is scattered across our image.
Deconvolution
It is pretty evident from the name itself that deconvolution is the inverse process of convolution. Deconvolution seeks to mitigate the impact of the PSF and recover the original image. Mathematically speaking, deconvolution is a process of computing inverse PSF and convolving the blurred image with it to restore the original data.
The signal from the original sharp image is distributed across the area of PSF in the blurred image with various proportions. If there was no noise in the blurred image and we could estimate PSF with 100% accuracy, then deconvolution would boil down to a simple system of linear equations. Unfortunately, due to noise in the blurred image and inaccuracy of PSF estimation, such a system of equations would have no solution. To deal with this problem, mathematicians developed mechanisms to approximate the original sharp image. It means that there are many original sharp images that when convolved with PSF produce a given blurred image with a certain degree of accuracy.
Richardson-Lucy deconvolution algorithm
A very popular, strictly mathematic method to recover original data given a blurred image and a PSF was developed by Richardson and Lucy. This algorithm is iterative, meaning it produces the original image step by step, improving the accuracy over time. It cannot invent data that doesn’t exist in the blurred image and does not recognize the structure of the subject in the photo. It takes pixel by pixel, performing mathematical operations.
If we crank up the iterations too much or provide inaccurate PSF on input – it will produce all sorts of distortions. The algorithm does not understand whether the image makes sense to the human eye – it just does the math. In broad strokes, the algorithm looks as follows:
- On input it takes 3 parameters: blurred image estimated PSF and a number of iterations. This algorithm operates on grayscale images so each channel of the color image must run individually.
- Initialize the final result image with the input blurred image
- Loop the specified number of iterations and perform the following computation
- Convolve the final result image with the PSF provided on input
- Calculate the relative blur of each pixel by dividing the initial input blurred image by the final result image, pixel by pixel. The idea behind this step is once the final result image becomes identical to the initial blurred image, all further iterations of this algorithm will take no action.
- Estimate the error by convolving relative blur image with reversed PSF
- Apply the estimated error to the final result image
- When algorithm completes it returns the final result image
AI deconvolution
Tools that use AI for deconvolution (or sharpening) stir overwhelming excitement and speculation. I have heard comments in the community ranging from AI injecting images downloaded from Hubble Space Telescope during the deconvolution process to AI gaining consciousness and taking over the world. Neither of those can be further from the truth. Frankly speaking, “Artificial Intelligence” just sounds cool so the industry adopted the term. However, at the risk of opening a philosophical debate on the nature of cognition, I am going to state that no “thinking” is taking place during the deconvolution process – pattern recognition at best.
Disclaimer: I have not studied the implementation of any popular deconvolution tool but I have a half-decent understanding of neural networks. I firmly believe that authors of deconvolution tools should get the credit and reward for their hard work and ingenuity.
Most AI deconvolution tools use Convolutional Neural Networks. These networks take an image on input, perform certain actions on that image, and provide an image of the same dimensions on the output. Convolutional Neural Networks (CNN) have convolutional layers that can detect structures, such as lines, circles, edges, etc. They can then use those edges to construct a sharper image using data from the original image. A subclass of these neural networks is Super Resolution Convolutional Neural Network (SRCNN), which can be used for deconvolution purposes.
The beauty of neural networks is the ability to use the Reinforcement Learning technique. Instead of spending countless months writing specific computer code to sharpen the image, the author builds a network, and feeds a large number of blurred images on the input and sharpened images on the output, forcing the network to learn how to convert blurred images into sharp ones. I do not want to diminish the work of authors of AI deconvolution tools, but in reality, the TensorFlow library model fitting algorithm does a lot of the heavy lifting.
High-level neural network design
The neural network is trained with a large but finite number of parameters. To process photos of different sizes, they are broken into strides. The area of each stride is fixed to the input of the neural network.
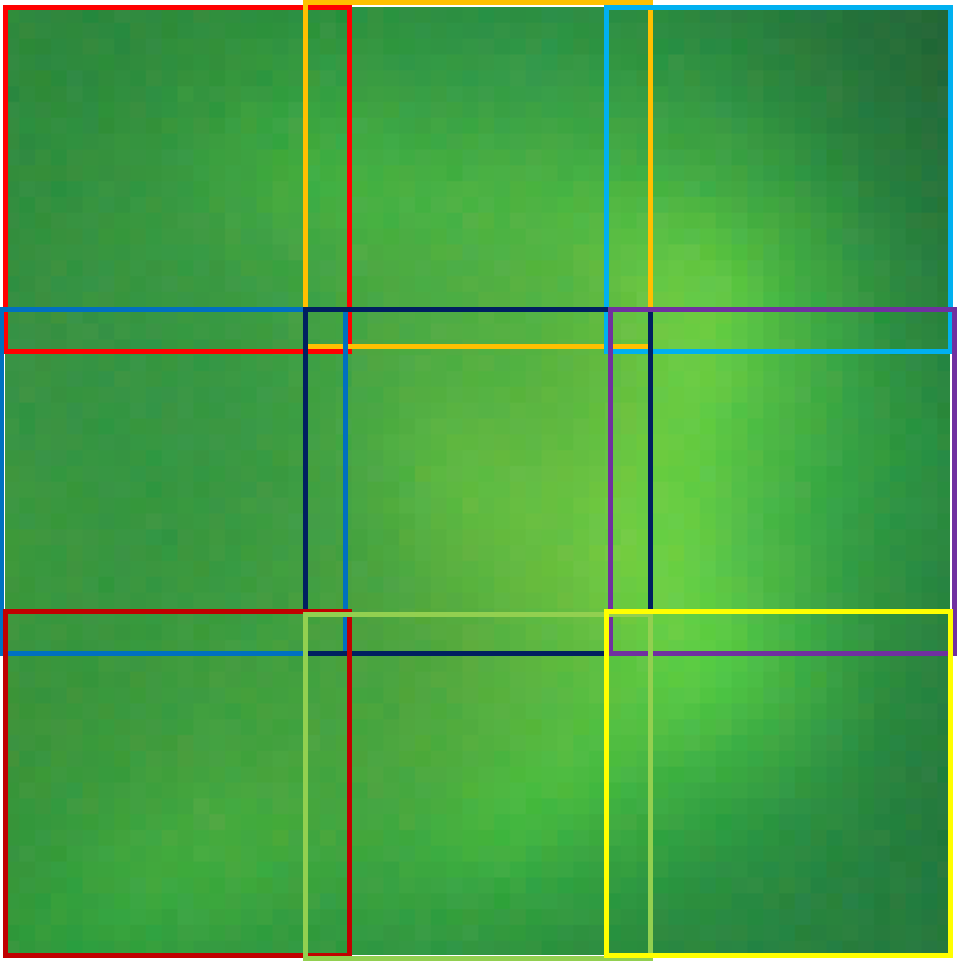
Strides need to overlap to create a continuous image without sharp features around the edges. The size of each stride should be large enough to capture visually recognizable features in the image. My guess is the stride needs to be at least 256×256 pixels, if not more. The algorithm that orchestrates the neural network is responsible to stitch together the final image stride by stride.
The neural network takes the entire stride as input – each pixel has a corresponding input parameter in the network. There are at least 3 layers in the network. Some networks may have interpolation and down-sample layers around them to upscale and downscale the image.
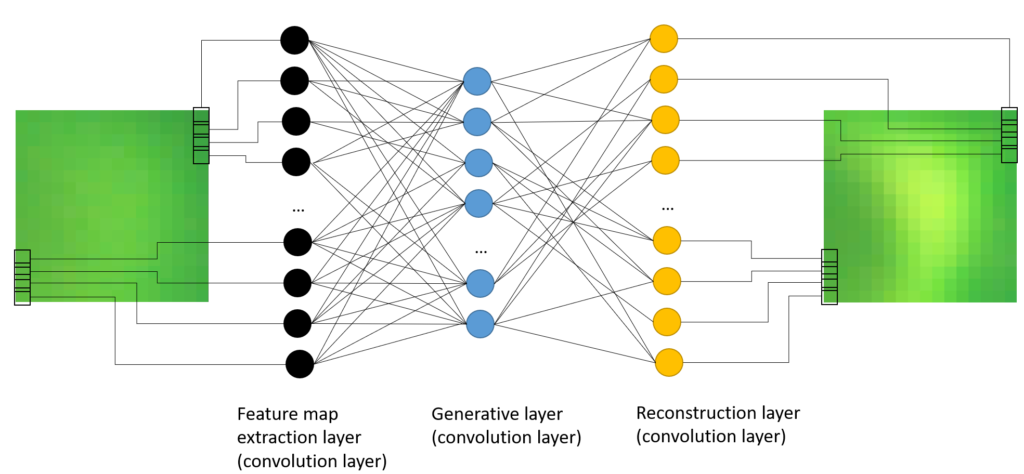
Fundamentally, the layers of the network have the following responsibilities:
- The first layer recognizes the patterns in the image (from left to right) and distinguishes between stars and nebulae
- The second layer fills the gaps in the data following the pattern
- The last layer rebuilds the image using the original image color data
I am sure in reality the networks are more complex and consider PSF as input parameters or perhaps other user-configurable thresholds. The most important takeaway from this section should be understanding that neural network does not carry data from Hubble. The neural network knows how to mutate the original image and apply the non-linear transformation.
Deconvolution tools
It is worth noting that all deconvolution tools are purpose-built. There is no silver bullet that covers all astrophotography needs and you would use different tools in different cases. Even if you have multiple tools built for the purpose at hand, they will not perform equally well.
Deep space
At the time of writing this post, the best deconvolution tool for deep-space objects is RC-Astro BlurXTerminator. Its neural network has been explicitly trained for deep sky objects so it does the best job recovering details from the blurred images using PSF of the closest stars. This tool doesn’t help with noise reduction, in fact, it explicitly ignores noise. I am thoroughly impressed with the data recovery it provides.
My other go-to tool for sharpening and noise reduction is Topaz Denoise AI. This tool does a bit more than sharpen images – it removes noise. It isn’t tuned specifically for astrophotography so sharpening doesn’t consider PSF from stars and frankly stars look really bad. But the noise removal is remarkable. You can incorporate this tool into your image processing workflow after the star removal step (RC Astro StarXTerminator is an excellent tool)
The third tool I use in my workflow is Topaz Sharpen AI. It does an excellent job at sharpening images, but it wasn’t designed with astrophotography in mind. As such, it doesn’t handle the noise well, which is inherent in every astrophoto. In fact, it sharpens the noise too. To use this too effectively one needs to clean the image, remove stars and then apply carefully not to sharpen what must never be sharpened.
Planets and moon
I am not aware of good AI-based deconvolution tools for planetary astrophotography. None of the tools covered in this article so far are suitable to bring out the details of planets. This is where the good old-school Richardson-Lucy regularized deconvolution algorithm performs best. My tool of choice is PixInsight – it is like a spaceship for astrophotographers. It gives a great degree of control over the deconvolution process and produces the best results, in my view.
One challenge with planetary deconvolution is that it is hard to calculate PSF automatically. There are no stars in planetary images so we can’t run PSF fit algorithm and calculate the PSF. As such, for planetary deconvolution, one must sit and tweak gaussian distribution parameters manually to strike a balance between sharpness and distortion.
Final thoughts
Is deconvolution considered cheating? I do not think so. Astrophotography is a form of art and tolerance/appetite for deviation from realism is not uniform across the community. I personally prefer realistic photos that depict space as accurately as possible. As such, I apply a reasonable amount of processing to remove noise and recover data, but not so much that it starts to invent non-existing structures in space.
If you enjoy astrophotography content, check out an in-depth look at astronomic plate-solving.