

Recently I expanded my landscape photography hobby into astrophotography territory. All it really takes to join this exclusive club is to walk outside your house at night and tilt the camera up. Everything after that is a function of commitment, skills, and gear. The sky is full of mesmerizing nebulae and constellations. The light from them takes millions of years to reach the Earth and we can capture it with a simple DSLR camera. Of course, this hobby is not for everyone. There’s really not that many people willing to sacrifice their comfort to make great deep-sky photos. Assuming you are one of those 3 people, let’s go over step-by-step instructions on how to photograph the closest deep-sky object – our own Milky Way galaxy. Buckle up, this post will be lengthy, but in the end, you will know everything necessary to shoot the Milky Way like a pro.
This hobby is not for faint-hearted
Most of us live in a city or a suburb with plenty of light pollution. It makes it impossible to photograph the Milky Way. Even light pollution camera filters won’t be able to bring out the Milky Way in the city. Our galaxy requires complete and utter darkness. To find this dark sky one needs to drive a few hours out of the city into the wilderness. Human civilization comes hand in hand with light, so to escape light, one has to escape civilization, so to speak.
Picture this – you are by yourself in complete darkness in the middle of nowhere, exposed to weather elements and wildlife. Even simple luxury like a torchlight or campfire will ruin your photo. Heck, even a red headlamp will mess your shot, so you have to turn it off while imaging. Your eyes and ears will adjust. You will see quite well and hear every raccoon lurking in the trees. If it’s cold or windy – you will be miserable. If this hasn’t scared you away, congratulations Mr. Lionheart, the rest is careful planning and execution.
Find a perfectly dark and clear sky in your area
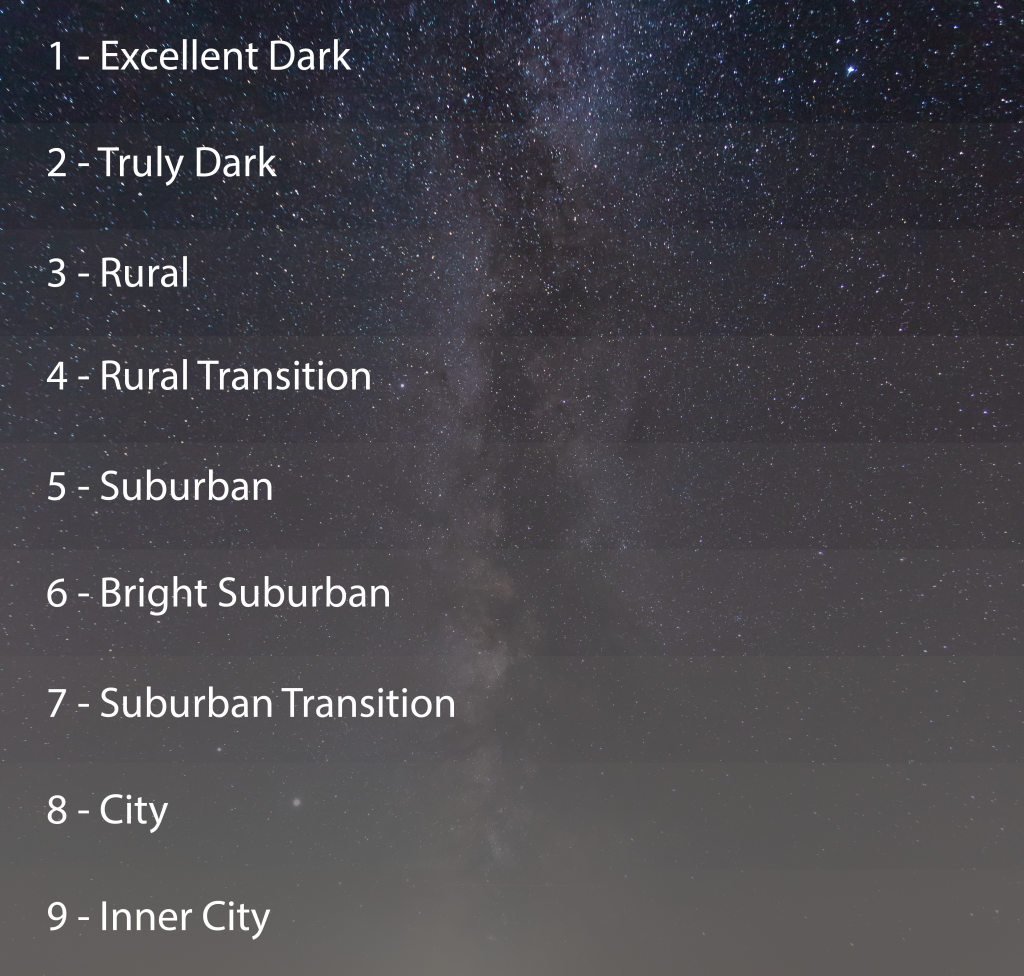
To capture the Milky Way we are going to have to find an area classified as Bortle 3 or lower on the light pollution scale. Areas above 4 will not allow enough details to justify the trip and time investment. There are plenty of apps and websites to help us out, for example, lightpollutionmap.info. There is a “halo” zone around every light-polluted area. As a compromise, it is OK to be shooting from the “halo” area into the darker skies.
National forests and state parks tend to be dark areas. If you have some of them near the house I’d recommend checking them out first. The only catch is that trees will obstruct your view of the night sky. An open area in the middle of the national forest is probably the best place for the Milky Way photography. If you have a choice of the area with the lake and without – go for the one with the lake. It will add an interesting reflection to your photo.
Search for Dark Sky preserves near you on Google. There’s likely a list of places someone cared to put together for you. In Washington nice people from WTA compiled such a list already.
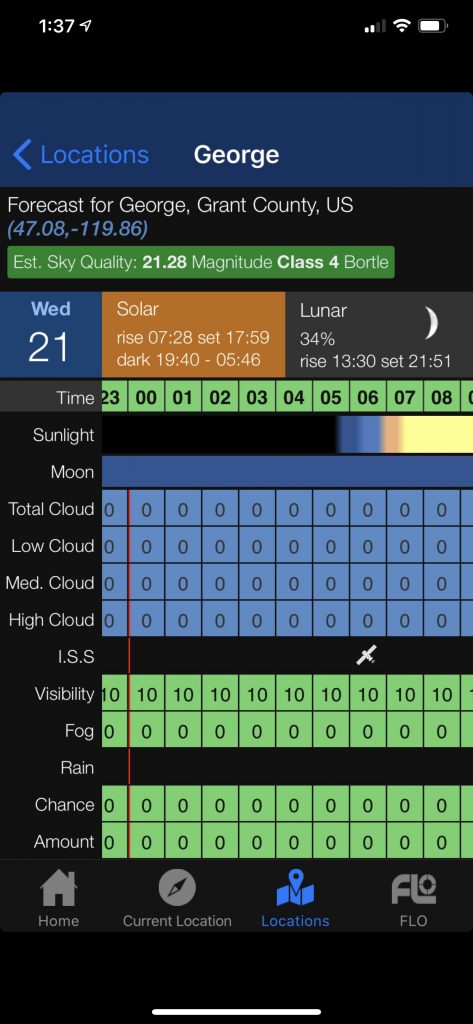
Check your cloud cover before you head out for the night. I use the Clear Outside app, but there are others. Cloud code reflects light from nearby towns and obscures the view. If it’s not crystal clear outside, I’d wait it out.
The moon is not your friend
Shooting the Milky Way with the full moon is as useful as wearing the scuba gear in the middle of the Mohave desert. It doesn’t matter if the moon is behind you or in front of your camera, it will illuminate the area regardless of its position in the sky. You will want to have a longer exposure to capture faint details of the galaxy. During exposure, moonlight will dominate your camera sensor. To deal with moon you have a few tools:
- Horizon – the best moon is the one that doesn’t rise above the horizon. Plan your shoot around the time of the month when the moon sets below the horizon during the day and stays there until you are done with your photography.
- New moon – you can figure out Earth casts a shadow on the moon using the lunar calendar. When sunlight doesn’t shine on it, it doesn’t reflect it.
- Mountains – this is really the last resort and requires some serious planning. You can find a location that shields everything in your camera view from the moonlight just enough to take your pictures. I don’t use this method because it requires Joda-level calculations.
Plan your observation time
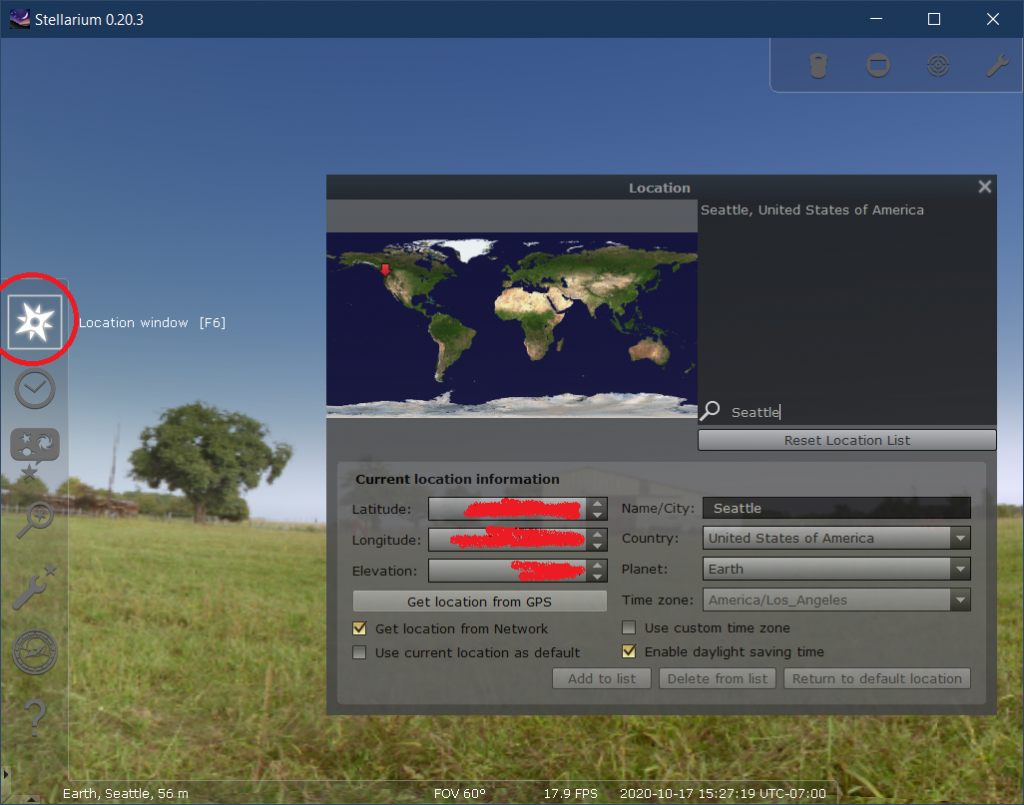
The deal with astrophotography is that all celestial objects are constantly in motion. It is not enough to just show up at the location yourself. You need to make sure that your deep-sky object will show up for the date too. There’s a free app Stellarium and a paid Starry Night and a bunch more in between. Most enthusiasts are using Stellarium.
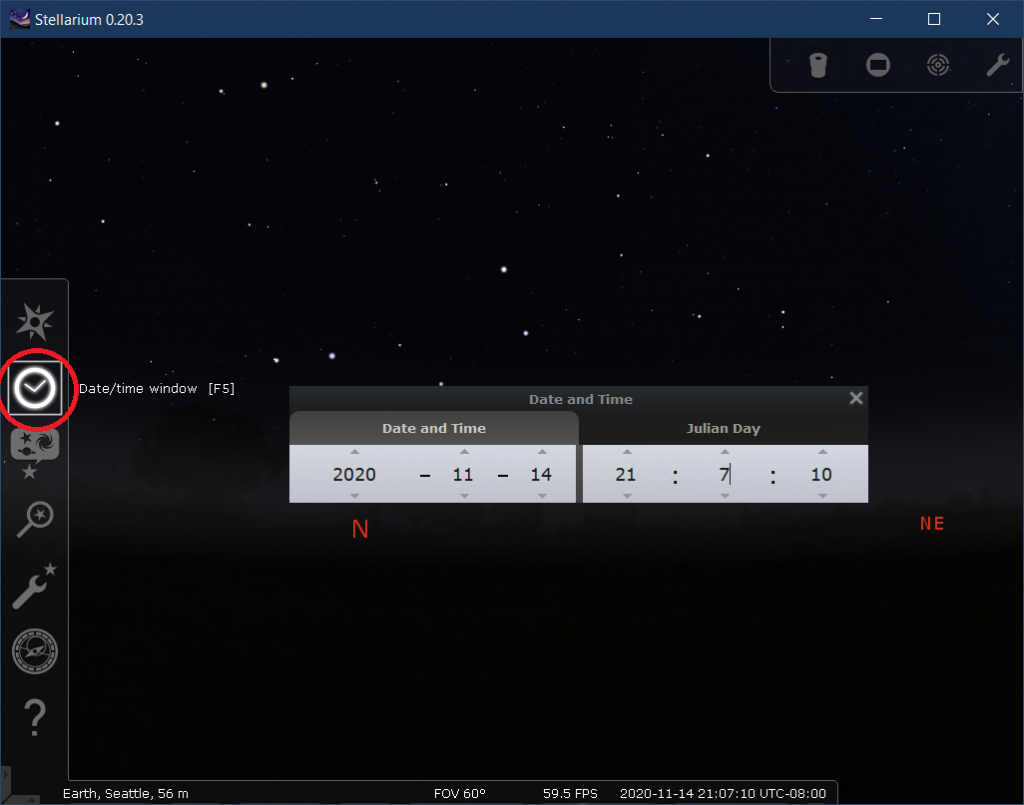
First we need to punch in the location of the dark sky site we chose for our observation having considered all prior points in this post.
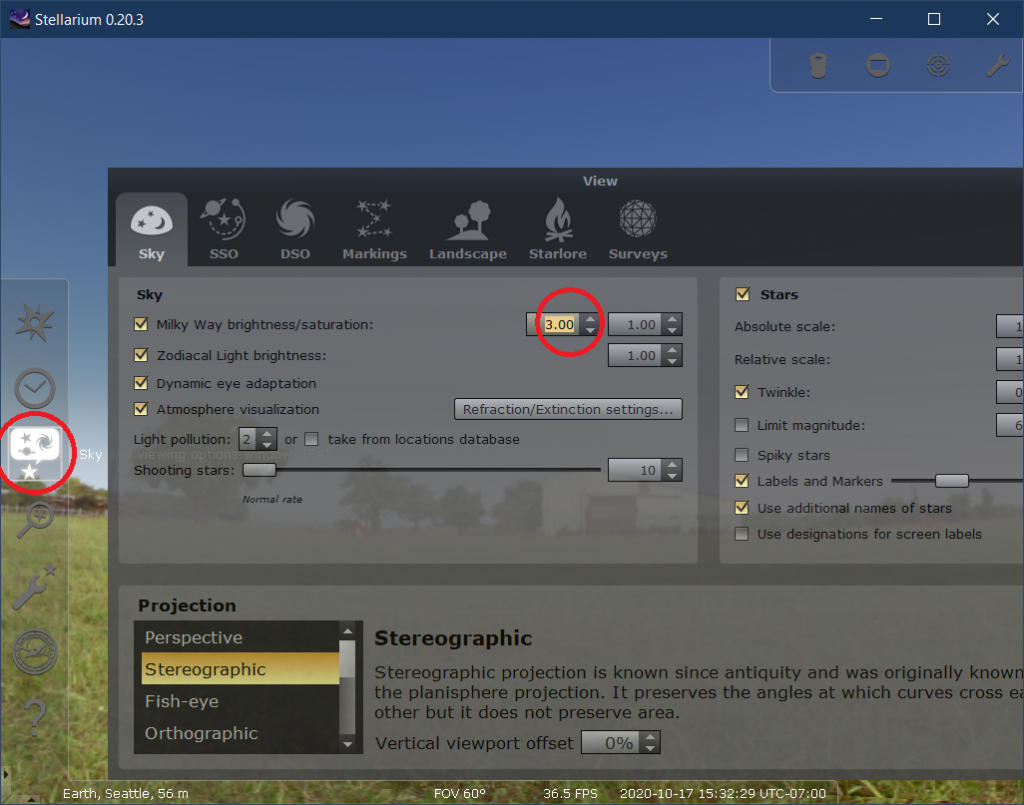
Next, we want to bring out the Milky Way a bit more. By default, it is fairly dim to represent a photo-realistic picture of the sky. We don’t care about it, we just need to know where the Milky Way will be in the sky, and for that, we need to see it.
By now we probably have a date and time in our mind when the sky is clear of the clouds and there’s no moon. Let’s check where the Milky Way will be and whether we can actually see it.
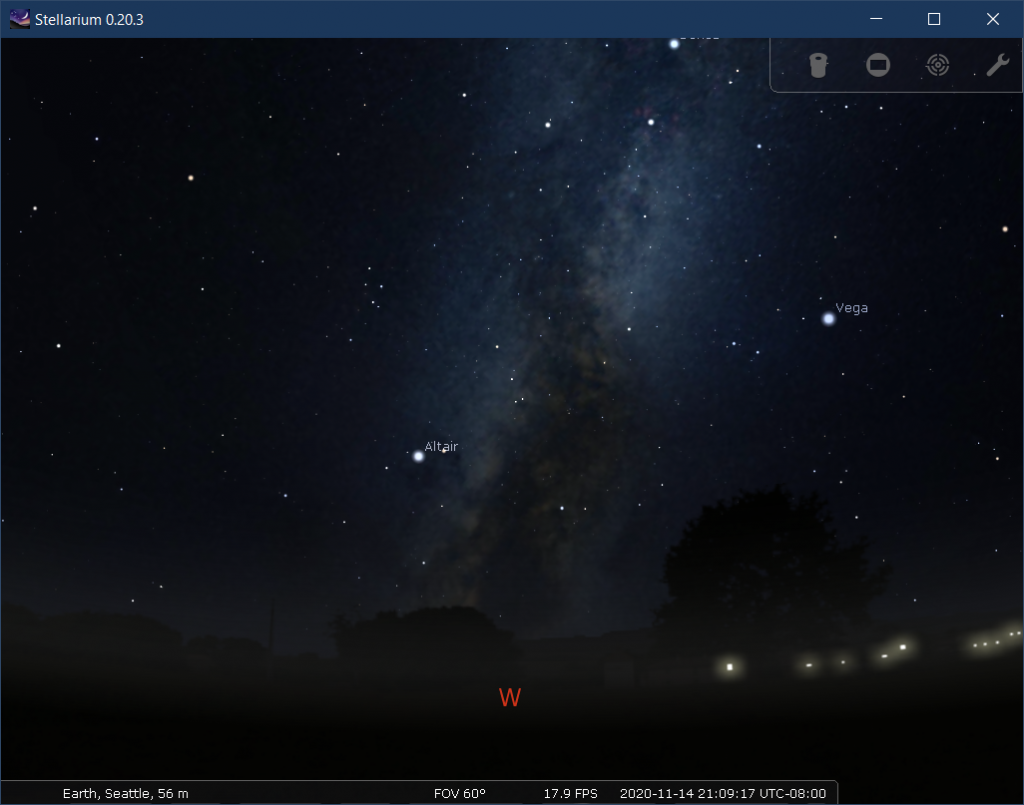
Turning our camera in Stellarium around we find Milky Way right across the night sky due West. We can fast forward the time in the app to see how long we can observe it before it dips below the horizon. If we get at least 2 hours – we are in good shape.
So far everything checks out. If weather permits, we should be able to take pictures of the Milky Way.
Weather
When we speak of the weather we obviously rule out rain, snow, or any other form of precipitation, because we are looking for a clear sky. However, we also need to be mindful of the wind, fog, and dew. A strong wind will shake the camera and tripod blurring the picture. Wind above 15 mph is not worth the trip unless you can shield your camera with a big object, like a rock, barn, or a car.
If you are planning to shoot by the body of water, check the forecast for fog. Light wind can mix moist air and create fog. If it happens your night it will ruin your night so you might as well skip the trip.
If there is no wind at all, dew can form if the temperature drops below the dew point. It is a good idea to check the dew point ahead of time for your shooting location and come prepared. Dew can fall onto the camera lens blurring the image. To deal with dew you have 2 tools at your disposal:
- Lens hood – it is always a great idea to protect your lens regardless of the situation, but the hood is also an effective way to prevent dew from falling on the lens glass.
- Lens warmer – this is a battery-powered heater you wrap around your lens to keep it warm and prevent dew formation. I’ve used this USB lens warmer hooked up to the phone charger.
How’s your motivation at this point in the article? 😊
Gear
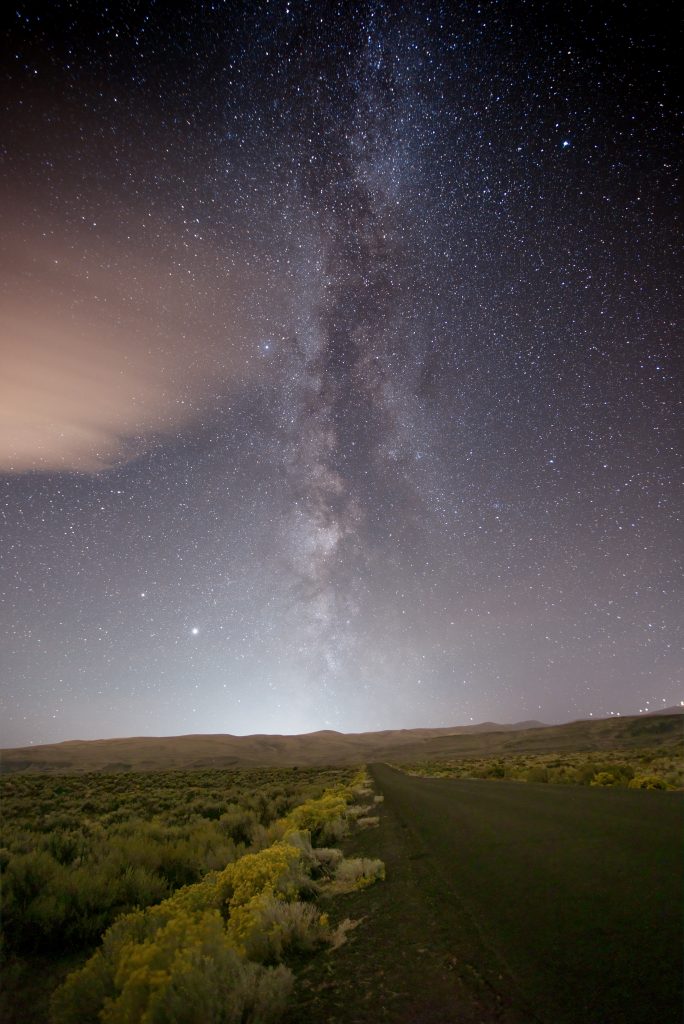
To understand gear needs we will start by looking at the final image at the top of this post and back-track from there. It has the Milky Way and the Earth in sharp focus appropriately illuminated. The Earth does not emit light as we know and there is no moon to shine on it. To obtain the fine level of details of the foreground we need to take a long exposure, approximately 4 minutes long. During this exposure, the stars and the Milky Way will drift significantly relative to the static foreground. They will drift about 1 degree to be specific (see Earth’s rotation to calculate angular rotation over 4-minute exposure). That’s enough of a drift to ruin a shot. Clearly, we can’t capture both the Milky Way and the foreground with one shot. We need two.
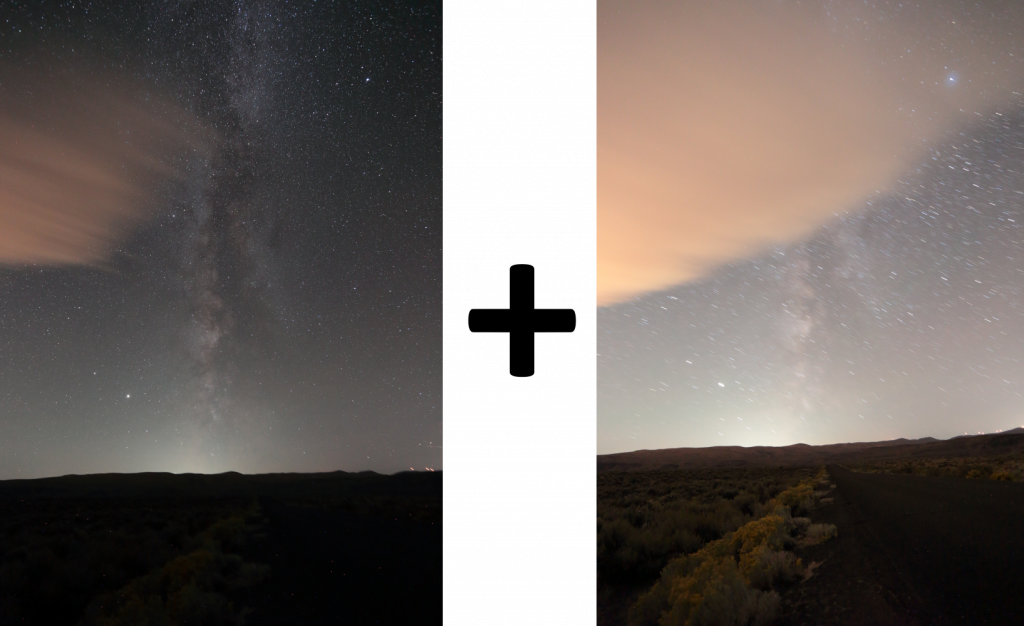
The image on the left focuses on stars and delivers a sharp Milky Way view. The image on the right focuses on the foreground and elongates the exposure to produce a well-lit road. Both images are raw before processing so details are not yet visible. To produce both images we will need a sturdy tripod.
If you pay close attention to the image on the left you will notice that while Milky Way is sharp but the Earth is blurry. This is not coincidental. The image on the left is tracking the rotation of stars with pin-point precision allowing the Earth to drift. The image on the right is pinned to Earth allowing the stars to drift. You will need a star tracker to create the image on the left.
Star tracker is polar aligned, meaning it is pointing to true north (since I am in the northern hemisphere), yet the picture is taken facing West. Star tracker is mounted on the tripod to ensure it accurately tracks the rotation of the Earth. To allow the camera to point in a different direction you will need a ball-head adapter.
To capture a large portion of the Milky Way you will need a wide-angle lens. Pictures above are taken with a full-frame camera mounted sideways and 17mm focal length. Since I used a full-frame camera I took advantage of the full 17mm range of view. If you have an APS-C (or crop) sensor, you’d have to multiply your lens focal length by the crop factor. Canon has 1.6x, Nikon – 1.5x. So the same exact view would be zoomed-in to 27.2 mm on a crop Canon camera or 25.5mm Nikon.
You want your lens to be “fast”, meaning it needs to have a low f-number. f/4 is OK but if you had f/2.8 or even f/1.2 it would be even better. The reason for the fast lens is Star tracker periodic error. Star tracker tracks Earth’s rotation accurately but with a small error. For example, 4-minute exposure on the Star tracker would really push it to the limit. To compensate for periodic error you’d need an auto-guide scope, camera, and PhD2 software on the laptop, which we won’t be covering in this post. So the faster your lens is, the shorter is your exposure, and the less you are affected by Star tracker errors.
Time to list every single piece of hardware you’ll need. I am not affiliated with any retailer or brand and do not get a commission from sales. These are my personal preferences.
| Gear | Purpose | More information |
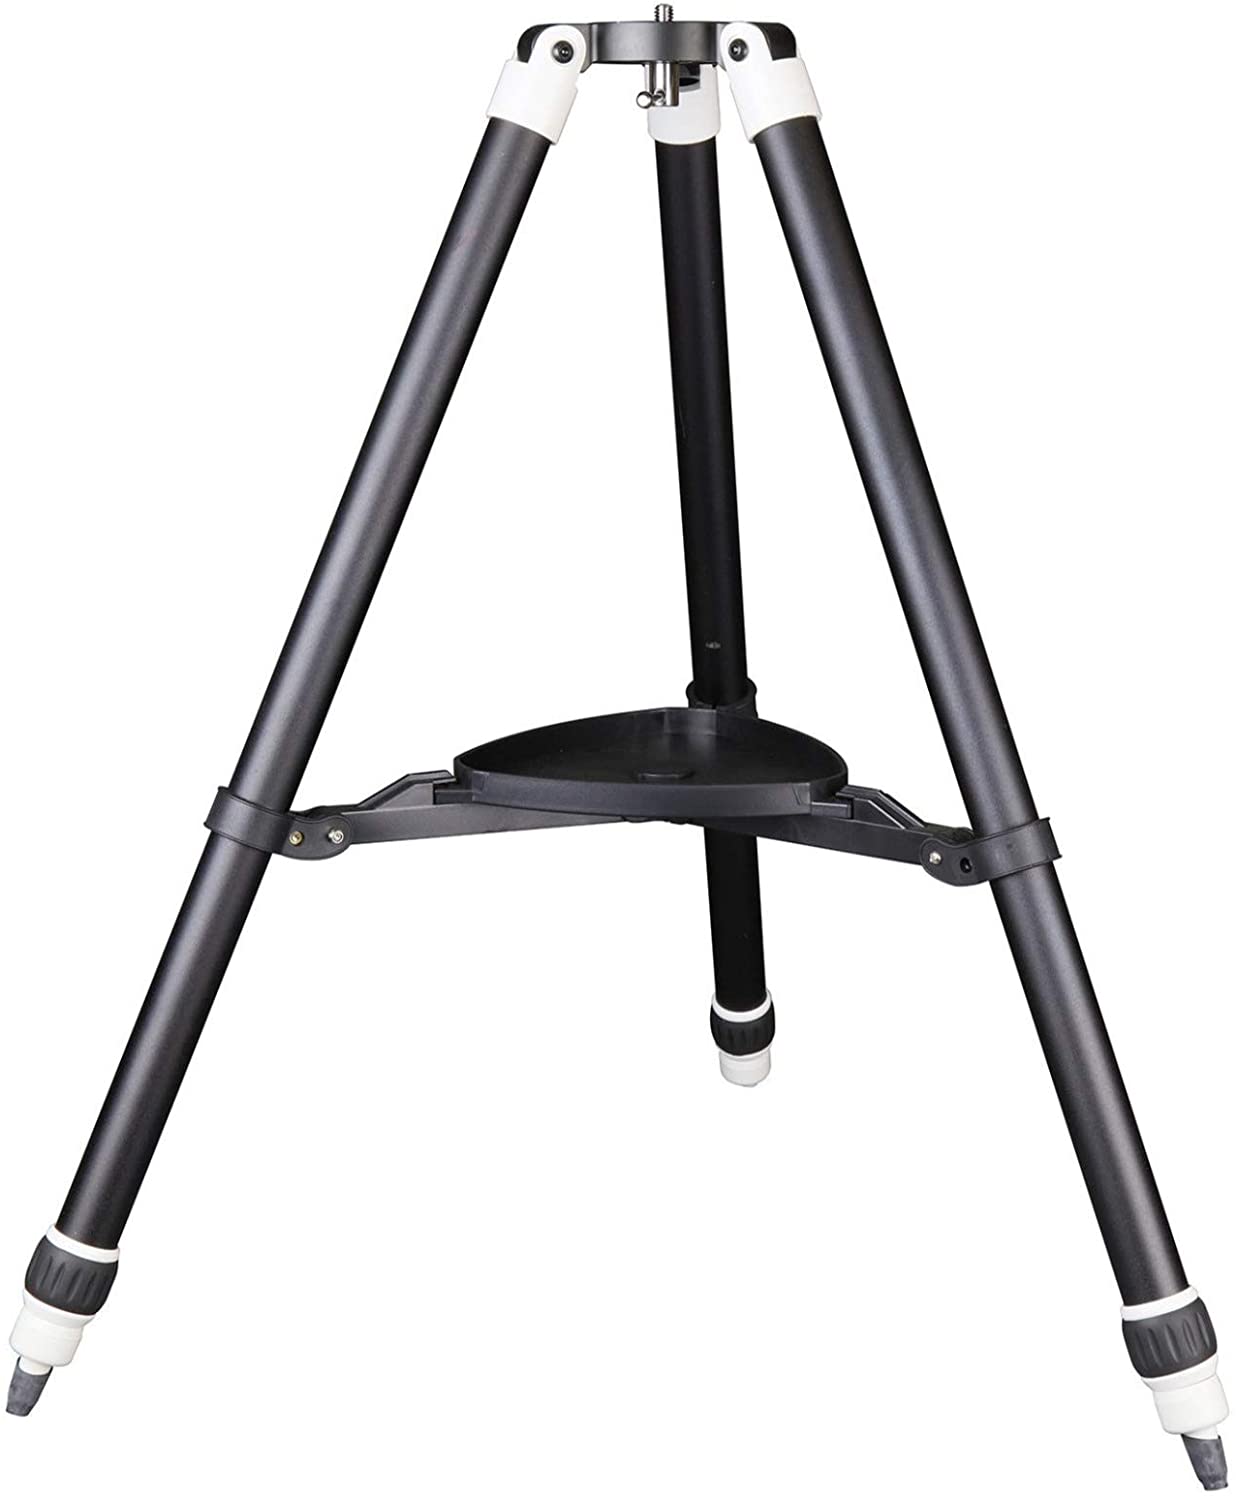 | Level the camera and fix it to the Earth. Hand-held camera and long exposures are at odds. Tripod is required to eliminate shake. This tripod is sturdier than a regular camera tripod. | Sky-Watcher Star Adventurer Tripod |
| Professional Star tracker with ball head mount adapter. It is used to compensate for Earth’s rotation and “pin” the stars for long exposure. Quite popular among astrophotographers. | Sky-Watcher Star Adventurer Photo Kit | |
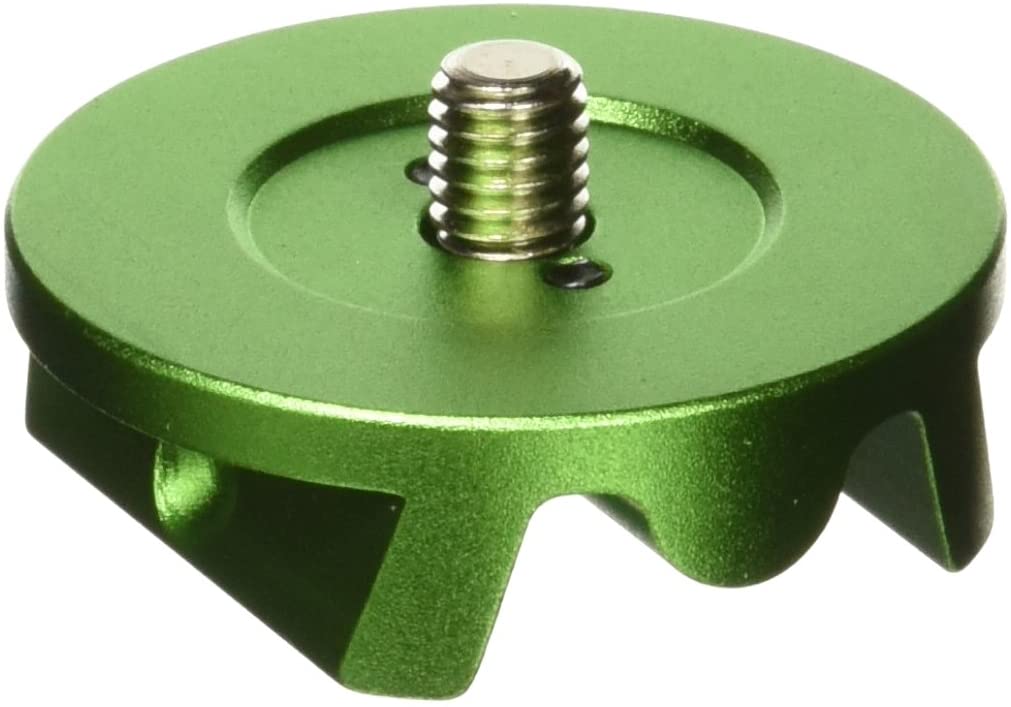 | This item is included in Star tracker Adventurer Pro Photo Kit. I am listing it here separately for completeness. | Sky-Watcher Ball Head Adapter |
 | This is the base that mounts the star tracker to the tripod. Star tracker needs to be polar-aligned at an angle relative to the horizon. | Sky-Watcher Latitude (EQ) Base |
 | This adapter allows the camera to be leveled and pointed in a different direction than the star tracker. Without this accessory, the camera will be pointed at a 90-degree angle relative to the star tracker. | ODWARF R1 Professional Camera Tripod Ball Head |
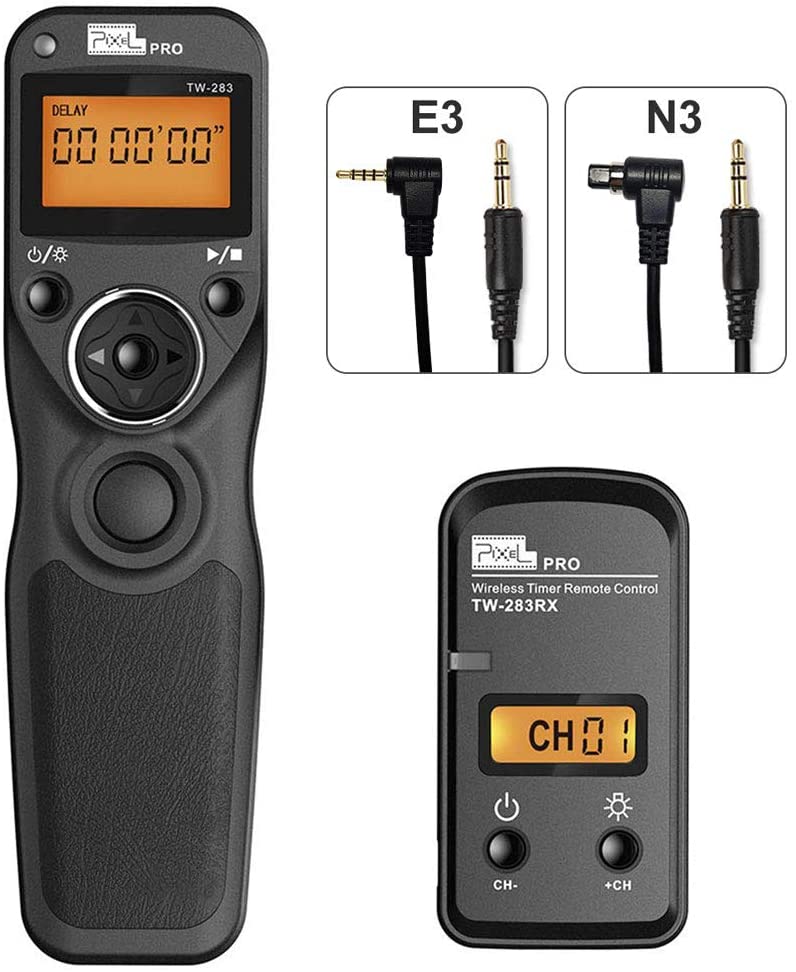 | This is an intervalometer to take a specific number of long exposure shots of the Milky Way. For best results, it is recommended to take multiple shots of identical exposure and stack them. We will cover stacking later in the post. | Remote Shutter Release for Canon |
 | I am a Canon guy. Full frame Canon camera captures more light and shortens the needed exposure interval. Feel free to use your existing camera. | Canon 5D Mark III full frame DSLR camera |
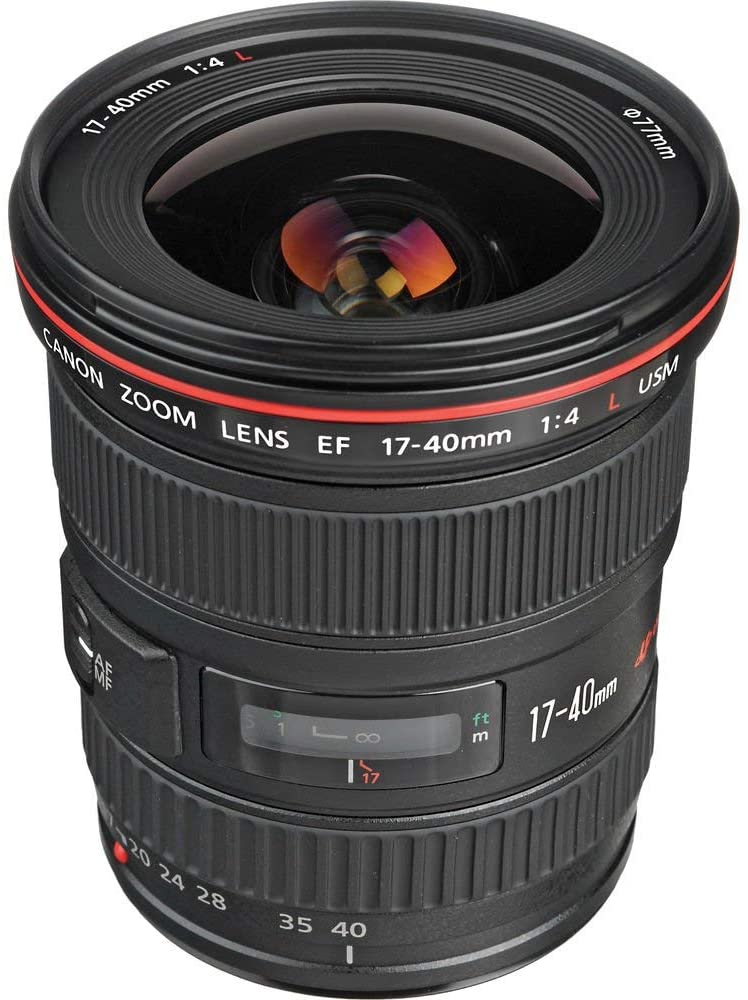 | This is a good wide-angle lens for Milky Way photography. | Canon EF 17-40mm f/4L USM Lens |
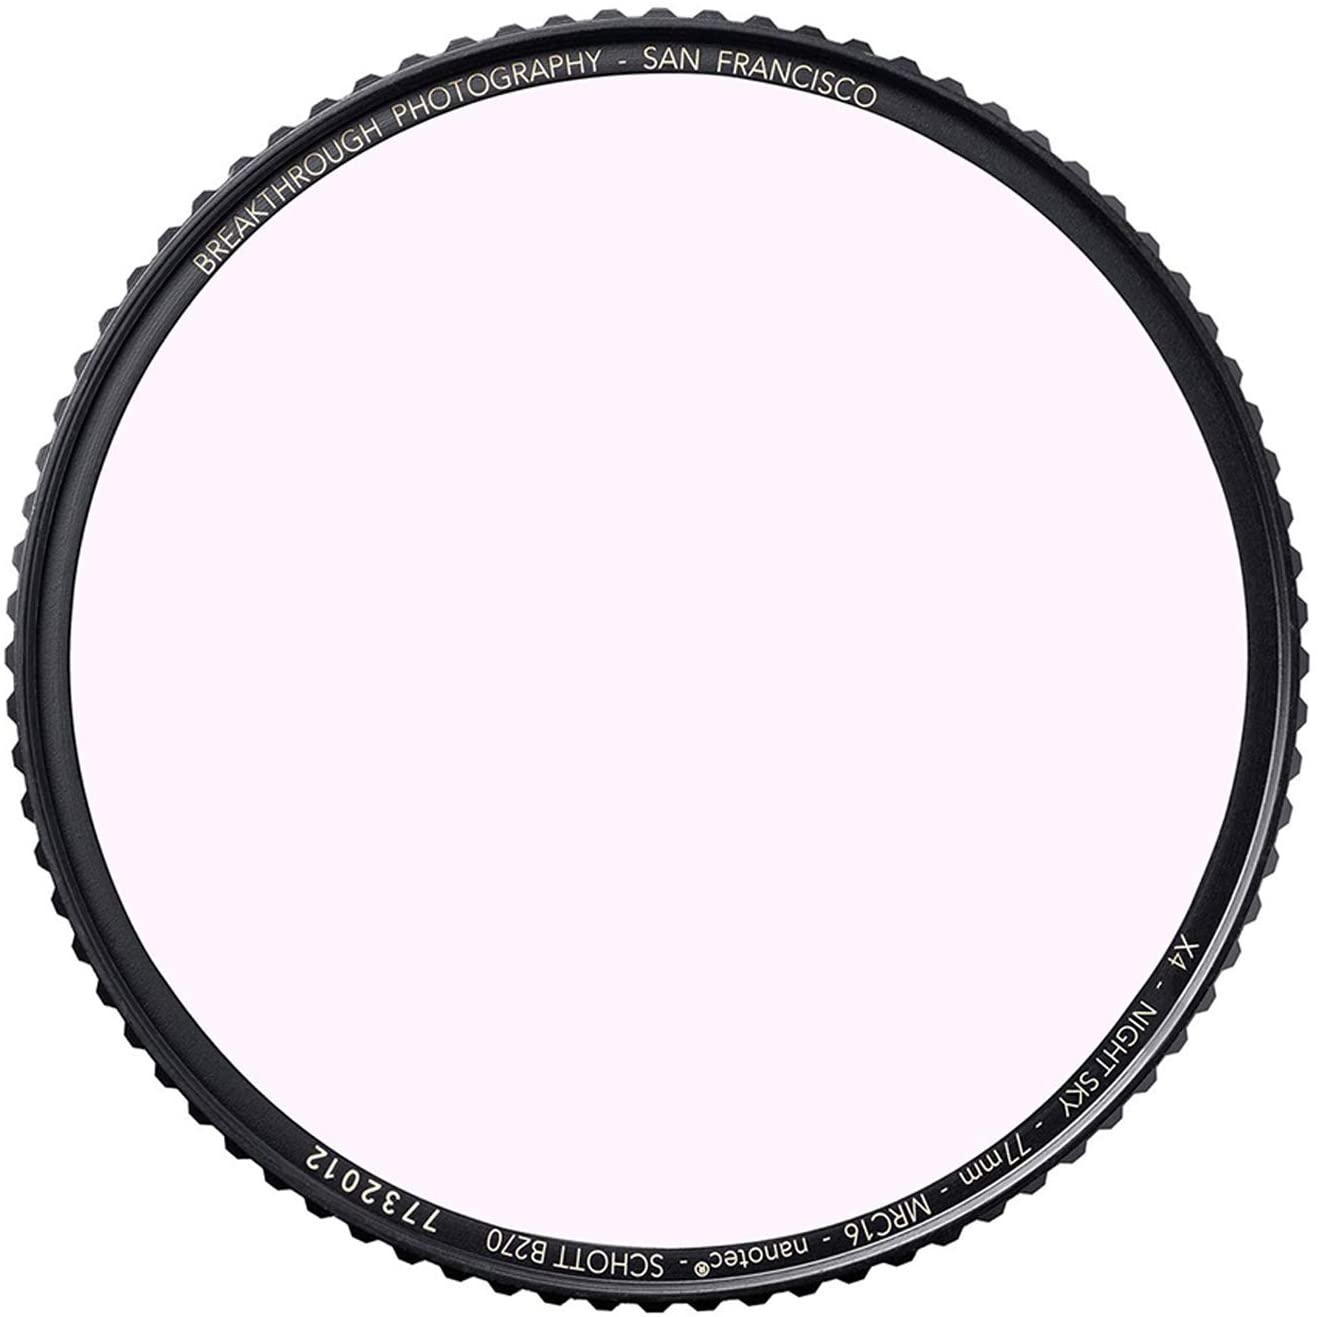 | The light pollution filter reduces street light effects on the Milky Way and pulls-out the details. | 77mm Night Sky Light Pollution Reduction Filter for Camera Lenses |
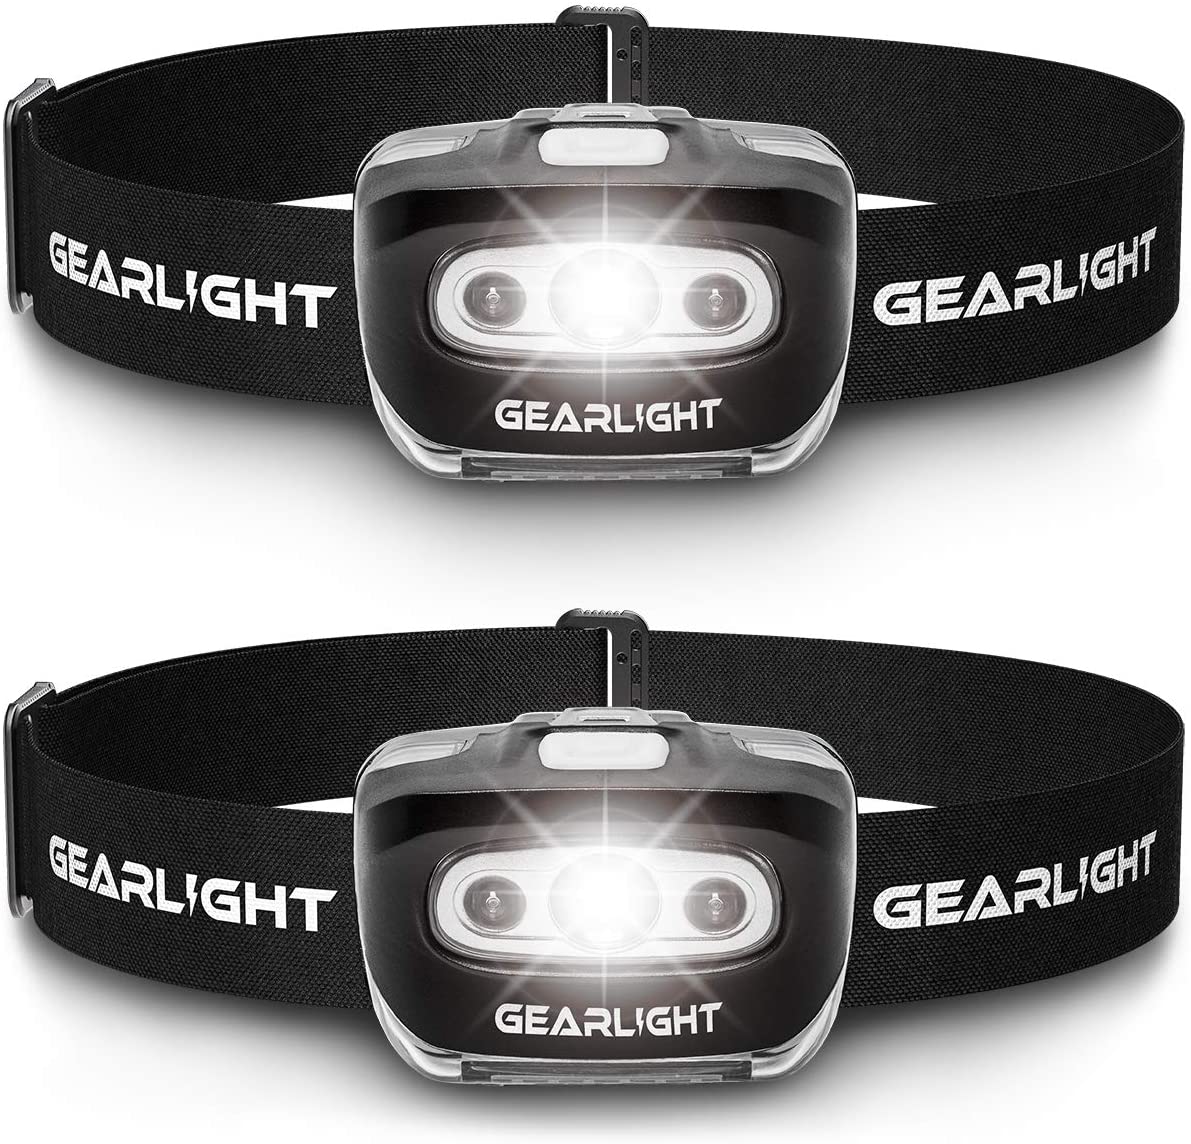 | It is more convenient to carry a redlight on your head than use an iPhone to illuminate the camera while you’re tweaking settings. | GearLight LED Headlamp Flashlight |
I have to admit that this is not the cheapest hobby. If you aren’t going to spend years shooting the night sky then these expenses are probably not justified. When I started on this hobby I had most of the gear already from landscape photography days.
On-site rig setup
I hope you are reading this before you actually arrived on location. There’s a bit more education left before you are ready to shoot.
Before you actually head out for the night, charge all your batteries and take backup ones. It is such a disappointment to drive 2-3 hours, assemble the rig at night to discover that you Star Tracker or camera is dead.
I travel with my star tracker mounted on EQ based attached to the tripod. I do not disassemble the entire rig into pieces for transportation. There is no point and it saves time. Start by installing your tripod roughly facing in the direction of the north pole. Try to be as precise as you can. Every smartphone these days comes with the compass app – use it to find magnetic north. Sky tracker should roughly point to the north star. Open your compass app, lay the smartphone flush on the star tracker, and adjust the tripod position until the smartphone points to the north.
Level your tripod to the best of your ability looking at the bubble in the EQ base of the Star tracker. Being level is important for tracking accuracy. Even slight misalignment will result in star trails. Look down straight on to the air bubble and keep tweaking your tripod legs until that sucker is right in the middle.
I highly recommend this video by Peter Zelinka about the basics of polar alignment. There are a few important things I’ve learned by trial and error that he isn’t covering but I will after you watch it.
When you’re looking through the polar scope, the view is inverted upside down. Do not expect to see the sky you see with your eyes. Also, when you tweak controls on your Star tracker base, stars will move in the opposite direction in the scope. It takes a bit of getting used to.
The best way to find Polaris in the night sky is to draw an imaginary line through Merek and Dubhe stars of the big dipper. When you look at a really dark class 3 or below sky it will be filled with stars. Finding Polaris is easier through star hopping than just eyeballing somewhere around the North pole.
If you are looking through the polar scope and can’t tell if you are looking at Polaris – you are not looking at Polaris. Most of the stars around Polaris have about the same brightness. Polaris is bigger and brighter than the rest of them. If your Star Tracker is roughly aligned then the brightest star you will see is Polaris. If you can’t tell which one it is – keep moving your tripod around slightly until you see a bright star in your scope. That’s Polaris. Go back to tripod leveling exercise and make sure that it is still level while Polaris is in scope.
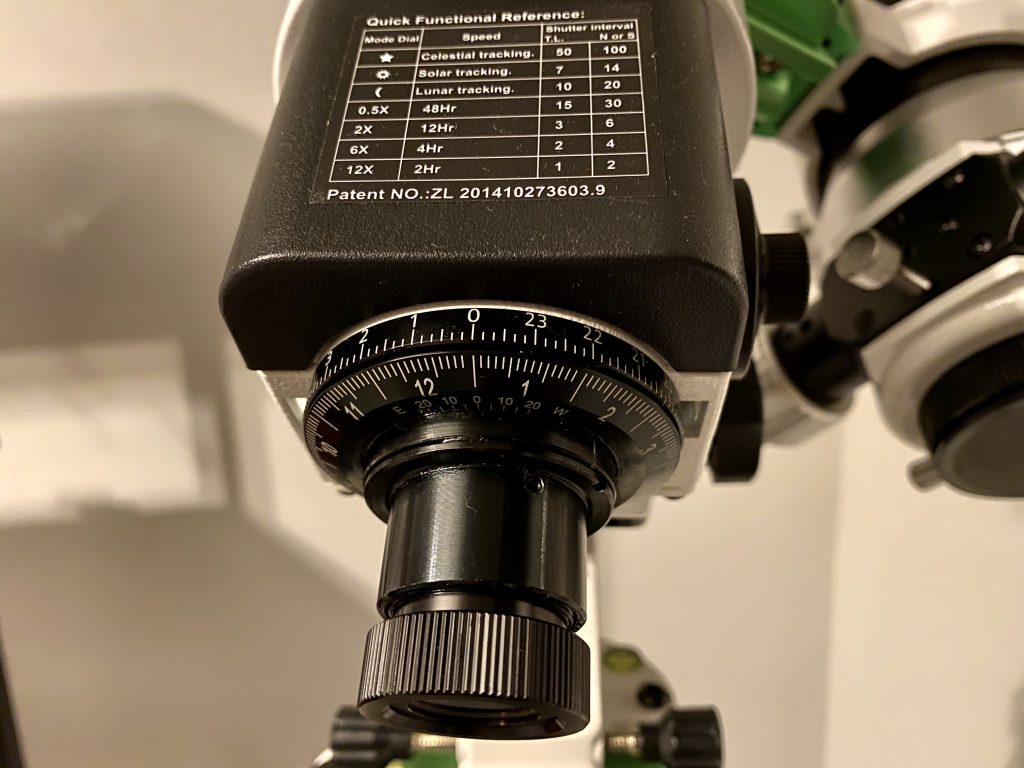
Lastly, how do you know that your reticle is actually properly upright? To make it upright, align “0” on your Time Graduation Circle with “0” on your Date Graduation Circle. Take a look at the user manual for Star Adventurer Pro to learn more about those dials. On the device, it should look as follows.
After polar alignment and mounting of the camera, I like to remove the camera with the ball-head adapter attached and re-check polar alignment. This helps offset any shifts that occurred while I was mounting the camera. Polar alignment by far is the hardest thing to get right because it requires precision. If you find yourself doing it for an hour – that’s natural for someone just starting. I am not an expert by any stretch of the imagination, yet it takes about 20 minutes to get my polar alignment in place.
Camera setup
Make sure all your camera gear is hooked-up:
- The lens should have the light pollution filter attached
- Intervalometer should be mounted in the hot-shoe adapter and connected to remote release port on the camera body
- Lens hood should be attached
- If dew is expected, a dew heater should be attached as well. You don’t want to be attaching it after the camera is focused because it will likely rotate the focus ring putting stars out of focus.
The first thing to do is to focus the camera on the stars. It doesn’t need to be mounted onto the star tracker, but it helps remove the hand shake when focusing to achieve higher precision. Switch your lens into manual focus mode and change the aperture to the widest position possible (f/4.0 on 17-44 EF lens mentioned above). Pick a bright star to begin the focusing procedure and point your camera at it until you can see it in the viewfinder. Switch to live view mode on your camera for the remainder of the focusing procedure.
Zoom on the star and focus manually until the star is clear and sharp. Zoom in even more and keep adjusting the focus ring until the star gets the sharpest you can make it. Verify that the lens is close to the infinity position on the focusing ring. Exit the live view mode to conserve the battery as this completes our focusing exercise.
To be able to control your camera remotely switch it into the “bulb” mode. For the Milky Way the following settings are most appropriate.
| Setting | Value |
|---|---|
| f | 4.0 |
| ISO | 3200 |
| Exposure interval | 80 seconds |
I found that these settings are mostly universal across a variety of cameras and lenses when it comes to the Milky Way photography and should represent the starting point. Take a shot with these settings and look at the image histogram. If it is too skewed the to the left – increase exposure interval or ISO. If too much to the right – reduce. Do not trust the picture you see on the bright screen of your DSLR. Look at the histogram and keep tweaking until it is balanced in the middle.
Take the best picture you have while the camera is mounted on the star tracker and zoom-in on the stars as much as the camera allows you to. If you see star trails – either redo your polar alignment or reduce the exposure interval. If stars are sharp – you are ready to take pictures.
Photo session
To get the best results we will need to take a lot of different pictures. Astrophotography is all about increasing your signal-to-noise ratio in the photos. One way to do it is to take a lot of pictures and “stack” them together eliminating noise and pulling out the details.
The most widely used software in astrophotography is Deep Sky Stacker. It automates the workflow of overlaying photos on top of each other and removing artifacts. Basic idea is that signal is constant but noise is random. If we overlay multiple photos then the signal will be amplified by each photo. Noise will be diluted by each new photo stacked on top of the previous one. The more we take and stack, the stronger the signal becomes.
We will need the following photos (see here what they mean):
- Light frames – these are the actual pictures of the Milky Way. We should get at least 30 of them.
- Dark frames – pictures taken with the same aperture, ISO, and exposure as the light frames, except with the lens cap on. Let’s get at least 20 of them. The easiest way to make them is to put a cap on the lens while the camera is shooting and keep shooting additional frames. Unfortunately, you can’t take these pictures at home later because they need to be taken in the same sensor temperature as the light frames.
- Bias frames – these pictures contain the noise introduced by the CMOS sensor in the camera when it reads the value of each pixel. They are taken at the same aperture and ISO as the Light frames, but at the lowest possible exposure (1/8000 of a second). We will need at least 20 of these as well. To make these frames you want to switch the camera into time value mode and adjust exposure to the lowest number supported by the camera. Press the shutter release button at least 20 times.
- Flat frames – pictures of the white diffused light. These frames help remove dust particles and vignetting from the frames. Do these frames only after you are done with the entire photo session. Tilt the camera straight up, cover the lens with a white cloth, T-shirt, or piece of white paper. Pur the iPad in the brightest screen mode on top of that. Switch camera into automatic exposure calculation mode and take 20 pictures. They will not look actually white on the camera nor have anything pretty on them.
Aside from the photos of the Milky Way we want to capture the foreground photo as well. The easiest way to do that is to turn the Star Tracker off but keep the camera mounted. Obviously, do this only after you’ve taken all the Light frames of the Milky Way because it will ruin your polar alignment. Keep the same focus and the same ISO, but switch the exposure to 4 minutes. Take a few pictures and verify the histogram after every shot. Make sure your foreground is properly exposed. Ignore overexposed sky and star trails. We will remove them in post-processing.
Here’s the most effective workflow: Light frames ⟶ Stop Star Tracker and cover the lens with the cap ⟶ Dark frames ⟶ Open the lens cap and increase exposure interval ⟶ Foreground long exposure ⟶ Cover the lens with the cap and drop exposure interval ⟶ Bias frames ⟶ Rotate camera facing straight up, remove the lens cap and cover with white cloth ⟶ Flat frames.
If you are keeping track of the time you would notice that the photo session alone requires about 1.5 hours of time. With the setup and alignment be prepared to spend about 3 hours in the field at night. One way to keep yourself entertained is with coffee or tea and snacks. You may even want to consider an energy drink to stay awake and focused. I would not recommend playing iPhone games because that screen light will find its way into your shots and ruin them.
Organizing pictures on your computer
This is the first step in the post-processing of the Milky Way image. Stacking has become the standard way astrophotographers achieve stunning results with high contrast between the dark sky and the objects they photograph. As I mentioned above, stacking photos is a way to increase the signal-to-noise ratio. It was proven that a single long-exposure shot yields a lower signal-to-noise ratio than a series of short-exposure shots stacked on top of each other. It means that if you take a single 4-minute shot of the Milky Way, it will have a higher amount of noise than 4 x 1-minute pictures stacked.
Stacking does not work if shots have different focal lengths or focus points. All shots in each category (Light, Dark, Flat, and Bias) must be taken with exact same camera settings. The software can detect drifts between shots and align them, even rotate. But the software can’t fix the focus or the field of view.
Once you download the images from the camera you should inspect each Light and Flat frame. Dark and Bias frames are really hard to mess up, given that they are taken with the lens cap on. However, Light and Flat frames can have artifacts that can ruin your stacked picture.
Create 4 folders and sort the pictures into each folder. I use Canon Digital Photo Professional to categorize the shots and move them into respective folders. It shows f-stop, ISO, and exposure next to each picture and I can move photos in batches, rather than inspecting each one individually.
- Light frames contain images of the Milky Way
- Dark frames are completely black but have the same ISO, exposure, and aperture (f-value) as Light frames
- Bias frames have the same ISO and aperture as Light frames, but they have very fast shutter speed around 1/8000 or 1/4000 depending on the camera capabilities
- Flat frames contain a gray gradient picture and have the same ISO and aperture as Light frames, but different shutter speed. Shutter speed should be selected by the camera for balanced exposure.
Go through every Light frame and manually delete pictures that do not meet necessary quality bar:
- Test shots you took while calibrating your camera settings
- Pictures out of focus. Zoom-in to 100% and look at different stars of the frame. Make sure they are all round and focused.
- Those with star trails due to camera shake
- Pictures of a different area of the sky than the Milky Way or the ones that have Milky Way in a different part of the frame than the majority of them
- Pictures with different focal length or focus point than the majority of them
Go over your Flat frames and make sure there are no artifacts on them introduced by the light source or white cloth used to cover the lens. if you see dust particles in all frames and you are sure they aren’t on the white cloth used for light diffusion, keep those frames. They are likely on the camera lens or the sensor. Flat frames will remove these defects during stacking.
Stack the Milky Way
Deep Sky Stacker started as a tool that automates common tasks in processing astrophotography. Over time it evolved beyond capabilities available in Photoshop around noise reduction. Workflow is pretty straightforward and default settings are adequate for most photos.
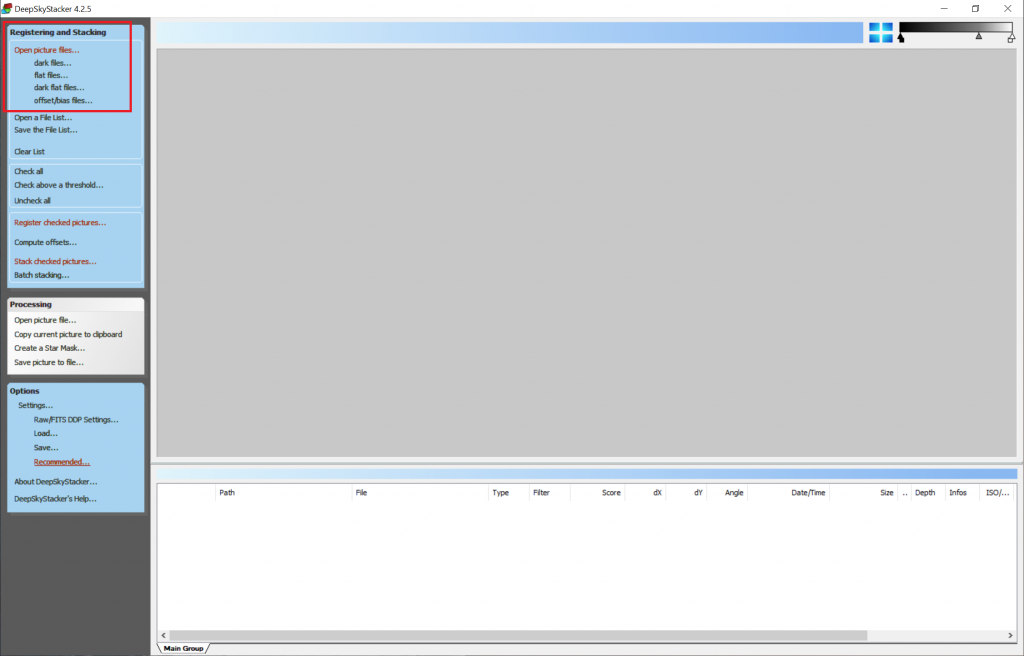
Start the application and load the pictures you organized across the folders:
- Click “Open picture files…” and load Light frames
- Click “dark files…” and load Dark frames
- Click “Flat files…” and load Flat frames
- Click “Offset/bias files…” and load Bias frames
- We will not be using the “dark flat files…” option
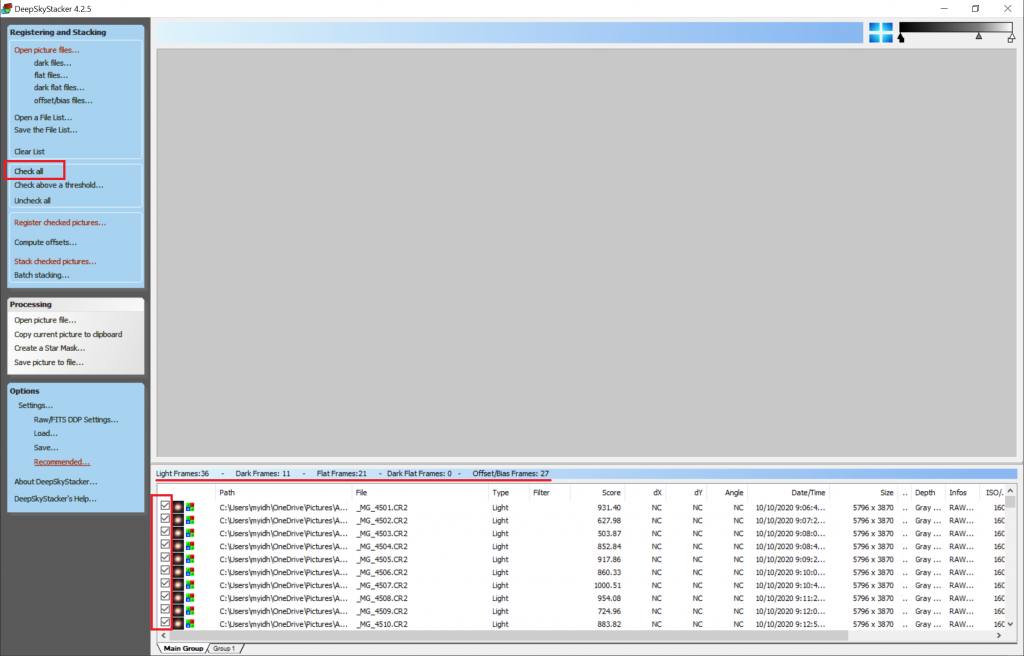
You should see your files in the table below the gray area of the window. Click “Check all” and all your pictures should get checked check marks in the check boxes. Verify count of images in each category and compare to the files you have in corresponding folders.
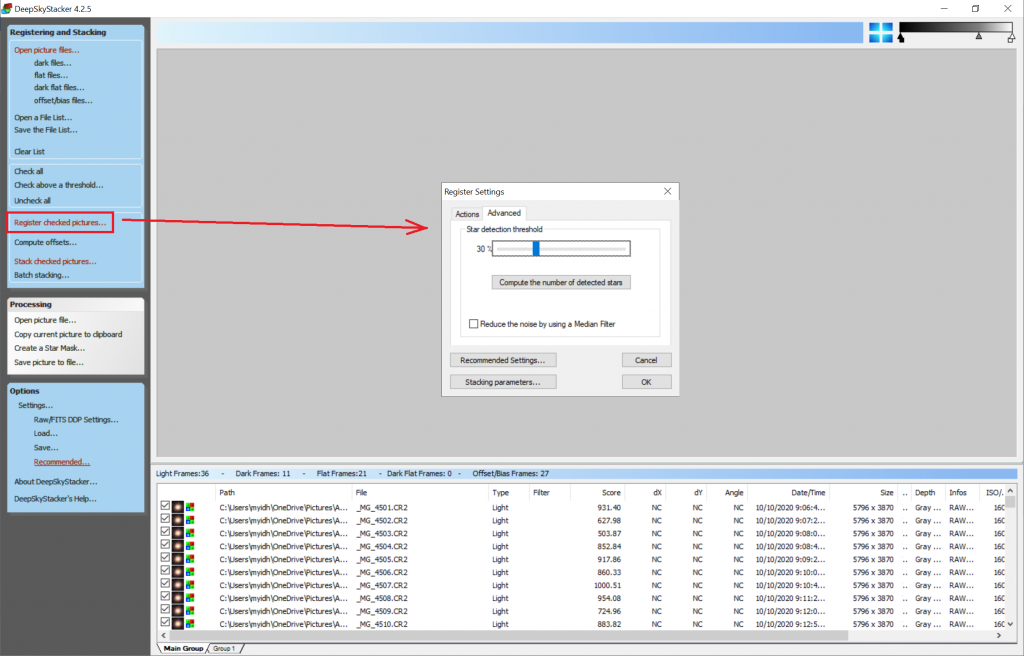
Click “Register checked pictures…” and a new registration dialog box will pop-up. Leave everything as-is on “Actions” tab. You should see a green text box with “darks, flags and offset/bias checked.” written on it. Switch over the “Advanced” tab and you will see a slider. This slider controls the sensitivity or star detection algorithm. The less sensitive you make it, the more stars it will detect. The goal is to get between 200-300 stars. Keep adjusting the slider position and clicking “Compute the number of detected stars” button until you see the number in that range. Too many stars will not yield much additional value but will slow down processing significantly. Too few stars will result in alignment mistakes.
If you want to achieve that extra punch on the stars you can tweak “Stacking parameters…“. However, all default settings will perform just fine. In my photo, I used the “Kappa-Sigma” method for Light frame stacking. Play with settings to see which yields the best results for your frames.
Click “OK” and DeepSkyStacker will prompt you to confirm all stacking parameters. It will show computed total exposure time – the higher the better. You should get at least 20-30 minutes of exposure time for a decent quality picture. The highest I’ve seen someone photograph a galaxy was 17 hours. Obviously, that person did it over a few nights, and as expected the results were stunning. However, for the Milky Way, even 30-minute exposure is sufficient for good results.
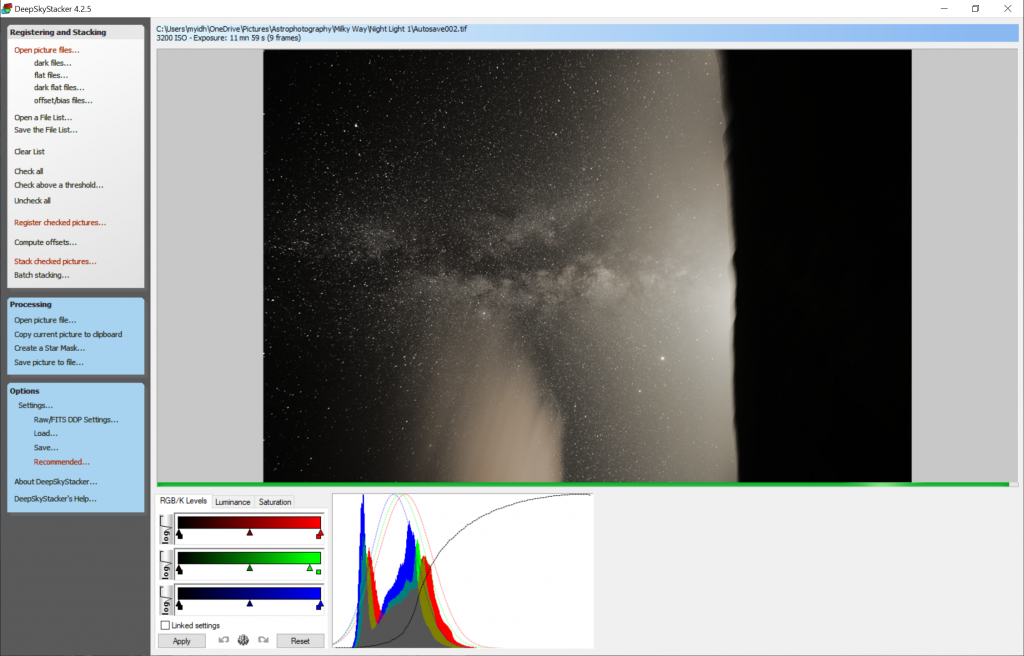
When you see what DeepSkyStacker produced you may feel a bit underwhelmed and disappointed. The image visually lacks color and seems gray-ish. Do not worry, this is expected. All the details and colors are in that image, they are just not visible yet. We will pull out those details in the next step in Photoshop.
On the right part of the photo, you see the black blurry foreground. This is also expected. We are stacking the Milky Way, not the foreground. This part of the image will be discarded in Photoshop so ignore it for now.
Click “Save picture to the file…” on the left pane in “Processing” section. Make sure the following options are selected on “Save as” dialog box:
- Compression – “None“
- Options – “Embed adjustments in the saved image but do not apply them“.
Click “Save” and DeepSkyStacker will write a multi-megabyte TIF file on your disk. It is normal for this image to take 300 megabytes or more, depending on the resolution. We will reduce this file size later in processing.
To learn more about DeepSkyStacker I’d recommend this video by AstroExploring. He covers stacking parameters at a reasonable level.
Final processing in Photoshop
This is the last step where the final image comes together. This picture will have 2 layers:
- Background image of the Milky Way loaded from the DeepSkyStacker in TIF format
- Foreground image straight out of the camera in RAW format. This is the image you took with a 4-minute exposure. Someone may prefer to process that image in Lightroom first before importing it into Photoshop for final stitching. Either way is fine.
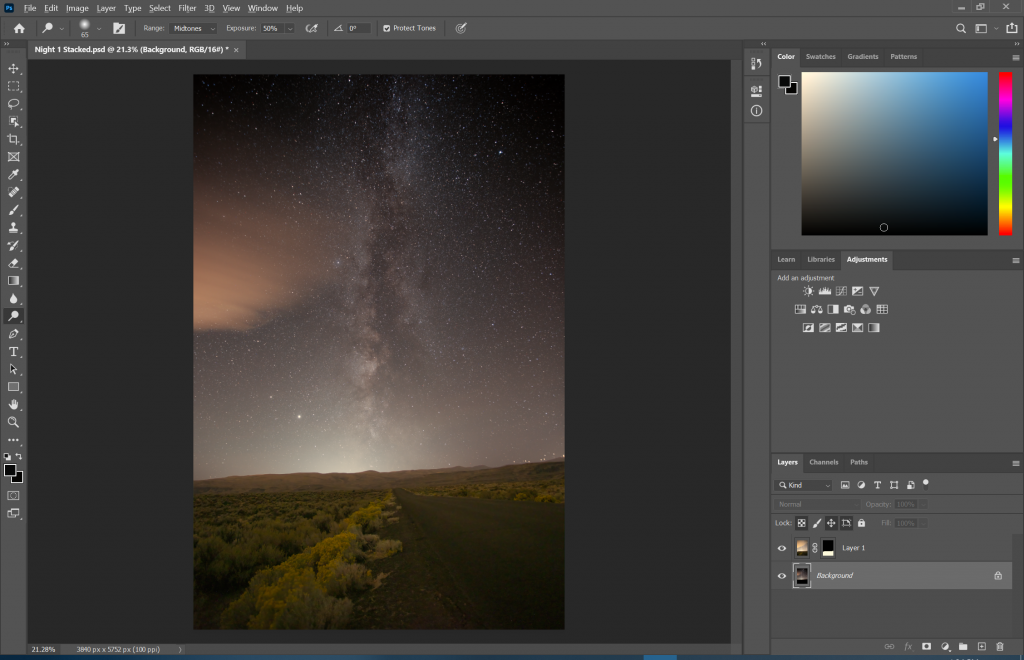
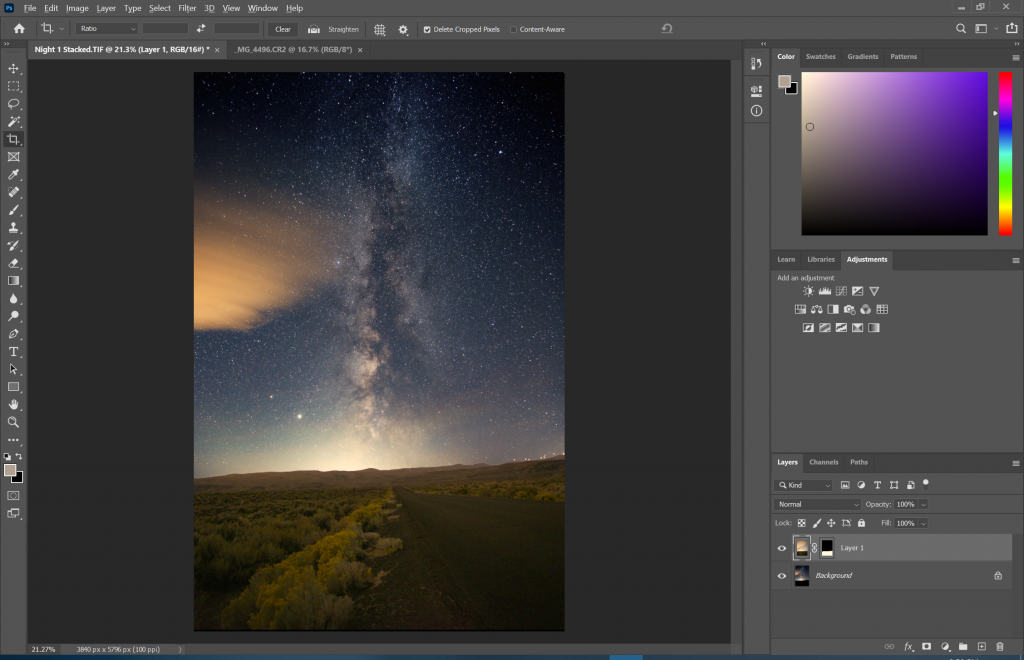
Start by loading the background image into Photoshop. We need to rotate it clock-wise since the camera was shooting vertically to capture more of the Milky Way. Click the “Image” menu item ⟶ “Image Rotation” ⟶ “90° Clockwise“.
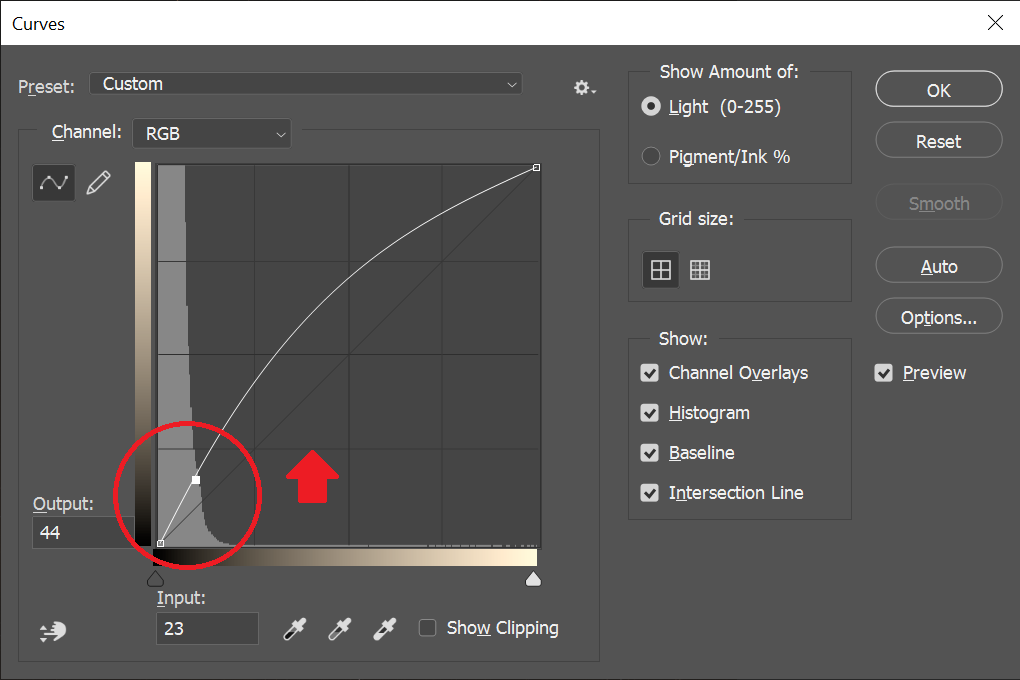
Next, we need to “stretch the histogram” because the details are too dark and we want to increase their brightness. Do not adjust levels or apply any other corrections until you stretch the histogram. Click the “Image” ⟶ “Adjustments” ⟶ “Curves…”. Drag up the right point on the histogram where it intersects with the direct diagonal line. Repeat this process 2-4 times until enough details of the Milky Way are visible on the image.
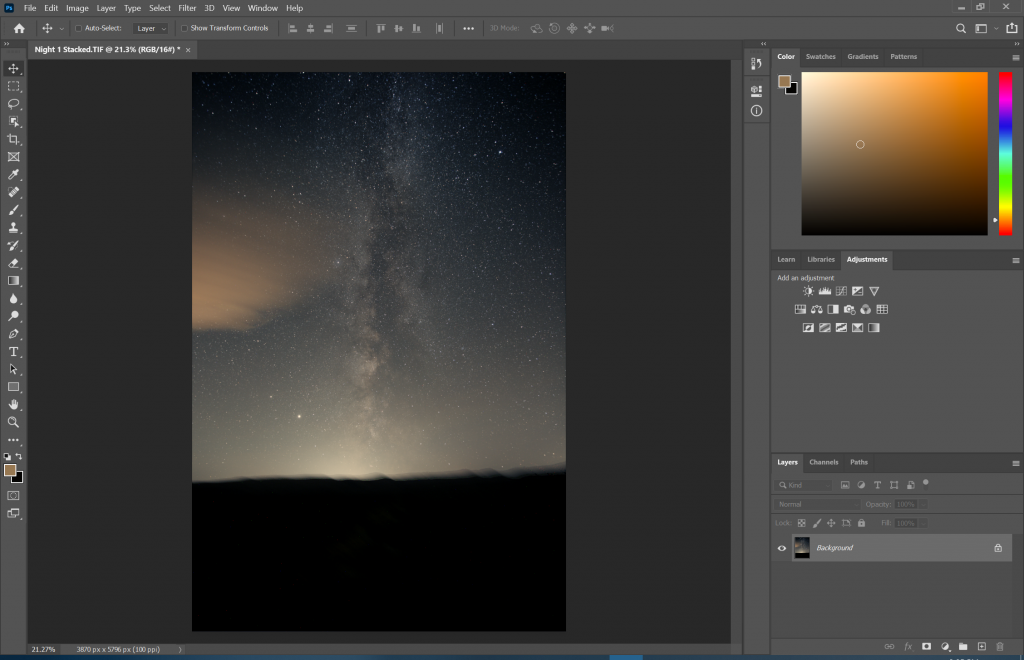
At this point, our image is brighter and we see the outline of the galaxy. Unfortunately, the image is horribly light-polluted, despite being taken in Bortle class 3 sky with light pollution filter. It shows how bad light pollution is around populated areas and how precious dark skies are.
After the curve stretch, we need to remove the light pollution and adjust our white balance. Click the “Image” ⟶ “Adjustments” ⟶ “Levels…”. We will be using the 3 color pickers to get the job done. The leftmost color picker is for black point. Click it and find the darkest part of the sky and click on it. The rightmost picker is for the white point. Click it and click in the middle of the star somewhere on the night sky. Lastly, click on the middle picker and select the part of the sky that should be gray.

Our color balance is improved and details are coming through. The Milky Way should be more clear. The most basic necessary processing steps are complete and you can use your imagination and inspiration to add character to the picture.
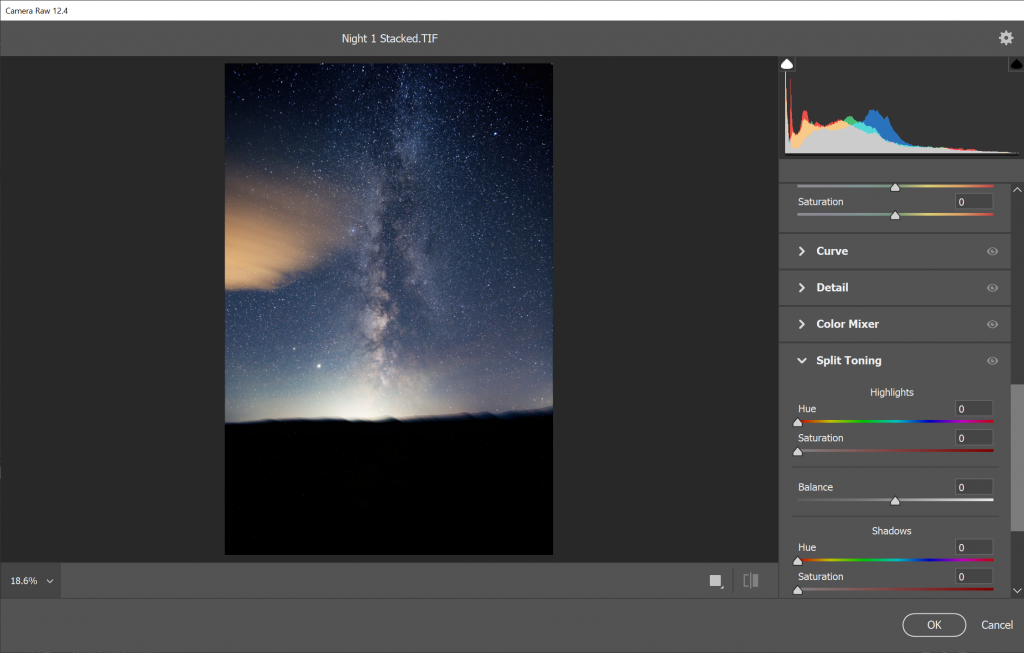
I chose to apply the following tweaks to the image – “Filter” ⟶ “Camera Raw“. I applied “Dehaze” to increase the contrast between the Milky Way and the haze around it. I also increased “Contrast” for the same reason. I have increased “Blacks“, “Vibrance” and “Saturation” just a bit.
To reduce color mottle every astrophotographer has a Topaz Denoise AI filter installed, so do I. It does a truly remarkable job removing left-over noise after image stacking, bringing out even more details, and reducing color noise.
After that, you can further increase contrast and exposure in Camera Raw in photoshop. You can also tweak Hue to make the sky look colder or even bring out some of the nebulosity around the Milky Way. You can also apply the graduated filter from the bottom of the image to the top and tweak local contrast and exposure to bring even more details of the Milky Way.
Every time I edit the same shot I end-up with a different outcome. Play with controls and colors until you achieve something you really like.
Ok, we’re almost there. It is time to bring our foreground layer into the final image and blend them. Click “File” ⟶ “Open…“, pick your 4-minute exposure of the foreground in RAW format and click OK. Photoshop will present the Camera Raw dialog. You can make a few small tweaks if you’d like and click “Open“. Now you have two separate images loaded in Photoshop on different tabs.
On that tab with the foreground image, click Ctrl + A and Ctrl + C to copy the image into the clipboard. Go back to your Milky Way shot, add a new layer, and paste your foreground right on top of it by clicking Ctrl + V. You should no longer see the Milky Way. The foreground is taking the entire real estate of the image.
To bring only the relevant part of the foreground click “Layer” ⟶ “Layer Mask” ⟶ “Reveal All“. You should see a layer mask added to the foreground layer in Photoshop. Now we need to delete the sky from the foreground and bring the sky from the background layer with the Milky Way.
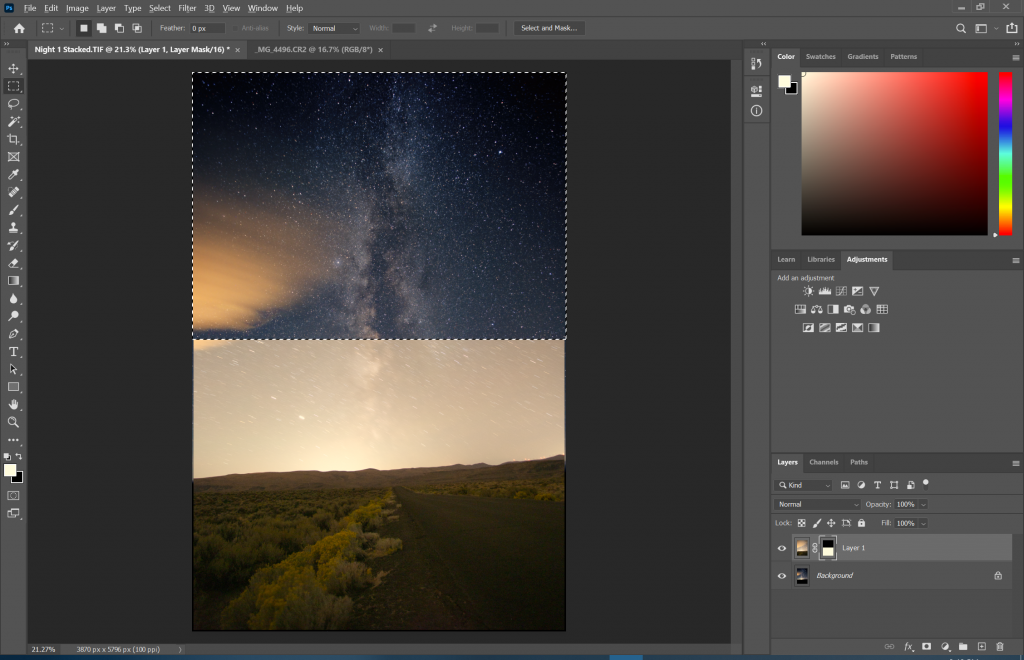
To remove the big chunk of the foreground we will use a simple “Rectangular Marquee Tool“, select the entire top part of the image and just hit Delete on the keyboard. We will also use “Magic Wand” tool to remove sections closer to the foreground. Then we will zoom-in and work on fine edges until the Milky Way blends in naturally with the foreground.
As the very last step we need to crop the image to make sure both layers have the same size. Select the background layer, select the “Crop” tool on the left and drag the left and right parts of the image until both layers match in size. Of course, as an artist, you should make a few more color adjustments as you see fit to perfect the image.
There are a few technical tweaks left to make. First one is to reduce image channel bit-width from 16 bits to 8. Human eye can’t tell the difference anyway so it is a safe reduction in quality. You may want to crop the part of the that is the most interesting. Lastly, you want to export this picture in PNG format for posting on Facebook or Instagram.