

Most home computer networks are not secure. At best, wireless networks are protected with a password. However, once the computer joins the network, a moderately skilled hacker can sniff most of the traffic, with the notable exception of properly protected internet resources (like google.com, facebook.com, etc.). Wired ethernet networks are even less secure because they require no password to join – plug the network cable and off you go. It’s difficult to detect properly hidden alien hosts on your wired network. To keep information on your network away from prying eyes communications need to be encrypted. Doing so with public certification authorities (like Starfield, DigiCert, etc.) is not an option. Private Certification Authority to the rescue! In this post, we will go step-by-step through the entire process, and in the end, we will see a padlock in the browser connected to the local server.

How do certificates work?
There two types of encryption – symmetric and asymmetric. In symmetric encryption, the same exact key encrypts and decrypts the data. In asymmetric – one key encrypts the data, and a different key decrypts it. It is not possible to encrypt and decrypt the data with the same key using an asymmetric encryption algorithm. Modern Public Key Infrastructure relies on asymmetric encryption.
Two keys used by the asymmetric encryption algorithm are not completely random – they are strongly related. For each encryption key, there is exactly one decryption key and vise versa. Both keys can be used interchangeably – information can be encrypted with the “decryption” key and decrypted with the “encryption” key. They aren’t actually called those names I am just using this terminology for simplicity. The proper terminology is the public and the private key. Public Key Infrastructure relies on fairly complex Elliptic Curve math, hence we won’t talk about it in this post.
Public and private keys are numbers. To prevent brute-force attacks they are very large numbers – 2,048 bits long (or 256 bytes). To put this in perspective, it takes only 16 bits, or 2 bytes to describe 5-digit numbers up to 65,535. Imagine how many digits can be represented by a chunk of data 128x times larger. Think of how long it would take to guess a number that large.
Certificates carry public and sometimes private keys with associated information. They have a well-defined structure and all consumers and producers of certificates know how to interpret metadata fields.

Required certificate fields
- Issuer – who created the certificate, usually this is a business name. For example, CN = Starfield Secure Certificate Authority – G2, OU = http://certs.starfieldtech.com/repository/, O = Starfield Technologies, Inc., L = Scottsdale, S = Arizona, C = US.
- Subject – who is the recipient of the certificate. This is typically a website domain name with associated business information. For example, CN = myidhub.com, O = MY ID HUB LLC, L = Sammamish, S = Washington, C = US.
- Valid from and Valid to fields describe the period of time when the certificate is valid. The certificate becomes invalid when it expires and all recipients will reject it.
- Public and Private keys are encryption material. Not all certificates contain private keys, some have only public keys.
- Signature algorithm – the name of the algorithm to run to verify certificate validity. Each certificate is signed, except for the root certificate. All recipients establish the chain of trust when they confirm the signature match. For example, sha256RSA.
- Thumbprint is a globally unique identifier of the certificate. It is computed over the entire certificate, including the signature. This value is not a secret, but rather a certificate name, so to speak. To tell the system which certificate to use one can give a certificate thumbprint. For example, 47f156d777f14cef377714f12289a22ae7198b89.
Chain of trust
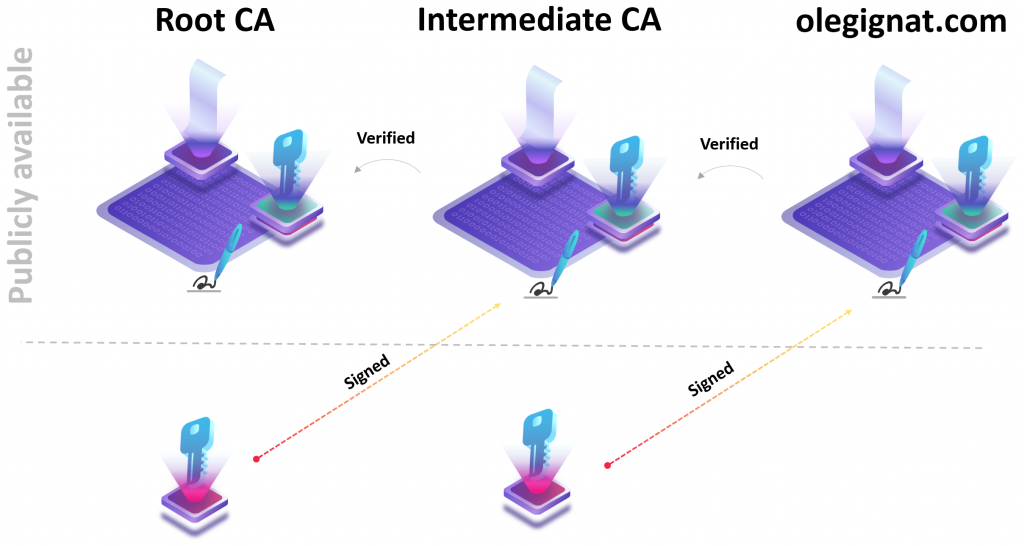
A computer system will only trust a certificate if a trusted Certification Authority issued it. To establish trust, each certificate is signed by the Certification Authority. To sign a certificate, the Certification Authority calculates the hash of the entire certificate and uses its own private key to generate the signature. Certification Authority records its name into the “Issuer” field and attaches the signature to the certificate.
When a system analyzes a certificate, it calculates the certificate hash using the algorithm in the “Signature algorithm hash” metadata field that the Certification Authority wrote. Then it uses that Certification Authority’s Public key to decrypt the signature field from the certificate and compare the hash to the calculated one. This is a trusted signature verification method because it relies on asymmetric cryptography. Certification Authority’s Public key is not sufficient to forge the signature – one needs to have its Private key.
The process of signature verification continues for every certificate involved in the chain of issuers. Every certificate in the chain must be trusted and it must be rooted in the certificate that the system trusts out of the box. Those certificates are called Root Certification Authorities.
All certificates from trusted Certification Authorities without their private keys are available online. For example, here’s Starfield repository and Microsoft repository. To trust a particular Certification Authority one needs to download and install their root certificate and intermediate ones.
Key protection
“Root CA” certificate is self-signed because there is no higher-level certificate to sign it. That certificate private key is protected with the highest level of security. It is usually kept in a secure facility offline on physical storage not connected to the internet. To access that key a quorum of security officers convenes with the physical tokens to unlock the vault. There are extensive background checks and audits for people with access to this key. This private key has a long period of validity – about a decade or two.
“Intermediate CA“ certificate is signed by “Root CA“ and is available online. It is used to issue end-point certificates on-demand. Obviously, it is also protected and can’t be accessed directly, except through a very carefully monitored asynchronous one-way communication interface established by the Certification Authority.
When the browser hits “https://olegignat.com” it gets a certificate back. The browser verifies DNS match, expiration period, revocation list, and other properties. Then it checks the signature against an installed public certificate of an intermediate CA – “Go Daddy Secure Certificate Authority – G2“. If that certificate checks-out, the browser walks up the chain and checks the root CA – “Go Daddy Root Certificate Authority – G2“. If a system has that certificate in the Trusted Root a secure connection completes and you see a padlock in the address bar.
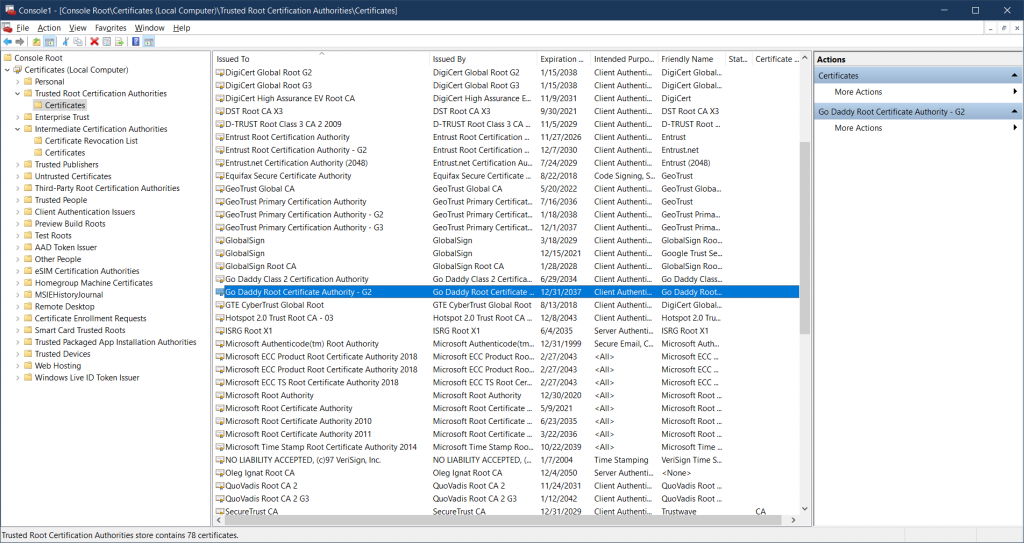
To view Trusted Root certificates on Windows open the command prompt, type “mmc” and hit Enter.
- When the window pops-up click File ⟶ Add/Remove Snap-in…
- In the pop-up window select “Certificates” and click the “Add >” button.
- Another window will pop-up with 3 options – “My user account”, “Service account” and “Computer account”. Choose “Computer account” and click “Next >” then “Finish“.
- Return back to the MMC window, navigate to “Trusted Root Certification Authorities” in the left pane, and expand “Certificates“.
Risk vs. Benefit analysis
By now it is pretty apparent that we’re going to attempt to replicate this Certification Authority chain for our own purpose. Is it safe and is it worth it?
Public Certification Authorities are prohibited from issuing certificates for internal domains by regulatory bodies. This means you can’t actually request a certificate from public CA for your home network. This fact alone is enough to close this topic and move to the next chapter, but we won’t.
Eva Gildan and Doug Barth argue in “Zero Trust Networks: Building Secure Systems in Untrusted Networks” that zero trust networks prefer private PKI systems over public ones. As the number of public CAs has grown, so has the risk of them signing fraudulent certificates. This isn’t a concern for our scenario. The fact that they endorse private PKI systems at all gives us an indication that this is not an outrageous idea.
Large companies like Microsoft, Google, and Salesforce run private PKI systems. They sign builds, tools, and packages deployed throughout the fleet of machines. Moreover, they run a few Certification Authorities – at least one for internal corporate use and one for production. They don’t deploy services signed by the 3rd party Certification Authorities to their production environments. Public Certification Authorities are too rigid and not scalable enough to meet the needs of large businesses.
Among benefits of our own Certification Authority we can find:
- Hand our public certificates to our friends and sign our own emails, free of charge.
- Sign any piece of software we come across and restrict which publishers can run software on our home server.
- Create a backup solution with all our files, photos, and videos outside of our house and protect it with mutual TLS (encryption and authentication)
- Encrypt TCP/IP traffic with IPSec using our own certificates.
Risk 1: Someone can steal our private key
Criminals and ill-wishers are humans too. This means they have the same needs as the rest of us – to live in a house, to put food on the table, even take a break from hacking go on vacation occasionally. They evaluate every intrusion opportunity from an economic point of view. Is the gain worth the time and money? If the gain isn’t clear and they have no personal motivation they won’t be spending time hacking into your system. To alleviate the risk of private key theft we need to build a deterrent that is costlier to overcome than the loot of issuing fraudulent certificates on your network.
Christopher Tarnovsky of Flylogic Engineering managed to extract encryption keys out of a Trusted Platform Module manufactured by Infineon. The approximate cost of the lab equipment necessary to carry out this attack was $200,000. The lowest cost of TPM cryptographic material extraction I have come across was $100,000. As such, if a real-world hacker has less than $100,000 to gain out of the attack he or she wouldn’t spend time on it.

We could protect our Certification Authority private key with a TPM and sleep tight if attackers have less than $100,000 to gain by hacking us. We wouldn’t actually be putting information into the TPM chip (even though we could). The idea is to write a Private key onto the hard drive of a laptop, encrypted with Windows BitLocker (or Linux equivalent). Configure Windows BitLocker to store keys inside the TPM chip. Most modern laptops come with TPM chips on their motherboards – Surface Laptop 3, for example.
Risk 2: Some devices don’t allow custom Trusted Root certificates
There is a chance that some devices on our network will not allow us to install a custom root certificate. Most commonly used operating systems will work just fine:
- Windows, Linux, and macOS devices all support trusted root customization.
- iOS devices install certificates via configuration profiles.
- Android devices support user certificates and system certificates. Installation instructions are available on the CACert wiki page.
As of today, following devices don’t allow mocking with trusted root store:
- Microsoft Xbox
- Amazon Alexa
- HP printers
- D-Link web cameras
It is safe to say that once we exit the realm of a computer or a smartphone, access to the root certificate store is not available. There may be exceptions to devices that can be “rooted”, like HP Live Due hard drive running a stripped-down version of Linux.
Is this a deal-breaker? Not necessarily. Most devices that we can’t install our trusted root certificate on, don’t need access to services on the local network. Those that do – don’t support encrypted communication. As such, you should carefully evaluate each device and either accept the risk or upgrade it to something more flexible.
Risk 3: Certificate expiration
Welcome to the certificate management world. Certificates expire without us doing anything and they continuously need renewal. We have to kee a registry of certificates we issued from our Certification Authority to track expiration dates. If we miss a date, then one morning some part of our network somewhere will stop working and we won’t know it. It will take time to investigate and correct it. What makes this especially painful is that certificates expire every 2 years, which gives us enough time to forget how to manage them.
It is even more fun when our Intermediate Certification Authority expires. It happens once in a decade and chances are, we will completely forget which certificates need to be renewed altogether. A lot will change in a decade – we will recycle old hardware, buy new, upgrade some, etc.
Cheap and dirty remedy for this challenge is a good old spreadsheet. Every time we touch our certification authority, we note down:
- Date certificate created
- Date it will expire
- Certificate thumbprint
- Certificate subject (who it is for?)
- Which part of the network has the certificate installed (ideally, machine names and individual service names)
Then all we need to do is create a reminder in our calendar for the nearest expiring certificate, 90 days in advance. When it rings and we renew the certificate, we update the reminder for the next expiring certificate, 90 days in advance, and the process continues…
Risk 4: Loss of the private key
Our root CA private key needs to live somewhere for 30 years, a lot can happen in that time. Even the most durable storage drives don’t last that long. If we lose our root private key we’d have to redo the entire certificate tree, which will be time-consuming. It won’t be the end of the world, just a bunch of work.
This problem has a lot in common with potential key theft – whether it is economically viable to provide higher durable storage, or just ignore the problem and redo the work if disaster strikes. If we have a few devices to protect, then this is not a big deal – key loss is an acceptable event. If we’ve gone ninja and encrypted over 50 end-points then the key loss is undesirable and may be worth splurging an extra $30 on Kingston Digital 4GB Data Traveler AES Encrypted Vault USB flash drive.
Risk 5: Do you trust yourself?
The weakest spot in the security posture could be human. Attackers wouldn’t necessarily go the brute-force route as the first choice. It is likely they will try to social-engineer a human into giving up the secret (key in this case, or signing a certificate). A human may inadvertently run a program or a script that will steal the key. To protect against these threats real Certification Authorities have processes, multiple layers of security, including physical and biometric barriers. They have internal and external auditing in place. This stuff costs money.
Designate a separate computer for Certification Authority
It helps to have a physical barrier between the typical workstation or the network and a computer running all crypto operations to issue certificates. Another physical computer or a virtual machine will work just fine. It doesn’t even need to be powerful – heck, even Raspberry Pi would be a cheap and worthy option. Ideally, that machine runs bare bones of the operating system:
- Uninstall unnecessary applications and stop services you don’t need
- Block all ports are by the firewall, except a single port you will use to connect to it (Remote Desktop or SSH)
- Keep software and operating system components up to date
- Create a local non-administrator user with bare-bones privileges to run only 1 application OpenSSL in 1 specific folder
All our certificate creation operations will take place on this machine. The difference between Root CA and Intermediate CA will be such that Root CA will be taken offline and disconnected from this machine. Intermediate CA will remain on this machine available for use on-demand at any time.
Root CA Private Key
It is hard to mitigate this risk completely, but we can reduce the probability of a mistake just enough to make it worth our time. Root Certification Authority Private Key should be stored offline on a hard drive encrypted with 3 passwords.
- Software password should be stored inside the TPM chip on a laptop that we use to sign Intermediate Certification Authority keys. BitLocker will encrypt the drive using this password at the operating system level.
- Hardware password should be used to encrypt the drive at the disk controlled level and stored in a password manager (like https://myidhub.com). Just be mindful that WD My Passport drives have been hacked left and right so their hardware encryption is meaningless.
- The key file itself will be encrypted with a passphrase by OpenSSL. It is worth having this secret out of reach completely. We will need it only once a decade so it is OK to stash it in physical form somewhere outside of the house. We can print it on a piece of paper and ask a friend or a relative we trust to file it for us. It is OK for them to see the secret – they can’t use it anyway without the other two passwords and a physical device in hand. We aren’t protecting our key from them as much as from ourselves.
The hard drive should be kept out of sight and out of immediate reach, somewhere in the attic or the basement. We need to have to walk to get it plugged in and do so intentionally. The drive shouldn’t be immediately reachable, which mitigates “Oops” moments.
Intermediate CA Private Key
It is fine to store the Intermediate Certification Authority Private Key on a computer connected to the local network. It should be protected with two layers of security:
- Software password inside TPM that BitLocker uses to encrypt the storage drive of our Certification Authority computer.
- Local non-administrator password that grants access to the machine remotely.
To top it off, Private Key will be protected with a passphrase by OpenSSL. Passphrase will be stored in a password manager (like https://myidhub.com).
Prepare the storage
Enough of theory, let’s get down to business. Go ahead and connect to our dedicated cryptographic computer, either via Remote Desktop or SSH, whatever your operating system choice is. If you are running Windows you need to get a port of OpenSSL, otherwise, you already have it installed on your Linux or macOS. For Windows, add OpenSSL to your local user PATH environment variable. Create a folder structure that looks like the one below. Let’s say your system drive is “C:” on Windows.
C:\Certification Authority
     \Certificates
         \Public
         \Private
     \IntermediateCA
         \Issued
         \Own
Plug your external USB storage device, as we discussed in the previous sections, and create a similar folder structure on it. Let’s say, this storage device mounts as a “D:” drive on Windows. Toggling hardware encryption on external USB storage wipes it clean, go ahead and enable hardware encryption first before doing anything else.
D:\Certification Authority
	\RootCA
		\Issued
		\Own
Next we need to create certificate registry files in each Certification Authority folder:
- index.txt – an empty text file that OpenSSL will use to record every certificate it creates in corresponding CA.
- serial – a file without extension with a single number, say “1000” and an empty line after it. This file will keep track of the next certificate the CA will lissue.
C:\Certification Authority
	\IntermediateCA
		index.txt
		serial
D:\Certification Authority
	\RootCA
		index.txt
		serial
The last thing remaining is the configuration for each Certification Authority. Let’s configure the Root CA first – create a file “D:\Certification Authority\RootCA\openssl.cnf” and copy the content inside.
RANDFILE        = .rnd

[ ca ]
default_ca    = RootCA        # The default ca section

[ RootCA ]

dir =  D:\\Certification Authority\\RootCA
certs = $dir\\certs                # We won't be needing this
crl_dir = $dir\\crl                # We won't be using certificate revocation list
database = $dir\\index.txt         # Registry of certificates produced by CA
new_certs_dir = $dir\\Issued       # Default drop location for new certificates

certificate = $dir\\Own\\rootca.pem    # The CA certificate
serial = $dir\\serial              # Serial number of the last certificate issued by CA
crl = $dir\\crl.pem                # The current CRL
private_key = $dir\\Own\\rootca.key.pem       # The Private key
RANDFILE = $dir\\.rnd              # Private random number file

default_days = 3650                # Certificate validity period. For a Root CA we will issue only intermediate CA certificates.
default_crl_days = 30              # how long before next CRL
default_md = sha256                # We need a strong hash algorithm, SHA256 is strong
preserve = no

policy = policy_match

[ policy_match ]
countryName = match
stateOrProvinceName = match
organizationName = match
organizationalUnitName = optional
commonName = supplied


[ req ]
default_bits = 2048
encrypt_key = yes 	          # Protect private key
utf8 = yes                        # Input is UTF-8
distinguished_name = req_distinguished_name
attributes = req_attributes

[ req_distinguished_name ]
countryName = Country Name (2 letter code)
countryName_default = US
countryName_min = 2
countryName_max = 2

stateOrProvinceName = State or Province Name (full name)
stateOrProvinceName_default = Washington

localityName = Locality Name (eg, city)
localityName_default = Seattle

organizationName = Organization Name (eg, company)
organizationName_default = Oleg Ignat

commonName = Common Name (eg, your website’s domain name)
commonName_max = 64

[ req_attributes ]
challengePassword_min = 4
challengePassword_max = 20

[ x509v3_intermediate_extensions ]
keyUsage = critical,keyCertSign,digitalSignature,cRLSign
extendedKeyUsage = critical,serverAuth,clientAuth,codeSigning,emailProtection,timeStamping
basicConstraints = critical,CA:true,pathlen:0
 # Intermediate CA can only sign leaf certificates
subjectKeyIdentifier = hash
authorityKeyIdentifier = keyid:always,issuer:always

[ x509v3_extensions ]
keyUsage = critical,keyCertSign,digitalSignature,cRLSign
extendedKeyUsage = critical,serverAuth,clientAuth,codeSigning,emailProtection,timeStamping
basicConstraints = critical,CA:true,pathlen:1
 # Allow CA to sign intermediate CA
subjectKeyIdentifier = hash
authorityKeyIdentifier = keyid:always,issuer:always
Now we need to configure the Intermediate CA. Copy the content below into the file “C:\Certification Authority\IntermediateCA\openssl.cnf“
RANDFILE        = .rnd

[ ca ]
default_ca    = IntermediateCA        # The default ca section

[ IntermediateCA ]

dir =  C:\\Certification Authority\\IntermediateCA
certs = $dir\\certs                # We won't be needing this
crl_dir = $dir\\crl                # We won't be using certificate revocation list
database = $dir\\index.txt         # Registry of certificates produced by CA
new_certs_dir = $dir\\Issued       # Default drop location for new certificates

certificate = $dir\\Own\\intermediateca.pem    # The CA certificate
serial = $dir\\serial              # Serial number of the last certificate issued by CA
crl = $dir\\crl.pem                # The current CRL
private_key = $dir\\Own\\intermediateca.key.pem       # The Private key
RANDFILE = $dir\\.rnd              # Private random number file

default_days = 730                 # Intermediate CA will issue certificates for 2 years
default_crl_days = 30              # How long before next CRL
default_md = sha256                # Use a strong SHA-256 for signatures
preserve = no

policy = policy_match

# For the CA policy
[ policy_match ]
countryName = match
stateOrProvinceName = match
organizationName = match
organizationalUnitName = optional
commonName = supplied

[ req ]
default_bits = 2048
encrypt_key = yes                   # Protect private key
utf8 = yes                          # Input is UTF-8
distinguished_name = req_distinguished_name
attributes = req_attributes

[ req_distinguished_name ]
countryName = Country Name (2 letter code)
countryName_default = US
countryName_min = 2
countryName_max = 2

stateOrProvinceName = State or Province Name (full name)
stateOrProvinceName_default = Washington

localityName = Locality Name (eg, city)
localityName_default = Seattle

organizationName = Organization Name (eg, company)
organizationName_default = Oleg Ignat

commonName = Common Name (eg, your website’s domain name)
commonName_max = 64

[ req_attributes ]
challengePassword_min = 4
challengePassword_max = 20

# Extension for client CSR
[ x509v3_client_extensions ]
keyUsage = critical,digitalSignature,keyEncipherment
extendedKeyUsage = critical,clientAuth
basicConstraints = critical,CA:false
subjectKeyIdentifier = hash
authorityKeyIdentifier = keyid:always

# Extension for server CSR
[ x509v3_server_extensions ]
keyUsage = critical,digitalSignature,keyEncipherment
extendedKeyUsage = critical,serverAuth
basicConstraints = critical,CA:false
subjectKeyIdentifier = hash
authorityKeyIdentifier = keyid:always
At this point, we are ready to start creating certificates so we need to encrypt the storage. Enable Windows BitLocker for “C:” and “D:” drives. BitLocker keys for both drives must be protected by a Trusted Platform Module installed in our cryptographic computer. BitLocker encryption is transparent and doesn’t wipe the drive clean.
Create a Root Certification Authority
We are ready to put some cryptographic material on our storage devices. Start with the Root CA that seeds the rest of the certificate tree. The first order of business – create a pseudo-random generated seed file we will need to produce keys. Open the command prompt and navigate into “D:\Certification Authority\RootCA” folder.
openssl rand -out .rnd 2048Produce a self-signed certificate valid for 30 years using our root CA extensions. As part of this operation, we will create a private key. We will type a passphrase to protect it. I recommend https://myidhub.com password manager to store it, but any other will work just fine as well, as long as it is not local to our dedicated cryptographic computer.
openssl req -x509 -new -days 10950 -sha256 -extensions x509v3_extensions -keyout Own/rootca.key.pem -out Own/rootca.pem -config openssl.cnfInspect the certificate to ensure it matches what we need.
openssl x509 -in Own/rootca.pem -text -nooutThe output should look similar to the one below, except redacted fields. Pay attention to a “Validity” period, “X509v3 Key Usage“, “x509v3 Extended Key Usage“, and “pathlen” value of “X509v3 Basic Constraints“
Certificate:
    Data:
        Version: 3 (0x2)
        Serial Number:
            aa:bb:cc:dd:ee:ff:00:11
    Signature Algorithm: sha256WithRSAEncryption
        Issuer: C=US, ST=Washington, L=Seattle, O=Oleg Ignat, CN=<redacted>
        Validity
            Not Before: Dec 18 18:25:21 2020 GMT
            Not After : Dec 14 18:25:21 2050 GMT
        Subject: C=US, ST=Washington, L=Seattle, O=Oleg Ignat, CN=<redacted>
        Subject Public Key Info:
            Public Key Algorithm: rsaEncryption
                Public-Key: (2048 bit)
                Modulus:
                    <redacted>
                Exponent: 65537 (0x10001)
        X509v3 extensions:
            X509v3 Key Usage: critical
                Digital Signature, Certificate Sign, CRL Sign
            X509v3 Extended Key Usage: critical
                TLS Web Server Authentication, TLS Web Client Authentication, Code Signing, E-mail Protection, Time Stamping
            X509v3 Basic Constraints: critical
                CA:TRUE, pathlen:1
            X509v3 Subject Key Identifier:
                AA:AA:AA:AA:AA:AA:AA:AA:AA:AA:AA:AA:AA:AA:AA:AA:AA:AA:AA:AA
            X509v3 Authority Key Identifier:
                keyid:AA:BB:CC:DD:EE:FF:00:11:22:33:44:55:66:77:88:99:00:AA:BB:CC
                DirName:/C=US/ST=Washington/L=Sammamish/O=Oleg Ignat/CN=<redacted>
                serial:AA:BB:CC:DD:EE:FF:00:11

    Signature Algorithm: sha256WithRSAEncryption
         <redacted>
Finally we need to convert PEM certificate file to CRT format for installation on Windows computers.
openssl x509 -outform der -in Own/rootca.pem -out Own/rootca.crtBy the end of this exercise we should have 3 files in the “Own” folder.
D:\Certification Authority\RootCA\Own
	rootca.crt
	rootca.pem
	rootca.key.pem
The most valuable file is “rootca.key.pem” which contains our Private Key. It must never be shared.
The other two files – “rootca.crt” and “rootca.pem” must be shared with all parties who you want to trust your certificates. You can copy these two files back onto the cryptographic computer from “D:\Certification Authority \RootCA\Own” to “C:\Certification Authority\Certificates\Public“.
Create an Intermediate Certification Authority
For an Intermediate CA we want to use a different random seem file, so let’s create one. Open a command prompt and navigate to “C:\Certification Authority\IntermediateCA“.
openssl rand -out .rnd 2048Using newly generated random seed file we will produce a Private Key. This is is not protected by a passphrase, it is a raw key.
openssl genrsa -rand .rnd -out Own/intermediateca.key.pem 2048Next we want to create a Certificate Signing Request (CSR) for our Intermediate CA and hand it to our Root CA to sign it.
openssl req -new -sha256 -key Own/intermediateca.key.pem -out Own/intermediateca.csr.pem -config openssl.cnfJust before we sign we need to check that CSR includes the right information about our Intermediate CA.
openssl req -text -noout -verify -in Own/intermediateca.csr.pemThe output should look similar to an example below. Important properties are “Subject” and “Signature Algorithm“.
Certificate Request:
    Data:
        Version: 0 (0x0)
        Subject: C=US, ST=Washington, L=Seattle, O=Oleg Ignat, CN=<redacted>
        Subject Public Key Info:
            Public Key Algorithm: rsaEncryption
                Public-Key: (2048 bit)
                Modulus:
                    <redacted>
                Exponent: 65537 (0x10001)
        Attributes:
            a0:00
    Signature Algorithm: sha256WithRSAEncryption
         <redacted>
We are ready to sign our CSR and officially spawn an Intermediate CA into existence. Notice that we are using Root CA configuration rather than Intermediate CA, that’s because we need access to Root CA’s Private Key.
openssl ca -config D:\Certification Authority\RootCA\openssl.cnf -extensions x509v3_intermediate_extensions -days 3650 -out Own/intermediateca.pem -in Own/intermediateca.csr.pemLast step is to create a CRT file for installation on Windows machines.
openssl x509 -outform der -in Own/intermediateca.pem -out Own/intermediateca.crtWe should see 4 files in our Intermediate CA folder.
C:\Certification Authority\IntermediateCA\Own
	intermediateca.crt
	intermediateca.pem
	intermediateca.csr.pem
	intermediateca.key.pem
The most valuable file is “intermediateca.key.pem” which contains our Private Key. It must never be shared.
Similar to Root CA, the other two files – “intermediateca.crt” and “intermediateca.pem” must be shared with everyone who you want to trust you. Go ahead and copy these two files into “C:\Certification Authority\Certificates\Public” for easy and convenient access. This folder should have 4 files at this point.
C:\Certification Authority\Certificates\Public
	intermediateca.crt
	intermediateca.pem
	rootca.crt
	rootca.pem
We no longer need access to our Root CA private key. Disconnect the storage device “D:” and store it in a safe place.
Share Public Certificates on the network
We need a mechanism for certificate distribution and rotation. Large enterprises deploy Automated Certificate Management Environments to take care of this. We will keep things simple and lean on manual work. The simples thing we can do is share our public certificates folder on the network via SMB and grant access to “Everyone”. Certificates are public and are meant to be accessible to everyone we want to trust them.
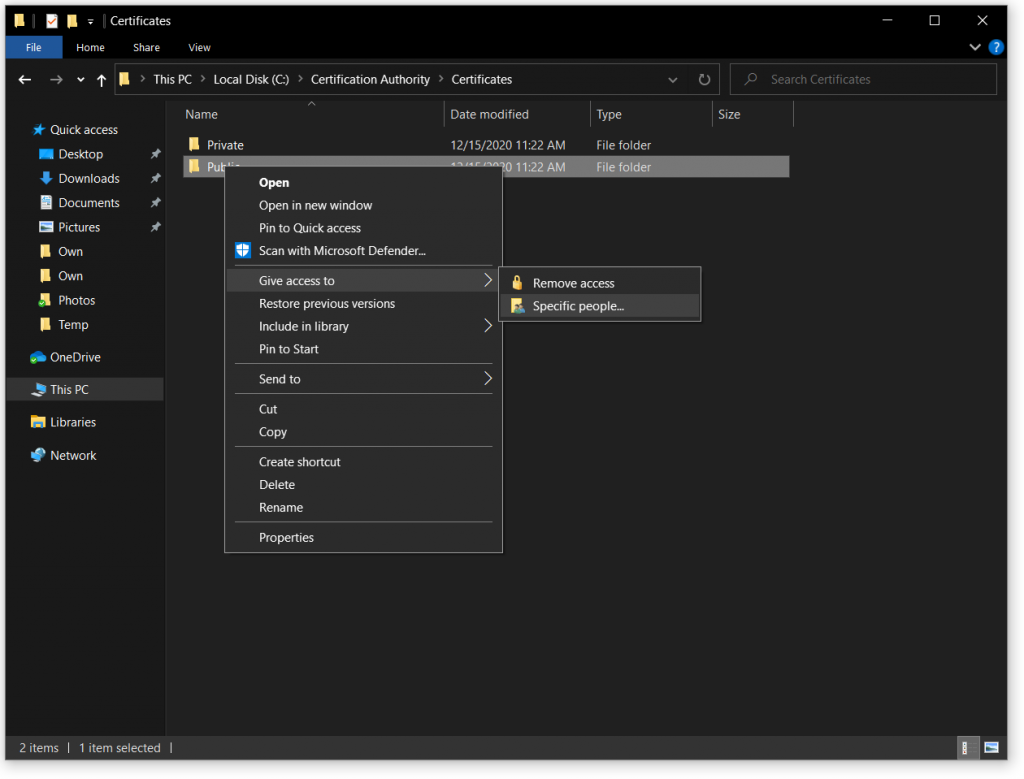
If your dedicated cryptographic computer is running Windows, open “C:\Certification Authority\Certificates” in Windows Explorer, right-click on the “Public” folder, and click on “Give access to” ⟶ “Specific people…“
In the new window that pops up, add “Everyone” group to the list of people with access, and grant then “Read” permission. They won’t be needing to write certificates, only read and install them.
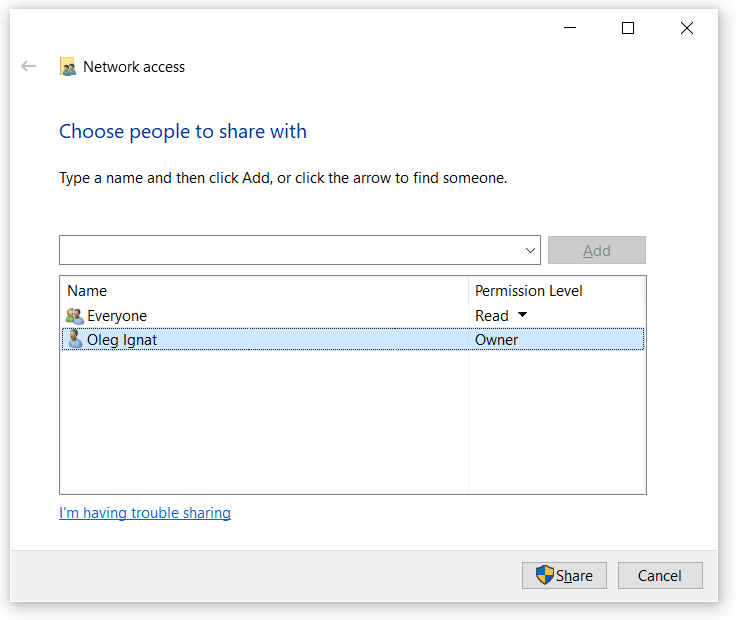
Click “Share” to complete the operation and make our certificates available on the network at “\\<cryptographic computer name>\Public” location.
Install the Root CA certificate
Everything we covered so far has been the prep-work. In this paragraph, we will start enacting real changes in our network. We need to seed the chain of trust on every computer and device we want to encrypt. Instructions will be provided for Windows OS only, but the same concepts exist on other operating systems.
Follow instructions in the Chain of Trust section to open the MMC console for a Computer account. It is best to make the entire computer trust our Root CA rather than chase individual users, one at a time. Right-click on “Certificates” under “Trusted Root Certification Authorities“, choose “All Tasks” ⟶ “Import…“
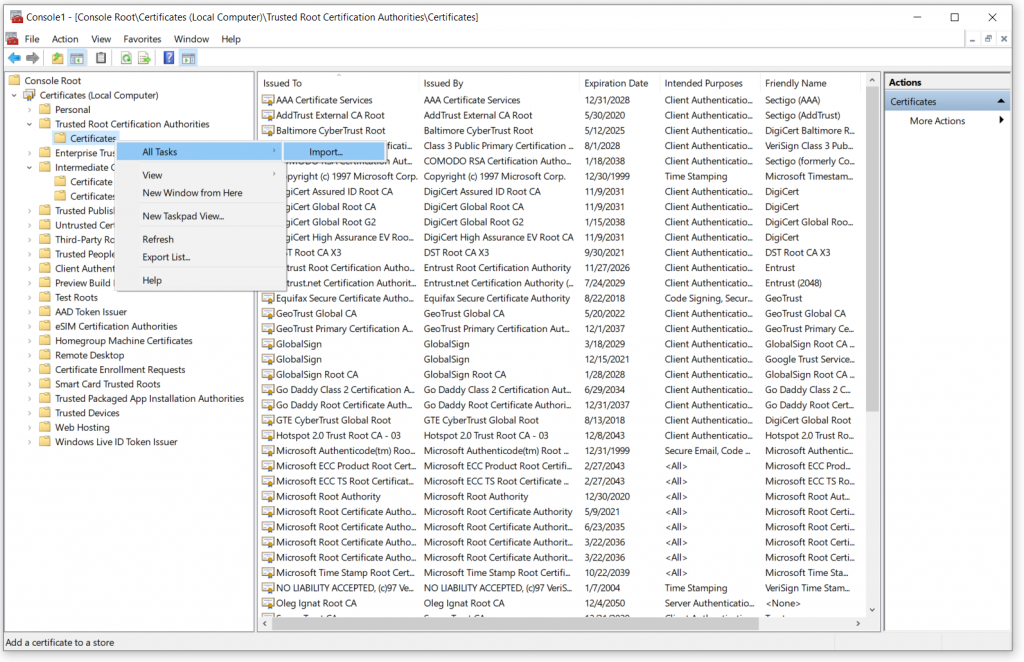
In the pop-up window make sure that “Local Machine” is the default selected “Store Location” and click “Next“. You will be presented with a page to select a certificate path. Click the “Browse” button and navigate to the network share of our cryptographic computer. We need to select a “rootca.crt” file in this step. If we configured our network share correctly we wouldn’t see any PFX or PEM files, only CRT.
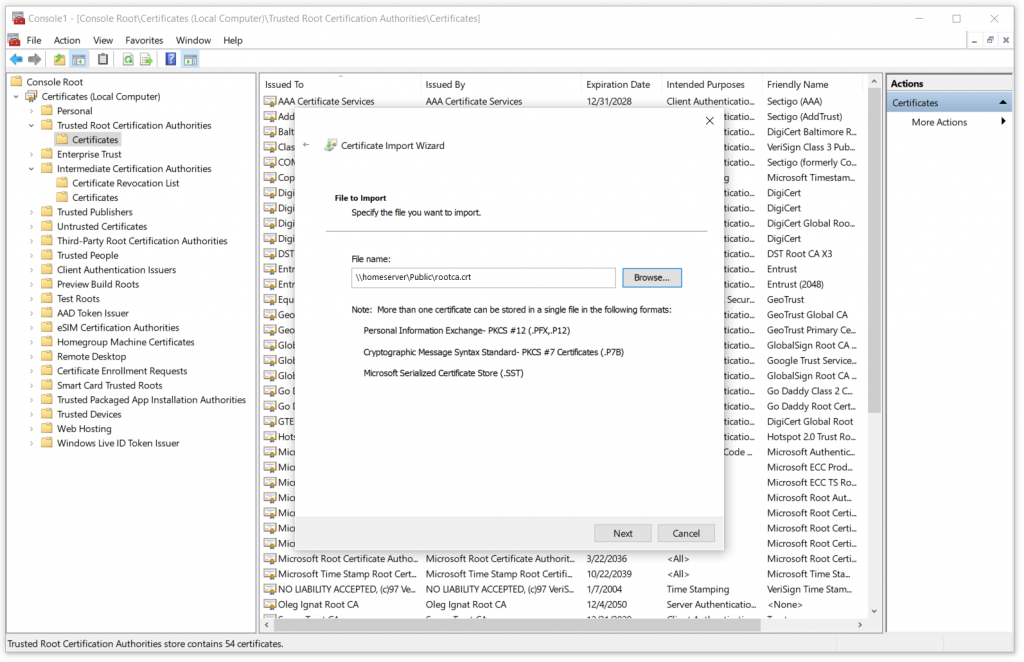
Click “Next” through the remainder of pages and click “Finish” on the last page, without changing anything. When the import is complete we should be able to find our Root CA certificate in the list. You may need to click “F5” in the MMC console to refresh the list of certificates after import. Look for the value you typed for “commonName” when running the OpenSSL command in the Create a Root Certification Authority step.
Warning
From this moment on, every computer with our Root CA installed will trust all certificates signed by that CA. This CA can issue a certificate for “paypal.com”, “facebook.com” or “bankofamerica.com” and the computer will trust them. If Root CA’s private key is leaked or compromised, your network can be hijacked with a man-in-the-middle attack. Protect your private key with the mechanisms we covered in this article.
Install Intermediate CA certificate
The process for intermediate CA installation is identical to the Root CA, except we will be installing a different certificate and under a different branch in the tree in the MMC console. The MMC console should still be running after the previous step. Right-click on “Certificates” under “Intermediate Certification Authorities“, choose “All Tasks” ⟶ “Import…“
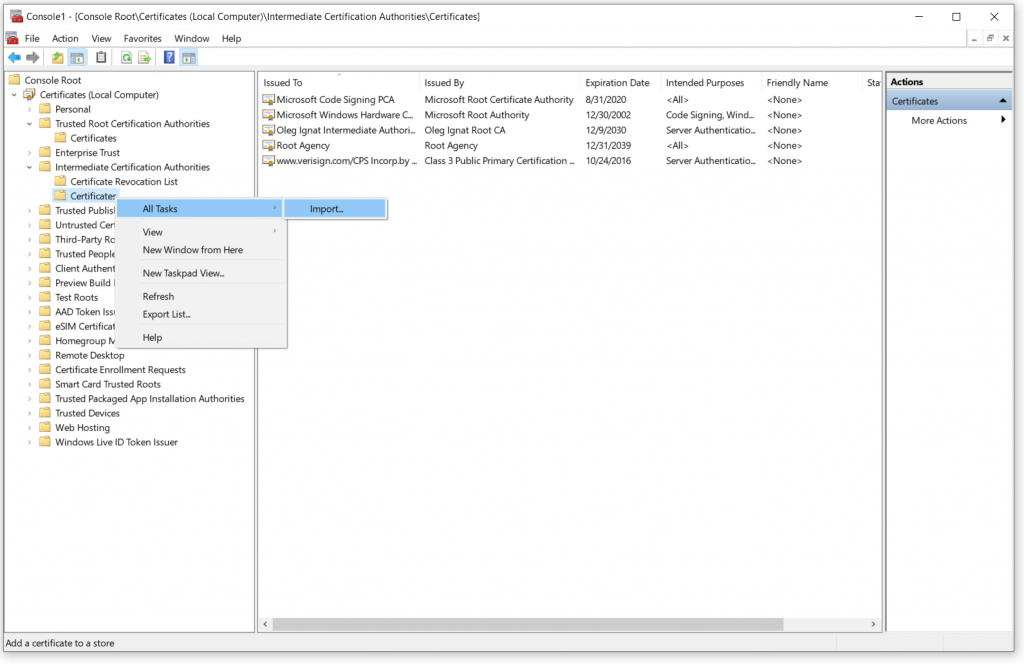
This time we need to select “intermediateca.crt” file from the same location on the network share.
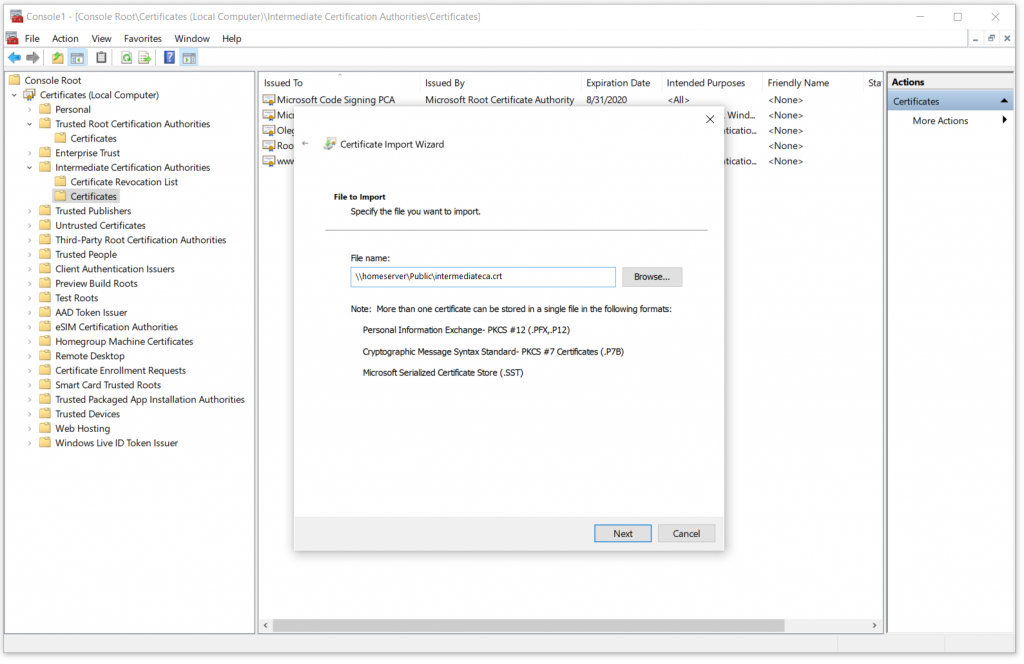
Complete certificate installation and verify that it is correctly imported. Now every certificate issued by our Intermediate CA will be trusted by all machines on our network. Time to go make some certificates!
Create the first SSL certificate
After we’ve established our root CA and installed appropriate certificates into trusted root stores, we are ready to stamp-out certificates for individual computers and devices on our network. This is a two-step process. First, we will create a Certificate Signing Request for each device and sign it with the Intermediate CA Private key. Each certificate with the Private key will be installed on target computers.
Connect to our cryptographic designated computer and navigate into the “C:\Certification Authority\Certificates” folder. We will be storing all our certificate definition files in it. Let’s create a certificate for a smart network router with a web management interface. We will protect the router with a TLS certificate to hide login and password sent over the network when we authenticate.
Create a “router.openssl.cnf” file with the content below.
RANDFILE        = .rnd

[ ca ]
default_ca    = IntermediateCA        # We will be using intermediate CA to sign our certificate

[ IntermediateCA ]
dir =  C:\\Certification Authority\\IntermediateCA
certs = $dir\certs
crl_dir = $dir\crl
database = $dir\index.txt
new_certs_dir = $dir\Issued
certificate = $dir\Own\intermediateCA.pem
serial = $dir\serial
crl = $dir\crl.pem
private_key = $dir\Own\IntermediateCA.key.pem       # The private key
RANDFILE = $dir\.rnd

default_days = 365
default_crl_days = 30
default_md = sha256
preserve = no

[ policy_match ]
countryName = match
stateOrProvinceName = match
organizationName = match
organizationalUnitName = optional
commonName = supplied

[ req ]
default_bits = 2048
encrypt_key = yes     # Protect private key
utf8 = yes                   # Input is UTF-8
distinguished_name = req_distinguished_name
attributes = req_attributes
req_extensions = req_ext

[ req_distinguished_name ]
countryName = Country Name (2 letter code)
countryName_default = US
countryName_min = 2
countryName_max = 2

stateOrProvinceName = State or Province Name (full name)
stateOrProvinceName_default = Washington

localityName = Locality Name (eg, city)
localityName_default = Seattle

organizationName = Organization Name (eg, company)
organizationName_default = Oleg Ignat

commonName = Common Name (eg, your website’s domain name)
commonName_default = router
commonName_max = 64

[ req_attributes ]
challengePassword_min = 4
challengePassword_max = 20

[ req_ext ]
subjectAltName = @alt_names

[alt_names]
DNS.1   = router                            # Compute name
DNS.2   = router.olegignat.com     # Fully qualified domain name
DNS.3   = 192.168.1.1                   # IP address of a router, this may not apply to other devices that have DHCP assigned IP addresses

Extension for server CSR
[ x509v3_server_extensions ]
keyUsage = critical,digitalSignature,keyEncipherment
extendedKeyUsage = critical,serverAuth
basicConstraints = critical,CA:false
subjectKeyIdentifier = hash
authorityKeyIdentifier = keyid:always
subjectAltName = @alt_names
We need a Private Key and a Certificate Signing Request for our server. Both will be created with the command below.
openssl req -newkey rsa:2048 -extensions x509v3_server_extensions -keyout Private\router.key.pem -nodes -config router.openssl.cnf -out Private\router.csr.pemWhen command above completes, we will see 2 PEM files created under “C:\Certification Authority\Certificates\Private“. Now we will sign our CSR with a Private Key of Intermediate CA.
openssl ca -config router.openssl.cnf -extensions x509v3_server_extensions -out Public\router.pem -infiles Private\router.csr.pemFor Windows ecosystem we will convert a certificate from PEM to CRT format.
openssl x509 -inform PEM -in Public\router.pem -out Public\router.crtIt would be smart to have a certificate with the private key in PFX format. This certificate format is not as popular in Linux ecosystem, but it is prevalent in the Windows world.
openssl pkcs12 -inkey Private\router.key.pem -in Public\router.pem -export -out Private\router.pfxBy the end of this exercise our folder content should look as described below – all secret material in “Private” folder and all public certificates in “Public“.
C:\Certification Authority\Certificates
     Private
         router.key.pem
         router.csr.pem
         router.pfx
     Public
         router.pem
         router.crt
Install the certificate with the private key on the target computer
The exact certificate installation instructions vary wildly depending on the system. For the Windows ecosystem, the “Private\router.pfx” file alone is sufficient, but for Linux, we will require “Private\router.key.pem” and “Public\router.pem” files.
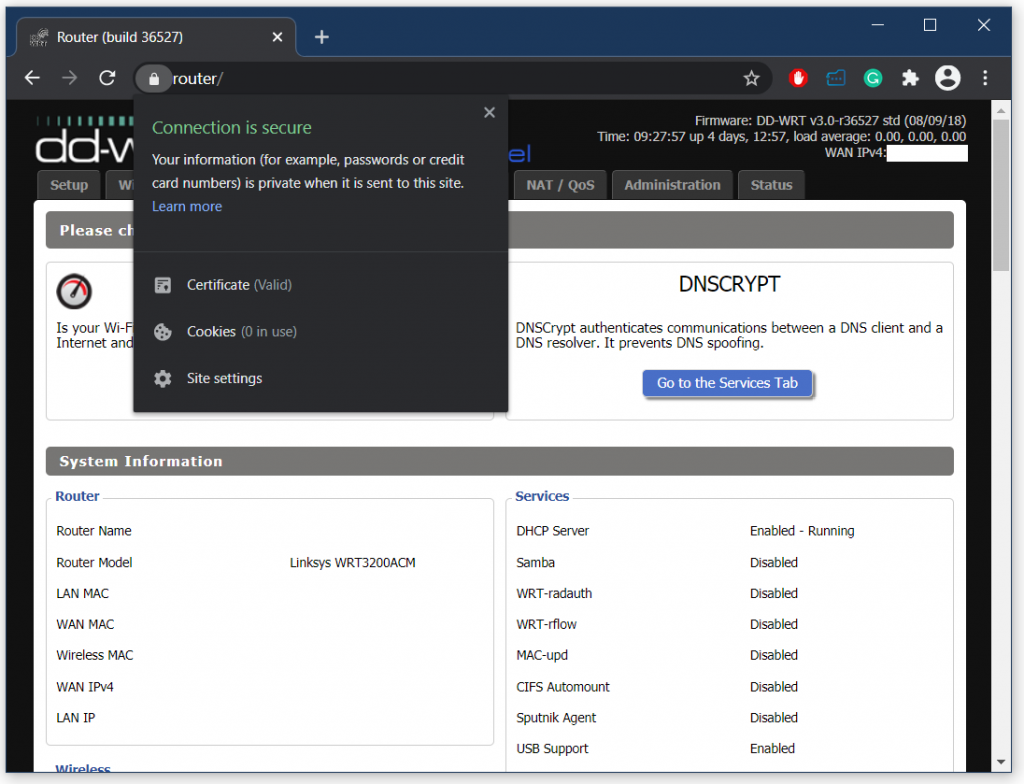
We can see that a local computer on the network can be protected with TLS just like any server on the public internet. We can sleep tight knowing that traffic sniffers on the network are powerless and are better off hacking someone else.