
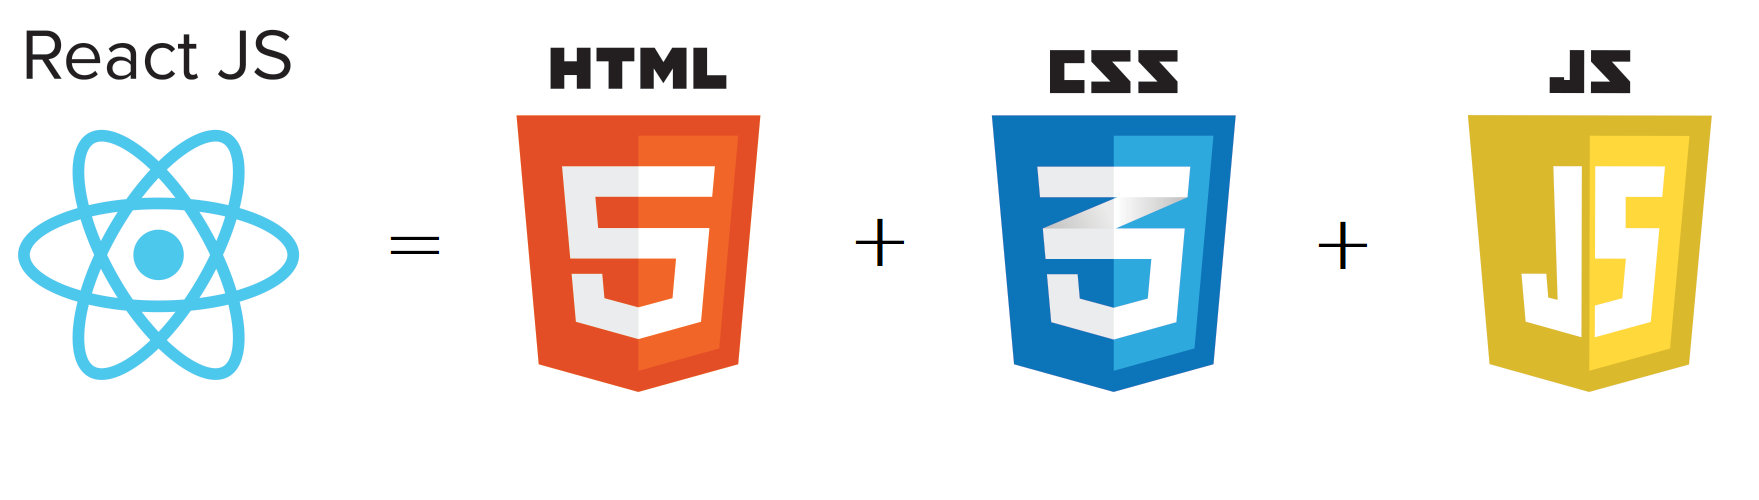
React.js is a developer-friendly framework for building interactive web applications. It takes the rich and verbose world of DOM and JavaScript runtime available in the modern browsers and packages it in easy-to-understand rules. No wonder ASP.NET, PHP, and other “server-side” developers are tempted to take React.js for a spin. The common challenge early converts face is what questions to ask. They understand their world well but lack the vocabulary to translate what they know into React.js quickly. In this post, we will cover important aspects of complex web applications and learn how to do them in React.js – namely execution of JavaScript, API calls, chaining multiple operations together and localization. The goal is to bridge what developers know with the basics of React.js to enable further independent exploration.

What’s the relationship between a web site and a React.js?
React.js complies into a bundle.js file that contains the entire react application. React.js application is associated with a web page, say index.html, but it can be any web page that loads the bundle script. The word “compiles” is an exaggeration, a more accurate word would be “transforms”. React.js application is converted from JSX into a set of JavaScript instructions that the browser understands, like document.createElement. This file is minified to speed up download and parsing and obfuscated to protect against the laziest of hackers. However, in the end, it remains a JavaScript file.
A developer can choose to write an entire web site in React.js. This website will have precisely 1 HTML page that loads the bundle.js, and from that moment on, React.js takes over. Another developer can decide to have only 1 web page render as a client-side React.js application, while the rest of the web site remains server-side rendered. The third developer can have a few different React.js apps included in a single web site if there is a good reason for it.
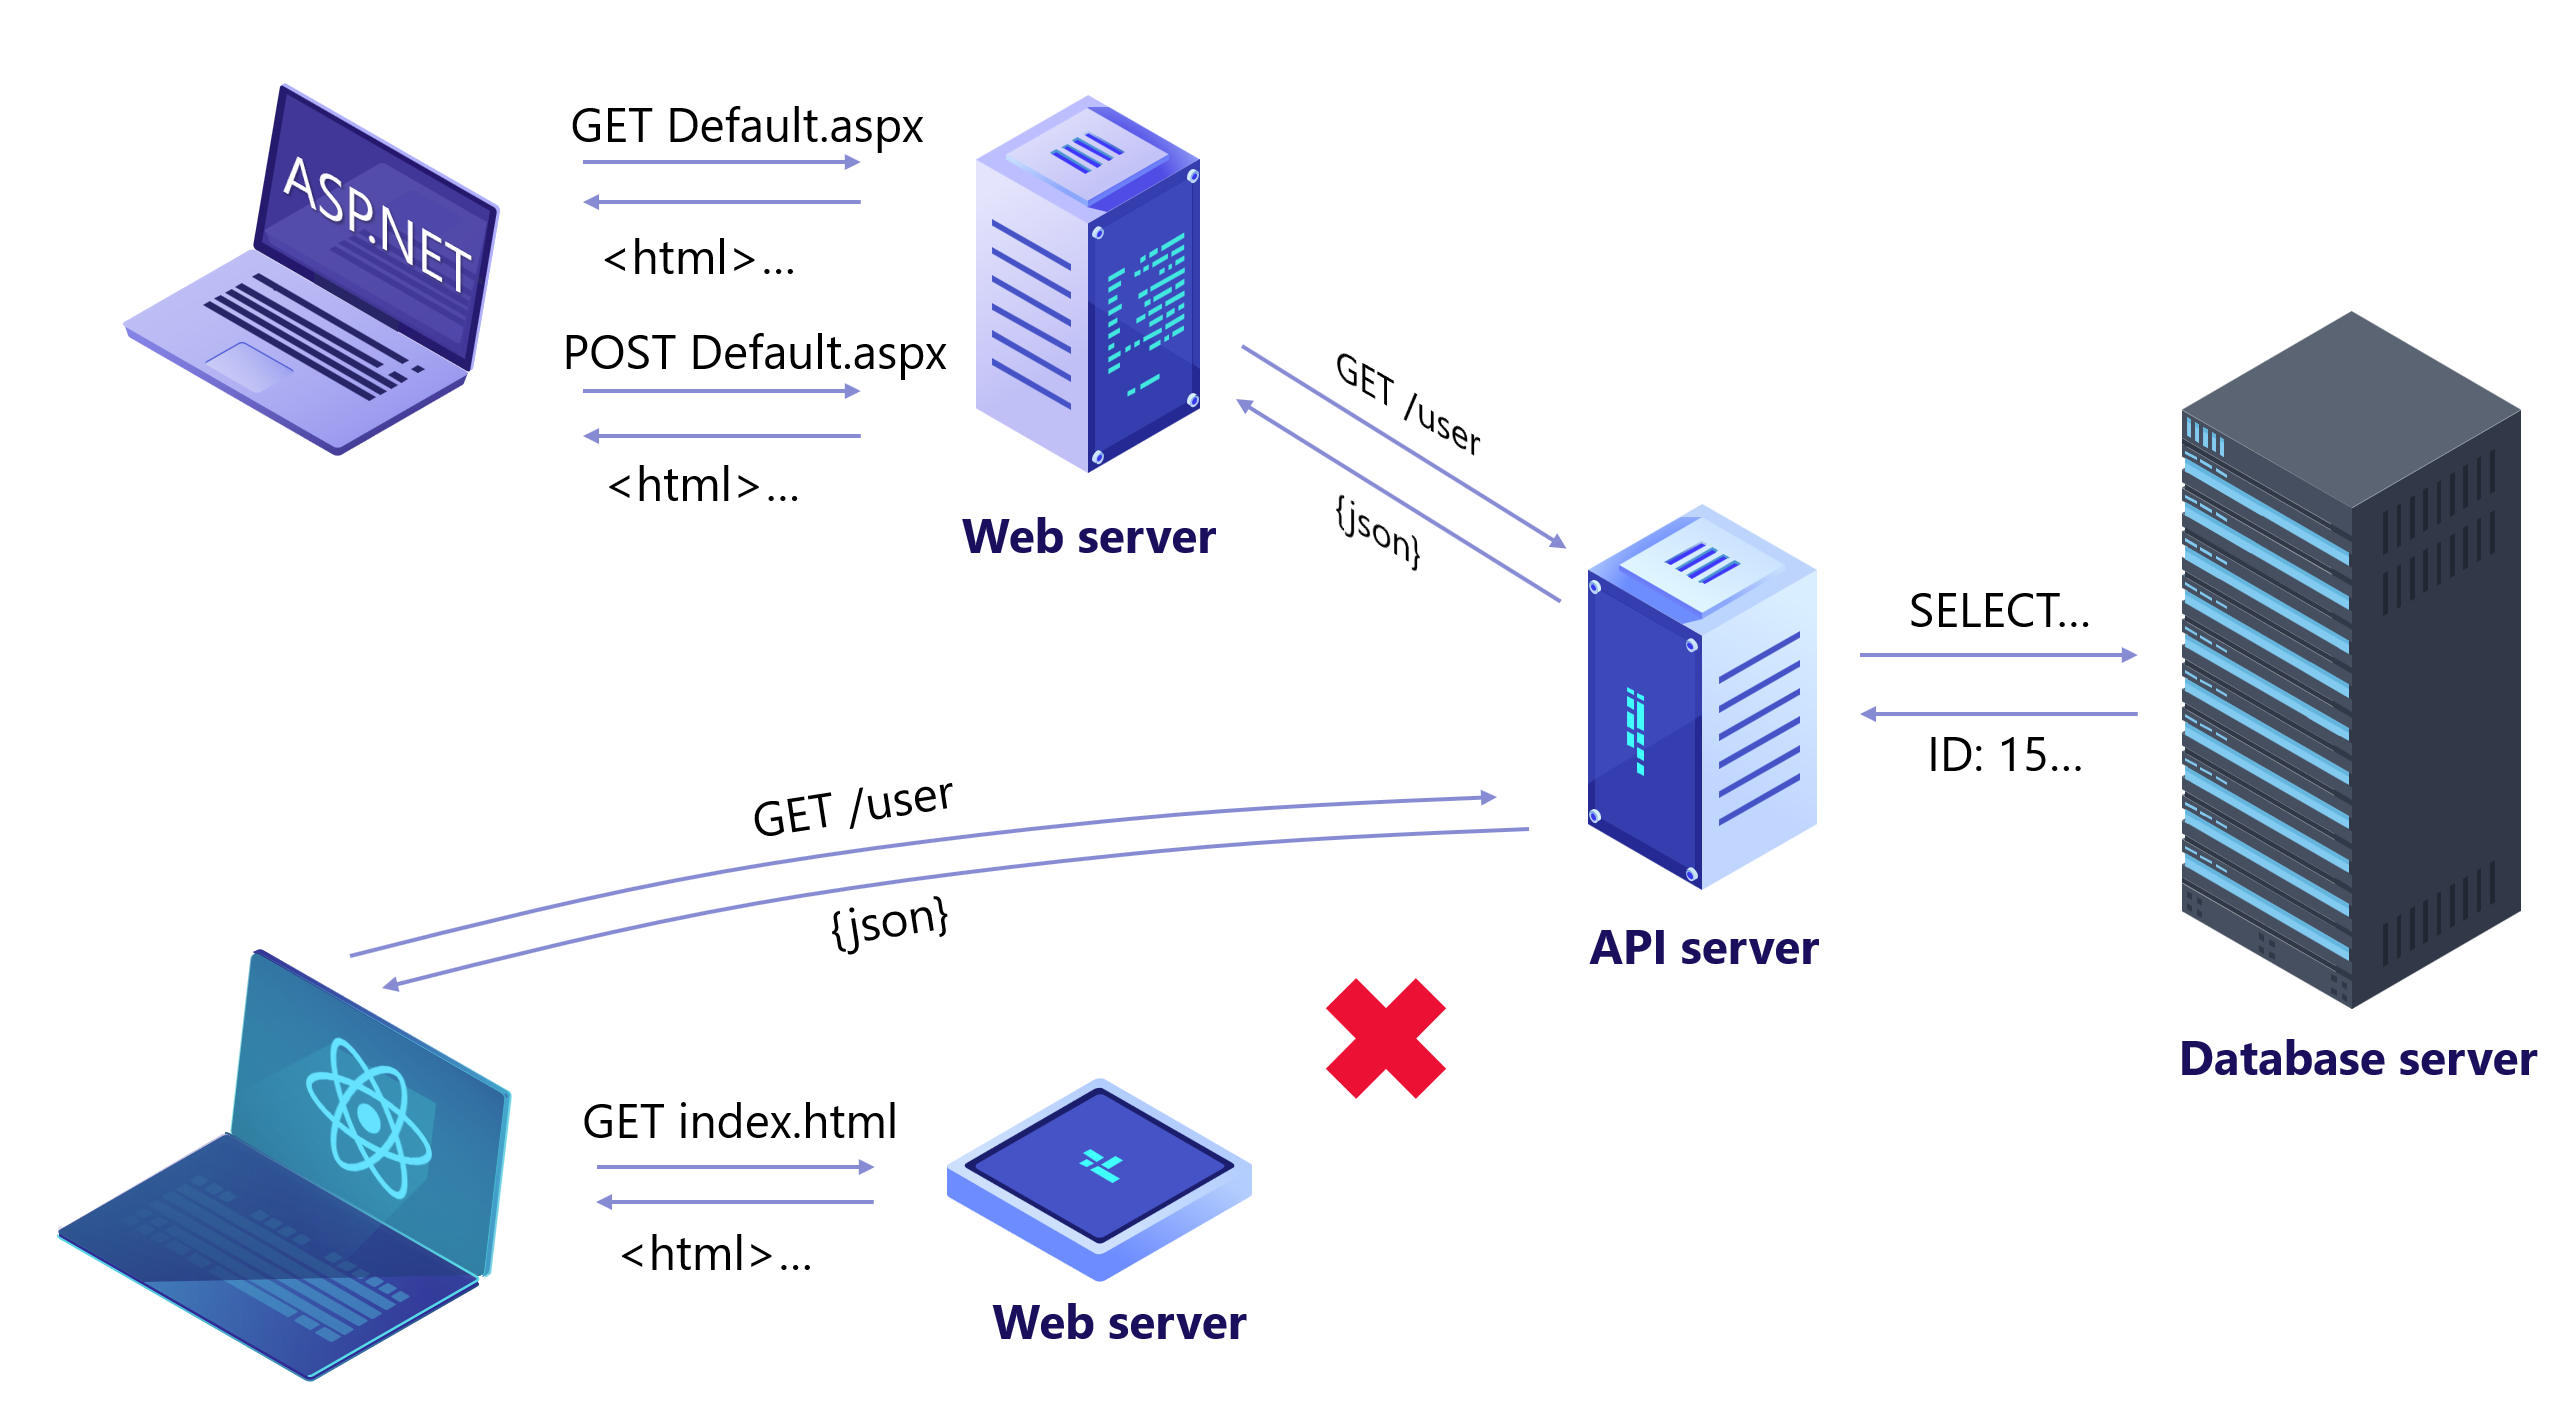
React.js application doesn’t have server-side code and runs entirely in the browser. We are going to leave server-side render (SSR) out of scope for now which is very different from the server-side button click handler in ASP.NET that I am talking about. As such React.js can’t handle things like database connectivity or intensive/distributed computations. React.js can only do what the browser can do, nothing more. React.js application relies on REST API calls to exchange data with the server. The entire application state runs in memory on the web page, as such, hitting F5 in the browser and reloading the page wipes the application state clean.
Can I use plain JavaScript code in React.js apps?
You bet! It is perfectly fine to have a bunch of JavaScript classes, constants, and functions that aren’t rendered in UI. The best application of custom JavaScript is the domain-specific object model. You are unlikely to find a pre-canned JavaScript library on the internet that does something unique to your business. Aside from that, you are better off using stable code beaten by years in production.
export const JavaScriptObject = {
    PropertyOne: 'ValueOne'
}

export function doJavaScriptFunction() {
    return JavaScriptObject.PropertyOne
}

export class JavaScriptClass {
    static getJavaScriptObject() {
        return JavaScriptObject.PropertyOne;
    }
}
Importing and consuming JavaScript in React.js is straightforward. It can be a state, property or participate in rendering.
import React from 'react'
import { JavaScriptObject, doJavaScriptFunction, JavaScriptClass } from '../javascript/greatCode';

export default class JavaScriptConsumer extends React.Component {
    render () {
        return <div>
            <div>{JavaScriptObject.PropertyOne}</div>
            <div>{doJavaScriptFunction()}</div>
            <div>{JavaScriptClass.getJavaScriptObject()}</div>
        </div>
    }
}
How to convert to and from Base64 in React.js?
A large swath of apps need to exchange binary data with the REST API. Sending raw byte stream over the wire is not a good idea for cross-platform compatibility. As such, most developers resort to Base64 for payload encoding. There are a few ways to do Base64 encoding and decoding on React.js. There are 3 ways to do it in React.js:
- Built-in atob() and btoa() functions are part of HTML specification
- Buffer.toString() allows conversion into base64 encoding.
- Base64 library
import React from 'react'

export default class Base64Operator extends React.Component {
    render () {
        // Encode into base64
        const base64encoded = Buffer.from("olegignat.com").toString('base64');
        const base64decoded = atob(base64encoded);

        return <div>
            <div>Base64 encoded: {base64encoded}</div>
            <div>Base64 decoded: {base64decoded}</div>
        </div>
    }
}
How to convert a UTF-8 string to and from a byte array in React.js?
There is a library or a class for pretty much any occasion in React.js. The most straightforward path is to use TextEncoder and TextDecoder.
import React from 'react'

export default class Utf8Operator extends React.Component {
    render () {
        const utf8UintArray = new TextEncoder('utf-8').encode("olegignat.com");
        const originalString = new TextDecoder('utf-8').decode(utf8UintArray);

        return <div>
            <div>Utf-8 buffer length: {utf8UintArray.length}</div>
            <div>Utf-8 decoded: {originalString}</div>
        </div>
    }
}
How to use setTimeout()/setInterval() in React.js?
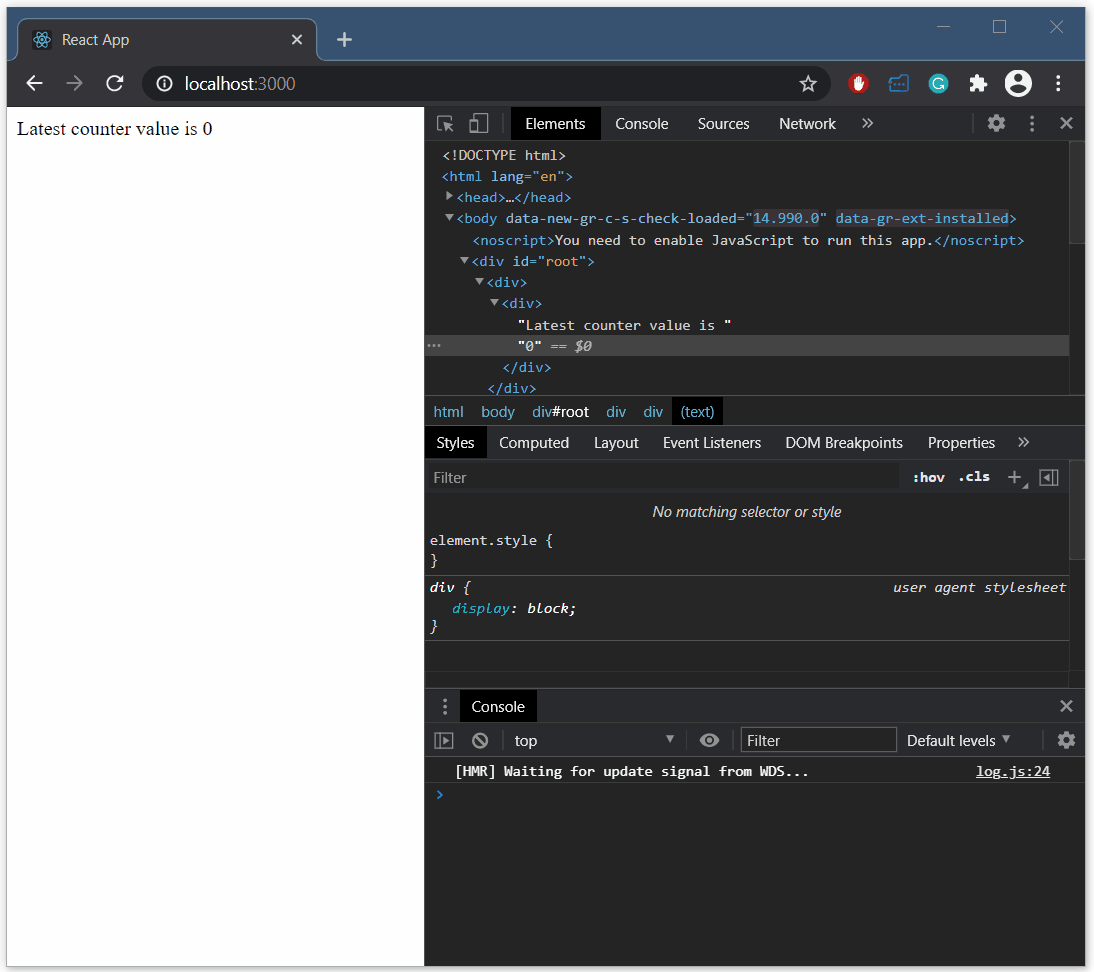
The React.js app is just another piece of JavaScript code running in the browser. Hence it can do just about anything JavaScript can do. In React.js, each component has state and properties that determine whether the component is re-rendered. Members of the class defined outside of this.state or this.props do not influence rendering decision by React.js. As such, if we want to have something update the component asynchronously or on a timer, it needs to change the state.
import React from 'react';

export default class TestComponent extends React.Component {
    constructor(props) {
        super(props);

        // We set initial state here explicitly, rather than this.setState()
        this.state = {
            counter: 0
        }

        // We need to capture the interval handle here to clear it when the component unmounts
        this.interval = null;
    }

    componentDidMount() {
        this.interval = setInterval(() => {
            this.setState({
                counter: this.state.counter + 1
            });
        }, 1000);
    }

    componentWillUnmount() {
        // Not clearing interval here will result in undefined behavior
        // JavaScript runtime will keep calling this.setState() even though component will have unmounted
        clearInterval(this.interval);
    }

    render() {
        return <div>Latest counter value is {this.state.counter}</div>;
    }
}
React.js will only re-render the part of the DOM that changed. render() will be not run if state and properties remain the same.
How to make an API call in React.js?
The answer to this question can be different depending on the context and criticality of the API call. If the API call is just an “effect” on the web page, which doesn’t really change the state of the application, then it can be part of the component code itself. For example, you may make a weather forecast API call to enhance the user experience, but if it fails – no big deal, the website keeps working as expected.
import React from 'react';

export default class TestComponent extends React.Component {
    constructor(props) {
        super(props);

        this.state = {
            response: null,
        }
    }

    componentDidMount() {
        // This is a most straightforward boring way of making an API call in React.js using "fetch" function
        fetch('https://jsonplaceholder.typicode.com/comments/5')
            .then(response => response.json())
            .then(json => this.setState({
                response: json
            }));
    }

    render() {
        return <div>Email: {this.state.response?.email}</div>;
    }
}
Conceptually the same but visually slightly fancier way of making an API call is using async/await pattern. Older browsers that don’t support it will get a fallback JavaScript code generated by Babel’s polyfill. Might as well add error handling – we need another property in the state to convey API call failure in the render() method.
import React from 'react';

export default class TestComponent extends React.Component {
    constructor(props) {
        super(props);

        this.state = {
            error: null,
            response: null,
        }
    }

    async componentDidMount() {
        try {
            // We can also use async/await syntactic sugar to make an API call
            const response = await fetch('https://jsonplaceholder.typicode.com/comments/5');

            // Non-transport errors need to be handled explicitly
            if (!response.ok) {
                throw new Error(response.status);
            }

            const payload = await response.json();

            this.setState({
                ...this.state,
                response: payload
            });
        }
        catch (e) {
            this.setState({
                ...this.state,
                error: e.message
            })
        }
    }

    render() {
        return <div>
            <div>Email: {this.state.response?.email}</div>
            <div>Error: {this.state.error}</div>
        </div>;
    }
}
So far we have dealt with the local state in the component. As long as the component is present on the page everything is good. However when the component unmounts this state goes away into the ether. What about a global state of the application – say, if you can’t log in you can’t see user private data? Obviously, it can’t be stored in the local component state. That’s the topic for the next section.
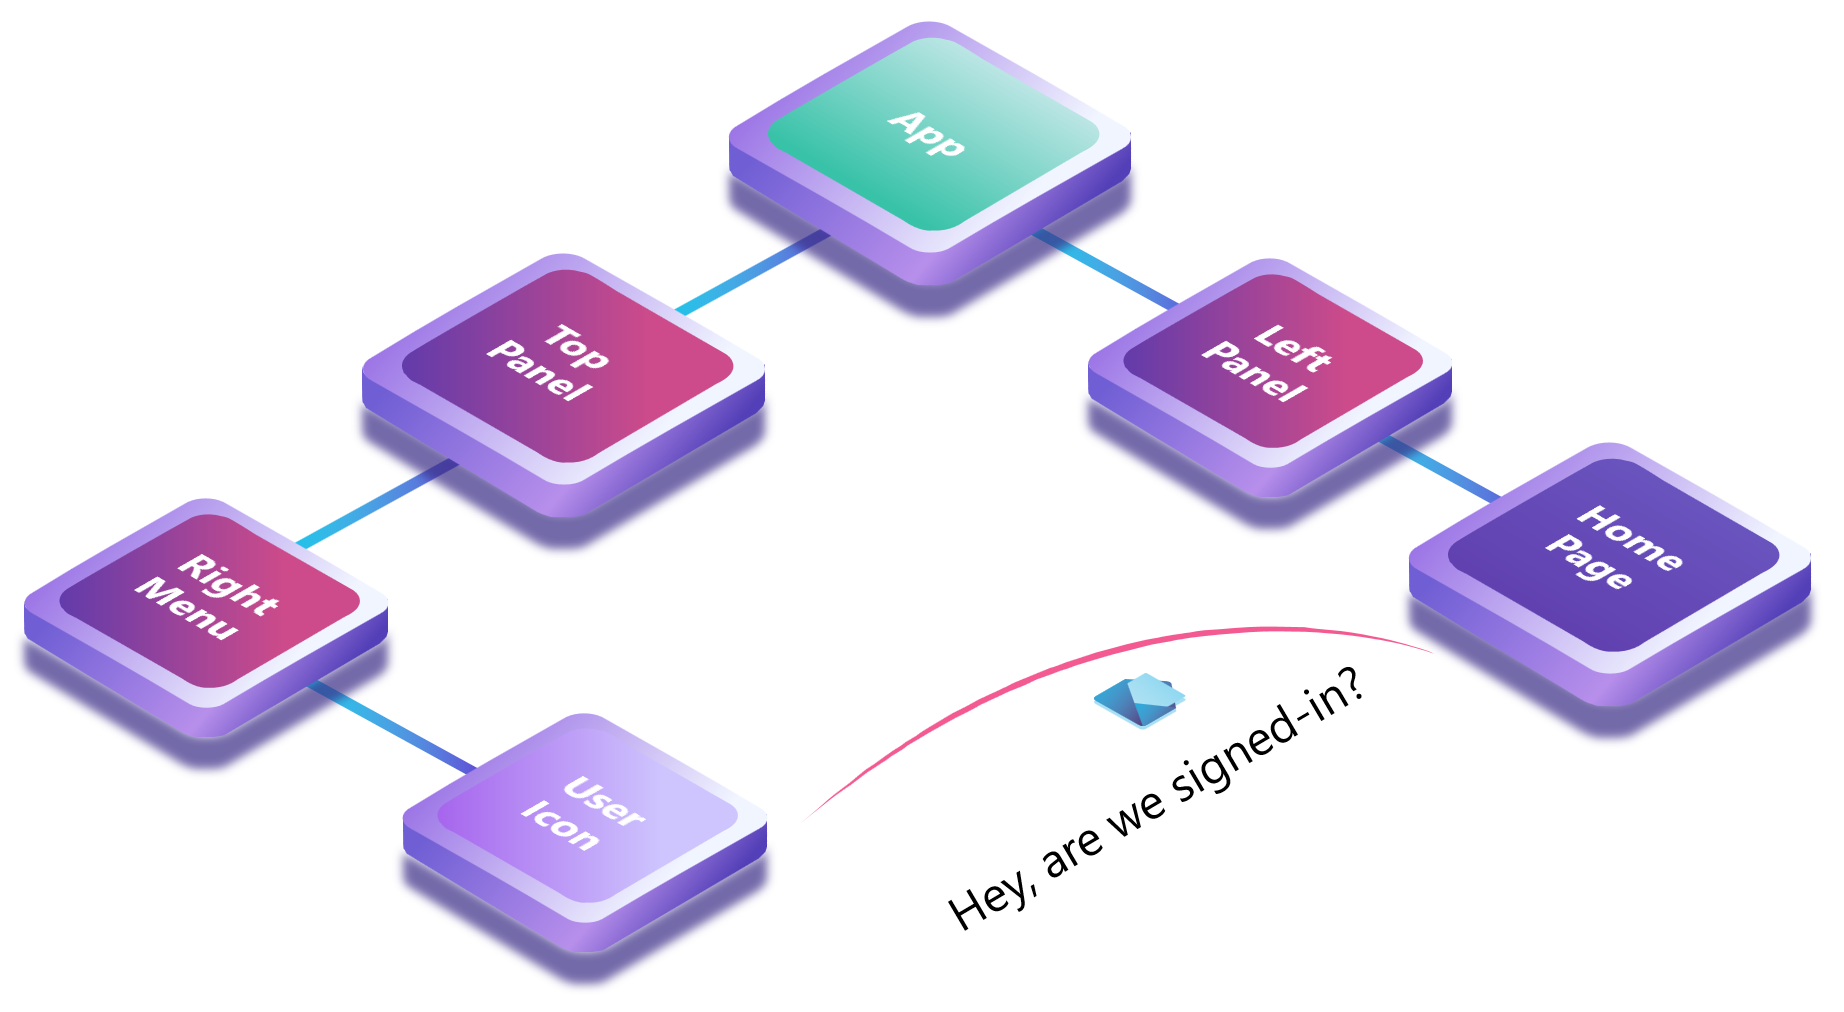
How to exchange data between two components in React.js?
This problem is very prevalent in any React.js app that is more complicated than a “Hello World”. The simplest example of such a problem is determining whether the user is authenticated and some basic information about the account. On one hand a component on the top-right corner of the screen may need to render a user icon with a log-out button. On the other hand – the home page component may need to know where to take the user immediately upon login. Somehow entire application needs to have a consistent view of the world. This is where the state container comes into the picture with Redux being the default go-to destination.
Similar to the local state in each component, the global state in Redux is also in-memory. When the page reloads the state is wiped clean. We will discuss the persistent state later in the article. The best way to think of Redux state as a simple framework providing two functions to every single component who asks:
- dispatch() is a function that any component can call to announce to the whole application that an event has occurred. Announcement is just a JSON object that an application developer decides to put together – there is no required contract for it.
- getState() provides access to this global state to any component that asks for it.
State propagation
The entire fancy state that Redux maintains is just a single JavaScript object. There are a few rules about modifying this state to keep it clean, but it is just a single object. It is almost as if an application had a singleton function getState() that returned an object.
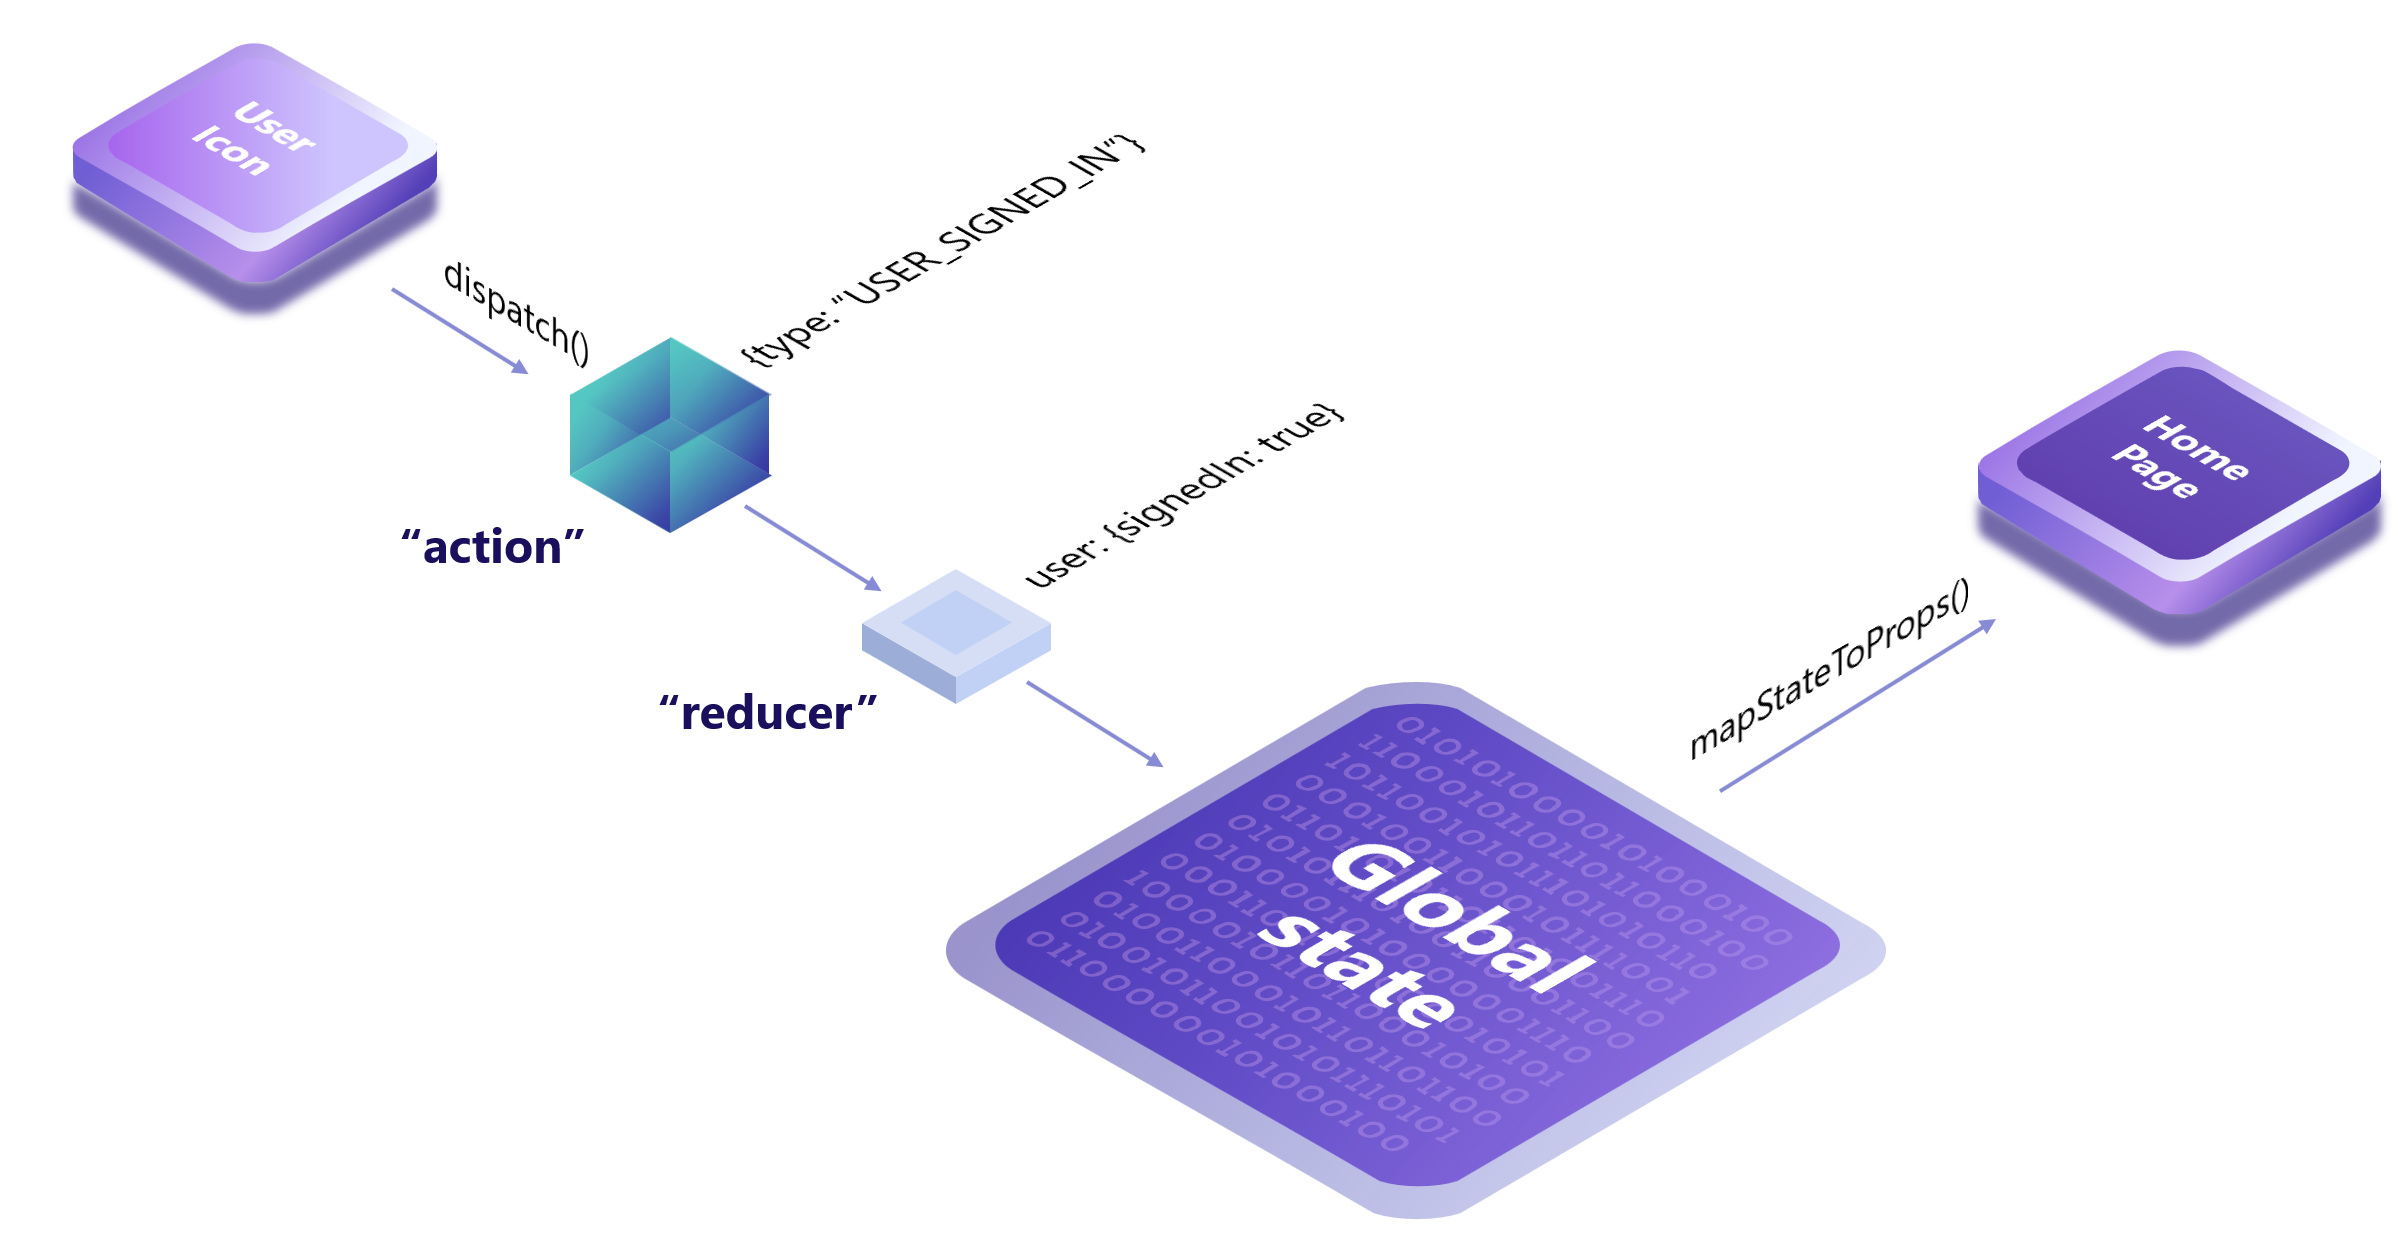
User Icon and Home Page components communicate via a global state, not directly. User Icon can publish an event, in Redux terms called “action”, that the user has completed the login procedure. This action will be picked up by a reducer that can recognize that event type – USER_SIGNED_IN, and return a new instance of that reducer’s state. Home Page will announce a function mapStateToProps() that knows how to interpret different parts of the global state and create its own component properties – this.props. When properties change, the Home Page component will be re-rendered by React.js and hence will get a chance to do something about user context change.
Create actions and reducers
There is an overwhelming amount of documentation on the web and videos on YouTube about Redux. In this section, we will focus on the most basic ingredients of state management – actions and reducers. We need to create a folder structure as shown in the picture below. It is not required, but it is a good practice to separate state from the rest of the app, as well as actions from reducers.
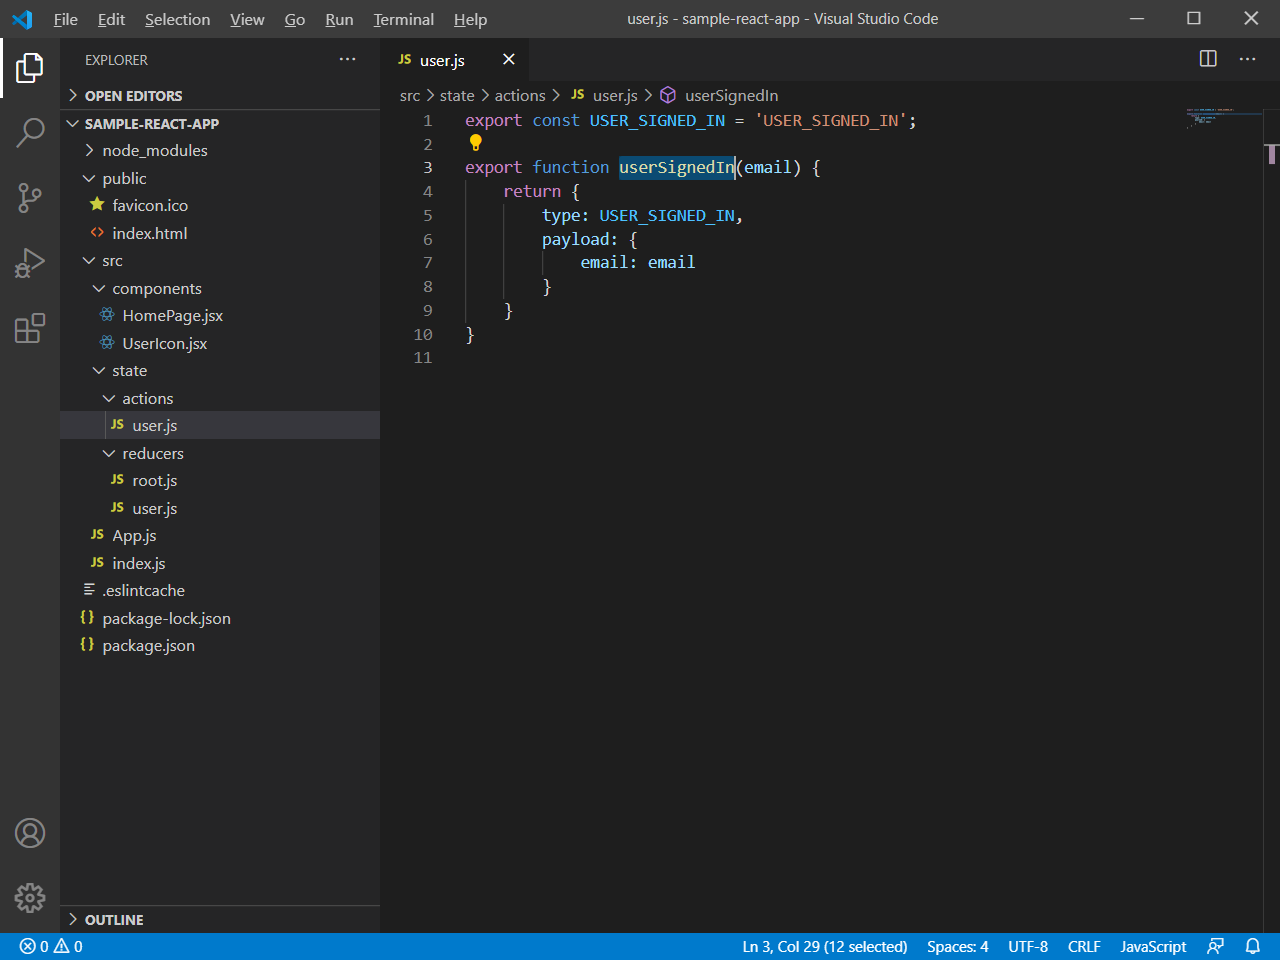
Action is fancy word for a function that returns a JSON object. There is really nothing to it. Object must be serializable so it is best to keep it plain and simple.
export const USER_SIGNED_IN = 'USER_SIGNED_IN';

export function userSignedIn(email) {
    return {
        type: USER_SIGNED_IN,
        payload: {
            email: email
        }
    }
}
Reducer is a fancy name for another function with a switch statement. It takes payload of each action and figures out how to blend it into the state. The key about reducer is that it must be pure.
import { USER_SIGNED_IN } from '../actions/user';

const initialState = {
    signedIn: false,
    email: null,
}

const userReducer = (state = initialState, action) => {
    switch (action.type) {
        case USER_SIGNED_IN:
            return {
                ...state,
                signedIn: true,
                email: action.payload.email
            }

        default:
            return state;
    }
}

export default userReducer;
We could have used our reducer directly in the store, but it is a good idea to wrap it with a combined reducer for future extensibility. The state store can have only 1 reducer so we will pass a combined reducer.
import userReducer from "./user";

import { combineReducers } from "redux";

const rootReducer = combineReducers({
    user: userReducer,
});

export default rootReducer;
Now we need to create a store in the application – we do it in the index.js. Redux store will be passed as a provider into the app so it must be created at a level above the app.
import React from 'react';
import { createStore } from 'redux';
import { Provider } from "react-redux";
import rootReducer from "./state/reducers/root";

import ReactDOM from 'react-dom';
import App from './App';

const store = createStore(rootReducer,
  // This is a Redux devtools Chrome extension integration, highly recommend.
  window.__REDUX_DEVTOOLS_EXTENSION__ && window.__REDUX_DEVTOOLS_EXTENSION__());

ReactDOM.render(
  <Provider store={store}>
    <App />
  </Provider>,
  document.getElementById('root')
);
Modify components to consult global state
At this point, we need two components as described in the example in the previous chapter. We will repurpose our TestComponent for UserIcon by renaming it and create another component HomePage from scratch.
UserIcon component makes an API call and stores the result in the local state. When user clicks the button UserIcon propagates local state to global state by calling this.props.userSignedIn() which is bound to dispatch() via bindActionCreators() .
import React from 'react';
import { connect } from 'react-redux';
import { bindActionCreators } from 'redux';
import { userSignedIn } from '../state/actions/user';

class UserIcon extends React.Component {
    constructor(props) {
        super(props);

        this.state = {
            error: null,
            response: null,
        }
    }

    async componentDidMount() {
        try {
            // We can also use async/await syntactic sugar to make an API call
            const response = await fetch('https://jsonplaceholder.typicode.com/comments/5');

            // Non-transport errors need to be handled explicitly
            if (!response.ok) {
                throw new Error(response.status);
            }

            const payload = await response.json();

            this.setState({
                ...this.state,
                response: payload
            });
        }
        catch (e) {
            this.setState({
                ...this.state,
                error: e.message
            })
        }
    }

    onSignInClick(e) {
        this.props.userSignedIn(this.state.response?.email);
    }

    render() {
        return <div>
            <div>Email: {this.state.response?.email}</div>
            <div>Error: {this.state.error}</div>
            <button onClick={this.onSignInClick.bind(this)}>Sign In</button>
        </div>;
    }
}

function mapStateToProps(state) {
    return {
    }
}

function mapDispatchToProps(dispatch) {
    return bindActionCreators({
        userSignedIn: userSignedIn,
    }, dispatch)
  };

  export default connect(
    mapStateToProps,
    mapDispatchToProps
  )(UserIcon);
Important part of HomePage component is mapStateToProps() that reads global state and extracts user information into local component properties. They are accessible to component’s render() method via this.props.
import React from 'react';
import { connect } from 'react-redux';
class HomePage extends React.Component {
render() {
return <div>
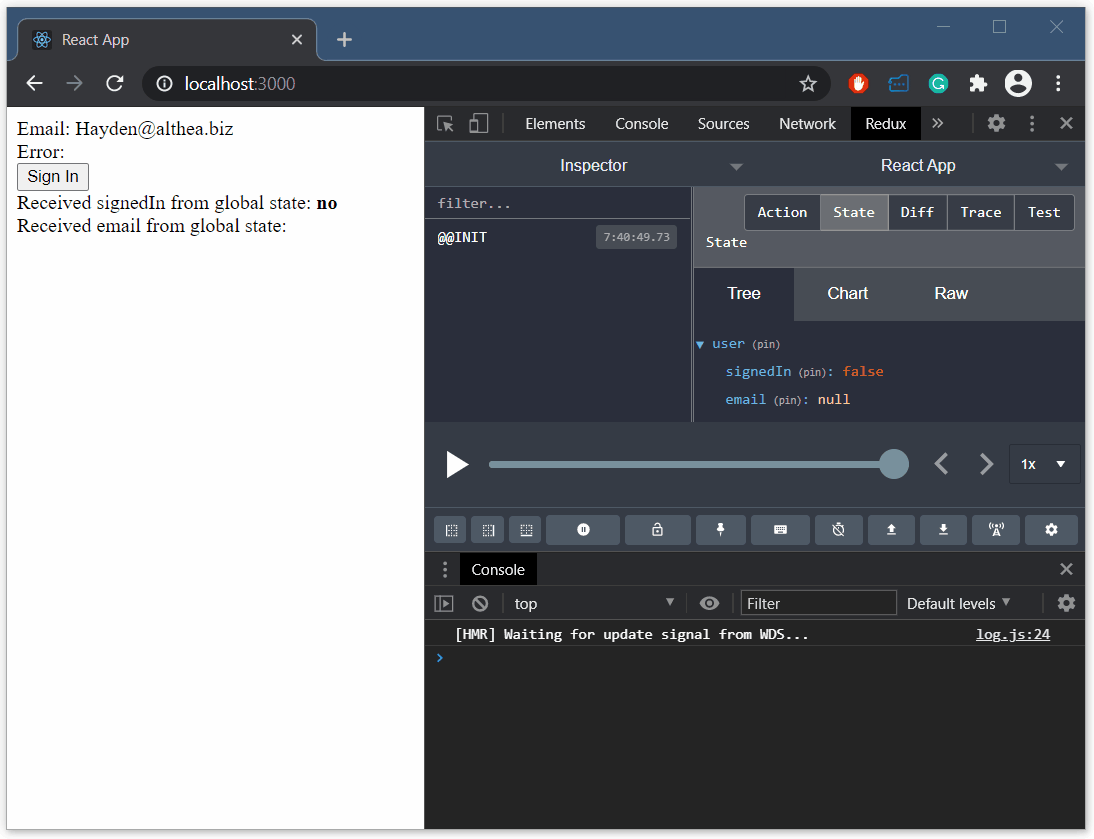
<div>Received signedIn from global state: <b>{this.props.signedIn ? "yes" : "no"}</b></div>
<div>Received email from global state: <b>{this.props.email}</b></div>
</div>;
}
}
function mapStateToProps(state) {
const { user } = state;
return {
signedIn: user.signedIn,
email: user.email
}
};
export default connect(
mapStateToProps
)(HomePage);Last part is straightforward – stitch both components together under one roof.
import UserIcon from './components/UserIcon';
import HomePage from './components/HomePage';

function App() {
  return (
    <div>
      <UserIcon />
      <HomePage />
    </div>
  );
}

export default App;
We are able to achieve the experience we desired. One component calls an API and holds on to the result. When the user clicks the button, the component submits an action into the store. Reducer picks it up and applies to global state. This, in turn, triggers another component to derive its own properties from the global state.
How to call API in React.js using Redux?
This question doesn’t make sense as written but it is likely that people will google just that. So if you are here because you typed this question in search engine let’s figure it out.
Redux state doesn’t allow running custom code – it is a simple publisher/subscriber model for state management inside the app. However, most apps do need to change state depending on API calls. Popular middleware redux-thunk helps us solve this problem. All it does really is enable developers to “dispatch()” not only Redux actions but also custom JavaScript functions that do stuff.
We need 3 actions to track API call status, because it is critical that at any point in time an entire application is aware of where the API call stands. This is a standard practice in development community.
export const API_CALL_PENDING = 'API_CALL_PENDING';
export const API_CALL_SUCCESS = 'API_CALL_SUCCESS';
export const API_CALL_FAILURE = 'API_CALL_FAILURE';

export function apiCallPending() {
    return {
        type: API_CALL_PENDING
    }
}

export function apiCallSuccess(result) {
    return {
        type: API_CALL_SUCCESS,
        payload: {
            result: result
        }
    }
}

export function apiCallFailure(error) {
    return {
        type: API_CALL_FAILURE,
        error: error
    }
}
To handle these actions we need a reducer, just like we discussed in the previous section. This reducer will keep track of the API call status with 3 properties in the state – pending, result and error.
import { API_CALL_PENDING, API_CALL_SUCCESS, API_CALL_FAILURE } from '../actions/apiCall';

const initialState = {
    pending: false,
    result: null,
    error: null
}

const apiCallReducer = (state = initialState, action) => {
    switch (action.type) {
        case API_CALL_PENDING:
            return {
                ...state,
                pending: true,
            }

        case API_CALL_SUCCESS:
            return {
                ...state,
                pending: false,
                result: action.payload.result,
                error: null
            }

        case API_CALL_FAILURE:
            return {
                ...state,
                pending: false,
                result: null,
                error: action.error
            }

        default:
            return state;
    }
}

export default apiCallReducer;

export const getApiCallPending = state => state.pending;
export const getApiCallResult = state => state.result;
export const getApiCallError = state => state.error;
Register our new reducer with the combined reducer
Remember we created a combined reducer called rootReducer a few paragraphs above? It will come in handy for this example. We will simply add another line into that reducer and add another record into our state store.
import userReducer from "./user";
import apiCallReducer from "./apiCall";

import { combineReducers } from "redux";

const rootReducer = combineReducers({
    user: userReducer,

    // Property "api" here must match the property we reference in the state inside mapStateToProps() below
    api: apiCallReducer,
});

export default rootReducer;
Function that wraps API call
Now we need a single function that wraps an API call with the calls into the Redux dispatch() method. It will notify the state before the API call starts to let the rest of the application know the call is in progress. It will then post either completion or failure notification with the result. Any component that depends on this state can take this opportunity to re-render the view.
import { apiCallPending, apiCallSuccess, apiCallFailure } from './actions/apiCall';

export function doApiCall() {
    return async (dispatch) => {
        dispatch(apiCallPending());

        try {
            const response = await fetch('https://jsonplaceholder.typicode.com/comments/5');

            if (!response.ok) {
                throw Error(response.status);
            }

            const json = await response.json();
            dispatch(apiCallSuccess(json));
        }
        catch (error) {
            dispatch(apiCallFailure(error.message));
        }
    }
}
Install redux-thunk middleware
Before we can dispatch this function we need to add redux-thunk middleware to the store.
import React from 'react';
import { applyMiddleware, createStore } from 'redux';
import { Provider } from "react-redux";
import reduxThunk from 'redux-thunk';

// This is how you can integrate Redux development tools when you install middleware
import { composeWithDevTools } from 'redux-devtools-extension';

import rootReducer from "./state/reducers/root";

import ReactDOM from 'react-dom';
import App from './App';

// Collection of middleware to apply for current scenario has only 1 element
const middlewares = [reduxThunk];

const store = createStore(
  rootReducer,
  composeWithDevTools(
      applyMiddleware(...middlewares)));

ReactDOM.render(
  <Provider store={store}>
    <App />
  </Provider>,
  document.getElementById('root')
);
Integrate custom API function with the component
We will create a brand new component to keep example clean but the same idea will work with existing component just fine.
import React from 'react';
import { connect } from 'react-redux';
import { bindActionCreators } from 'redux';

// Notice that this is no longer an action,
// but rather the function we created to call API and dispatch actions
import { doApiCall } from '../state/doApiCall';

class ApiCallOperator extends React.Component {
    onCallApiClick(e) {
        // This call will invoke dispatch() because this property was bound to dispatch with bindActionCreators() call
        this.props.doApiCall();
    }

    render() {
        return <div>
            <div>Api Call Pending: {this.props.isApiCallPending ? "yes" : "no"}</div>
            <div>Api Call Result: {this.props.apiCallResult?.email}</div>
            <div>Api Call Error: {this.props.apiCallError}</div>
            <button onClick={this.onCallApiClick.bind(this)}>Call API</button>
        </div>;
    }
}

function mapStateToProps(state) {
    // Pin the state from the store for API call status
    const { api } = state;

    return {
        isApiCallPending: api.pending,
        apiCallResult: api.result,
        apiCallError: api.error
    }
}

function mapDispatchToProps(dispatch) {
    return bindActionCreators({
        doApiCall: doApiCall,  // This doApiCall is a function that will run on our middleware
    }, dispatch)
  };

  export default connect(
    mapStateToProps,
    mapDispatchToProps
  )(ApiCallOperator);
Once we register the component above with the App component we will get the experience shown below. It is hard to notice because API call runs very fast, but for a brief moment “Api Call Pending” switches to “yes” and then back to “no”.

How to chain multiple actions in Redux?
Reasonably complex applications perform sequences of API calls and computations to provide rich user experience. For example – fetch user information, discover user location, check against known rules to apply to current user location, etc. Redux-thunk helps composing multiple actions into a single action to trigger on event.
Imagine we have added another “doAnotherApiCall()” function similar to the “doApiCall()” discussed above.
import { doApiCall } from './doApiCall';
import { doAnotherApiCall } from './doAnotherApiCall';

export function doApiCallChain() {
    // Notice getState argument - it provides access to the state
    // if the subsequence API call relies on the result of the previous one.
    return async (dispatch, getState) => {
        // Dispatch the first API call sequence
        await dispatch(doApiCall());

        // Get the result of the first API call
        const firstApiCallResult = getState().api.result;

        // Dispatch the second API call sequence
        return dispatch(doAnotherApiCall(firstApiCallResult));
    }
}
Now we can bind this action and invoke it inside the component. It will orchestrate the execution of the first API call, then get the rest, then make another API call. In the Redux debugger, we will see API_CALL_PENDING ⟶ API_CALL_SUCCESS ⟶ ANOTHER_API_CALL_PENDING ⟶ ANOTHER_API_CALL_SUCCESS action sequence.
How to localize React.js application in multiple languages?
Localization can be an expensive and painstaking afterthought in the project, so it is best-addressed upfront. When the whole application is hardcoded in English, then adding support for French will require hunting down all strings, including dynamically computed ones (assuming English language rules), moving them into a separate file, and re-thinking UI layout. To avoid this problem wise developers add localization during the very first component and amortize localization cost over the lifespan of the project.
We need 3 packages to add localization support in React.js app. Yeah, I know we could just type them all in 1 line.
npm install i18next
npm install react-i18next
npm install i18next-browser-languagedetector
Create i18n.js file in the application root folder and put the following content inside.
import i18n from 'i18next';
import LanguageDetector from 'i18next-browser-languagedetector';
import englishTranslations from './locales/en/translations.json';
i18n
.use(LanguageDetector)
.init({
debug: true,
lng: "en",
fallbackLng: "en", // use en if detected lng is not available
supportedLngs: ["en"],
// This saves the need to code Suspense components while primary component is loading
react: {
useSuspense: false,
},
resources: {
en: {
translations: englishTranslations
},
},
// have a common namespace used around the full app
ns: ["translations"],
defaultNS: "translations"
});
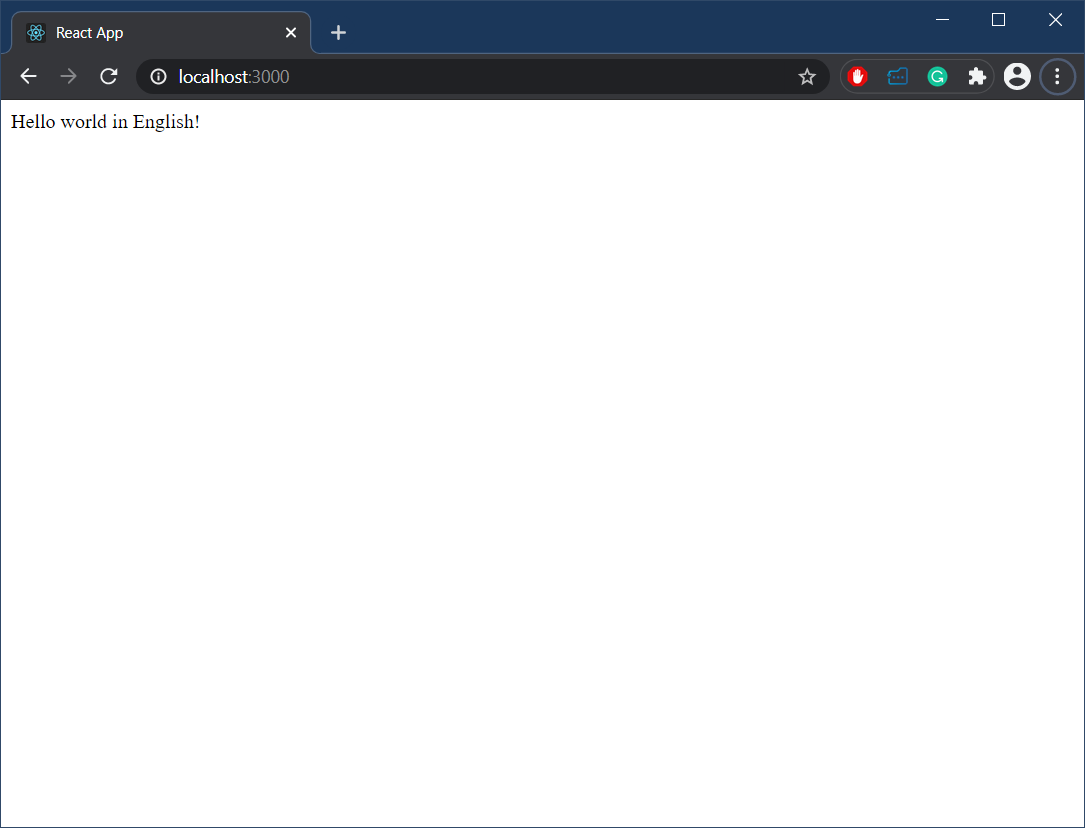
export default i18n;We need to create translation files for each language the app supports. It is perfectly fine to start with just 1 language initially and add all other languages in bulk at the end.
{
    "category": {
        "text": "Hello world in English!"
    }
}
Localization in i18next library is implemented as a provider so we need to wrap our entire App component with another provider. Our index.js already has a lot of stuff, we will pile localization on top to give a holistic picture.
import React from 'react';
import { applyMiddleware, createStore } from 'redux';
import { Provider } from "react-redux";
import reduxThunk from 'redux-thunk';
import { composeWithDevTools } from 'redux-devtools-extension';

// Localization support
import { I18nextProvider } from "react-i18next";
import i18n from "./i18n";

import rootReducer from "./state/reducers/root";

import ReactDOM from 'react-dom';
import App from './App';

const middlewares = [reduxThunk];

const store = createStore(
  rootReducer,
  composeWithDevTools(
    applyMiddleware(...middlewares)));

ReactDOM.render(
  <I18nextProvider i18n={i18n}>
    <Provider store={store}>
      <App />
    </Provider>
  </I18nextProvider>,
  document.getElementById('root')
);
For simplicity we will create a new component that demonstrates localization itself and register it with the App component.
import React from 'react'
import { withTranslation } from 'react-i18next';

class TranslationOperator extends React.Component {
    render () {
        // Translation shortcut
        const { t } = this.props;

        return <div>
            <span>{t("category.text")}</span>
        </div>
    }
}

export default withTranslation()(TranslationOperator);
That’s it. Our text comes from localization file and the app is ready to support any other language in due time.