

Salesforce offers a super cool metadata-driven platform that businesses shape to their needs. Anything a user can do in the UI, a developer can also do via the API. This is great for you as a developer, if you’ve are looking to build a Salesforce integration. One thing you may find challenging, despite the abundance of documentation, is how to start? It is obvious that the first step is to authenticate your application to the Salesforce org, but how do you do that? In this post we will go through detailed step-by-step instructions on how to configure a Connected App, authenticate to it from a Java app, obtain CDP token and perform a metadata API call.
Let’s assume you already have an org and you followed official Salesforce documentation to the letter but something doesn’t work.

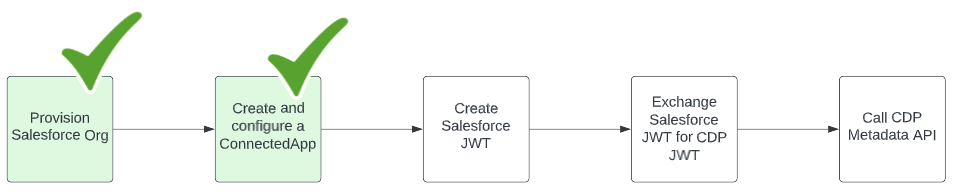
Create and configure a Connected App
Salesforce Connected App is a mechanism that enables 3rd party integrations to send API traffic to the Salesforce Org. Connected Apps support interactive logins for users (similar to how apps request access to your Facebook or Google profile) as well as non-interactive logins for programmatic background worker type of access. In this post we are interested in the latter. When a worker node of a 3rd party application sends a request to the Salesforce API, there is no user sitting at the console and there is no browser to render access request page. All necessary authentication credentials need to be configured and encoded ahead of time.
Most of the information in this section is also available on official Salesforce documentation for Marketing Cloud Connected App, if you are able to follow instructions without pictures. If not, keep reading.
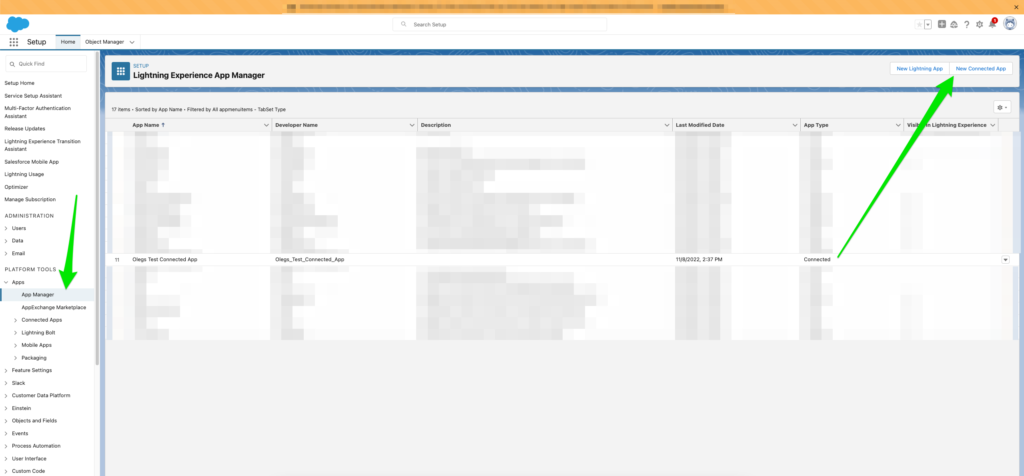
The first thing to do is to open Setup page for the org by clicking the gear box in the top right corner of the screen, then navigate on the left panel to “Apps” and open “App Manager“. Click “New Connected App” button on the top right part of the Lightning Experience App Manager window. We are not going to be actually writing an app now, we just need to configure authentication method for our future app.
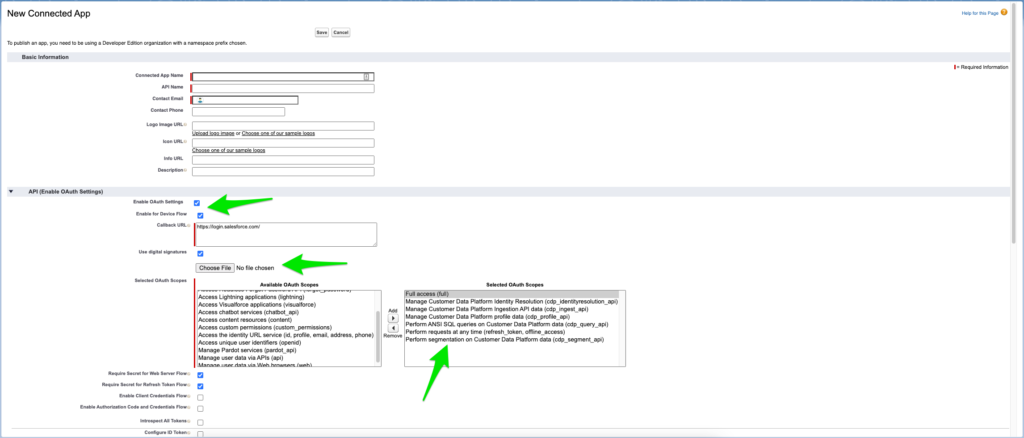
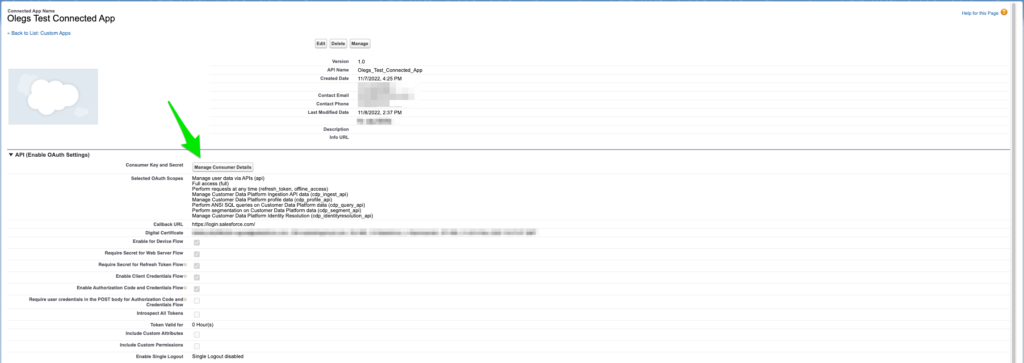
Out of all settings the most important on this page are:
- Enable OAuth Settings – this is what will allow our application to use JWT tokens
- Enable for Device Flow
- Use digital signatures – this setting will allow the application to login with a certificate-signed assertion. Follow these instructions to create a self-signing certificate if you don’t have one or you are not planning to use a certificate with a valid chain of trust. Upload the public portion of the certificate, not the private key.
- Selected OAuth Scopes
It is important to select at least the following scopes to allow application to login. Beyond these scopes, other scopes are application specific. In the screenshot above I have selected all cdp_* scopes as well since this article talks about CDP token.
- Full access (full)
- Perform requests at any time (refresh_token, offline_access)
Policies
That’s all we need to configure on the app creation page. We are about 1/3 of the way done configuring the application. The following screenshot appears after creation of the Connected App.
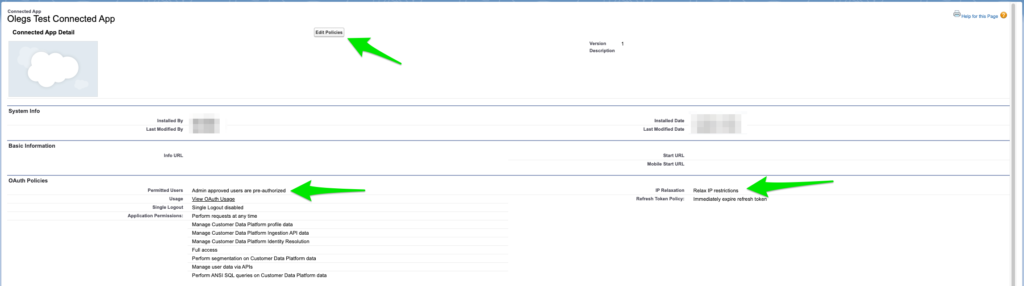
We need to click “Edit Policies” button at the top and configure the following settings correctly:
- Permitted Users is set to “Admin approved users are pre-authorized“
- IP Relaxation is set to “Relax IP restrictions“
I know that security-minded readers will experience a stack dump after reading the line above. That’s OK, you can bring IP Relaxation policy back to strict state once your application is working. Do not panic.
Permission Sets
You have to configure this contraption in order for authentication sequence for the application to complete successfully. If Permission Sets are not configured your application will fail to login.
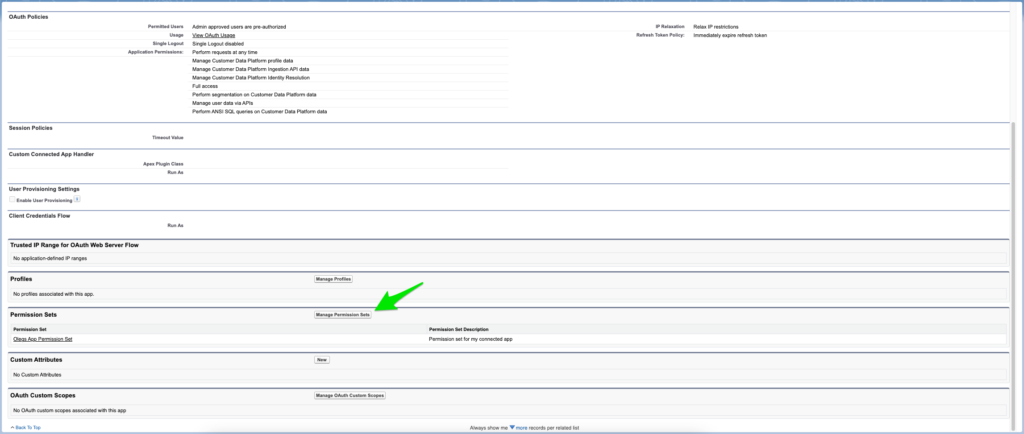
Create a new and empty Permission Set, give a description that you like. After that, click “Add Assignments” button and choose an existing user from your Salesforce Org.

Connected App configuration is complete. Everything is ready for our client app to send authentication request.
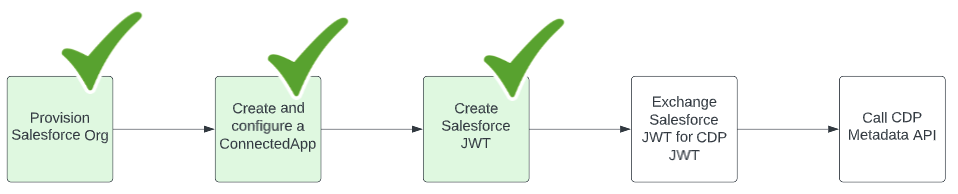
Mint Salesforce JWT token
To get the token we will need 4 pieces of information. The first piece is the identifier of the Connected App we just provisioned above. On the left hand side of the navigation bar go to “Apps” ⟶ “Connected Apps” then select your newly created app and choose “View” from the drop down list on the right side of the screen. On the next page, click “Manage Consumer Details” to reveal client ID and client secret. We will not need the secret, however we will need Client Id. Copy it into the notepad.
The next piece of data is the login of the user on who’s behalf we are going to be requesting token. This should be the same user we added into the Permission Sets in the section above. The login should be in the format <login>@salesforce.com. Copy the login into the notepad next to the Client Id.
To get the token we need to to issue a HTTP POST request to the metadata URL for your Salesforce Org. Compile the destination URL for the POST request by pre-pending “login” next to the Salesforce Org FQDN. For example, if your org is “https://amazingorg.salesforce.com” then token FQDN will be “https://login.amazingorg.salesforce.com“. Write down your login URL after the user login in the notepad for future use.
Finally, we are almost there. We need to convert the self-signing certificate private key we just created in the section above into PEM format. Java application we will be writing will consume PEM format hence we need to prepare the input – openssl to the rescue.
openssl pkcs8 -topk8 -inform PEM -outform DER -in server.key -out server_key2.pem -nocryptCreate and sign an assertion
We’ve got all the information we need to get the token. Let’s write a Java console app get the token for us programmatically. To start with, we will create a class “JwtAuthGenerator” and define 4 constants in it. The values for those constants will come from our notepad.
public class JwtAuthGenerator {
	// System-generated identifier of a connected app copied from Connect App page
	// in the Setup section of the core org.
	private static final String ClientId = "<Connected App Client id goes here>";

	// Name of the user requesting the token
	private static final String UserLogin = "<user login@salesforce.com goes here>";

	// Login URL of the target instance of Salesforce
	// MAKE SURE IT DOES NOT END WITH "/"
	private static final String LoginUrl = "<Login URL goes here>";

	// Path on the local file system where private key of self-signed the
	// certificate is stored
	private static final String PrivateKeyPEMFilePath = "/Users/oignat/cert/server_key2.pem";
}
Time to write a method that will generate JWT assertion. This assertion encodes identity and authentication material.
public class JwtAuthGenerator {

//
// ...
//

	private static String generateJwtAssertion() throws Exception {

		final String header = "{\"alg\":\"RS256\"}";
		final String claimTemplate = "'{'\"iss\": \"{0}\", \"sub\": \"{1}\", \"aud\": \"{2}\", \"exp\": \"{3}\"'}'";

		StringBuffer token = new StringBuffer();

		// Encode the JWT Header and add it to our string to sign
		token.append(Base64.encodeBase64URLSafeString(header.getBytes("UTF-8")));

		// Separate with a period
		token.append(".");

		// Create the JWT Claims Object
		String[] claimArray = new String[4];
		claimArray[0] = JwtAuthGenerator.ClientId;
		claimArray[1] = JwtAuthGenerator.UserLogin;
		claimArray[2] = JwtAuthGenerator.LoginUrl;
		claimArray[3] = Long.toString((System.currentTimeMillis() / 1000) + 300);

		MessageFormat claims;
		claims = new MessageFormat(claimTemplate);
		String payload = claims.format(claimArray);

		// Add the encoded claims object
		token.append(Base64.encodeBase64URLSafeString(payload.getBytes("UTF-8")));

		// Load the private key from a keystore
		byte[] key = Files.readAllBytes(Paths.get(JwtAuthGenerator.PrivateKeyPEMFilePath));
		KeyFactory keyFactory = KeyFactory.getInstance("RSA");
		PKCS8EncodedKeySpec keySpec = new PKCS8EncodedKeySpec(key);
		PrivateKey privateKey = keyFactory.generatePrivate(keySpec);

		// Sign the JWT Header + "." + JWT Claims Object
		Signature signature = Signature.getInstance("SHA256withRSA");
		signature.initSign(privateKey);
		signature.update(token.toString().getBytes("UTF-8"));
		String signedPayload = Base64.encodeBase64URLSafeString(signature.sign());

		// Separate with a period
		token.append(".");

		// Add the encoded signature
		token.append(signedPayload);

		return token.toString();
	}
}
Obtain the token
The last step is to send this assertion to the metadata URL and obtain the token from Salesforce authentication service.
public class JwtAuthGenerator {

//
// ...
//
	static class OauthToken {
		public String AccessToken;
		public String InstanceUrl;
	}

	// Get the token from Salesforce login end-point
	private static OauthToken getOAuthToken() throws Exception {
		String jwtAssertion = JwtAuthGenerator.generateJwtAssertion();

		String response = JwtAuthGenerator.sendHttpPostRequest(
				String.format("%s/services/oauth2/token", JwtAuthGenerator.LoginUrl),
				String.format("grant_type=urn:ietf:params:oauth:grant-type:jwt-bearer&assertion=%s", jwtAssertion));

		JsonElement jElement = JsonParser.parseString(response);
		JsonObject  jObject = jElement.getAsJsonObject();

		OauthToken oauthToken = new JwtAuthGenerator.OauthToken();
		oauthToken.AccessToken = jObject.get("access_token").getAsString();
		oauthToken.InstanceUrl = jObject.get("instance_url").getAsString();
		return oauthToken;
	}

	// Utility function that sends HTTP POST request
	private static String sendHttpPostRequest(String url, String body)
			throws URISyntaxException, IOException, InterruptedException {
		HttpClient httpclient = HttpClient.newBuilder()
				.version(Version.HTTP_1_1)
				.connectTimeout(Duration.ofSeconds(20))
				.build();

		HttpRequest httpRequest = HttpRequest.newBuilder()
				.uri(new URI(url))
				.setHeader("Content-Type", "application/x-www-form-urlencoded")
				.POST(HttpRequest.BodyPublishers.ofString(body))
				.build();

		HttpResponse<String> response = httpclient.send(httpRequest, BodyHandlers.ofString());

		return response.body();
	}
}
We will use this code to get the token and confirm that it works as expected.
public class JwtAuthGenerator {

//
// ...
//

	public static void main(String[] args) {
		try {
			OauthToken jwtSalesforceToken = JwtAuthGenerator.getOAuthToken();

			System.out.println(jwtSalesforceToken.AccessToken);
			System.out.println(jwtSalesforceToken.InstanceUrl);

		} catch (Exception e) {
			e.printStackTrace();
		}
	}
}
The hardest part is complete. Once we have a Salesforce token everything that follows is straightforward.
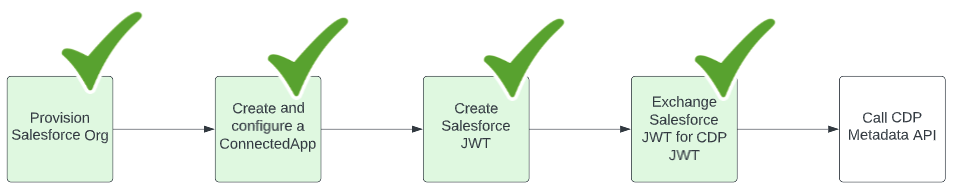
Exchange Salesforce JWT token for CDP JWT token
Even thought this part is straightforward we will still write code to demonstrate it as we need CDP token to invoke CDP API.
public class JwtAuthGenerator {

//
// ...
//

	private static OauthToken exchangeForCdpToken(OauthToken salesforceToken) throws Exception {
		String response = JwtAuthGenerator.sendHttpPostRequest(
				String.format("%s/services/a360/token", salesforceToken.InstanceUrl),
				String.format("grant_type=urn:salesforce:grant-type:external:cdp&subject_token=%s&subject_token_type=urn:ietf:params:oauth:token-type:access_token", salesforceToken.AccessToken));

		JsonElement jElement = JsonParser.parseString(response);
		JsonObject  jObject = jElement.getAsJsonObject();

		OauthToken oauthToken = new JwtAuthGenerator.OauthToken();
		oauthToken.AccessToken = jObject.get("access_token").getAsString();
		oauthToken.InstanceUrl = jObject.get("instance_url").getAsString();
		return oauthToken;
	}

	public static void main(String[] args) {
		try {
			OauthToken jwtSalesforceToken = JwtAuthGenerator.getOAuthToken();

			System.out.println(jwtSalesforceToken.AccessToken);
			System.out.println(jwtSalesforceToken.InstanceUrl);

			OauthToken jwtCdpToken = JwtAuthGenerator.exchangeForCdpToken(jwtSalesforceToken);

			System.out.println(jwtCdpToken.AccessToken);
			System.out.println(jwtCdpToken.InstanceUrl);

		} catch (Exception e) {
			e.printStackTrace();
		}
	}
}
This application will print both Salesforce and CDP JWT tokens. If you run this app and it doesn’t work it means that you likely missed a step.
Request CDP Profile Metadata
For the purposes of demonstration we are going to invoke Profile Metadata API, however other CDP API will work the same way.
public class JwtAuthGenerator {

//
// ...
//

	private static JsonObject requestCdpProfileMetadata(OauthToken cdpJwtToken) throws Exception {
		HttpClient httpclient = HttpClient.newBuilder()
				.version(Version.HTTP_1_1)
				.connectTimeout(Duration.ofSeconds(20))
				.build();

		HttpRequest httpRequest = HttpRequest.newBuilder()
				.uri(new URI(String.format("https://%s/api/v1/profile/metadata", cdpJwtToken.InstanceUrl)))
				.setHeader("Authorization", String.format("Bearer %s", cdpJwtToken.AccessToken))
				.GET()
				.build();

		HttpResponse<String> response = httpclient.send(httpRequest, BodyHandlers.ofString());

		JsonElement jElement = JsonParser.parseString(response.body());
		JsonObject  jObject = jElement.getAsJsonObject();

		return jObject;
	}

	public static void main(String[] args) {
		try {
			OauthToken jwtSalesforceToken = JwtAuthGenerator.getOAuthToken();

			System.out.println(jwtSalesforceToken.AccessToken);
			System.out.println(jwtSalesforceToken.InstanceUrl);

			OauthToken jwtCdpToken = JwtAuthGenerator.exchangeForCdpToken(jwtSalesforceToken);

			System.out.println(jwtCdpToken.AccessToken);
			System.out.println(jwtCdpToken.InstanceUrl);

			JsonObject cdpProfileMetadata = JwtAuthGenerator.requestCdpProfileMetadata(jwtCdpToken);
			System.out.println(cdpProfileMetadata);

		} catch (Exception e) {
			e.printStackTrace();
		}
	}
}
It is important to point out that this API is issued against CDP instance FQDN rather than Salesforce instance FQDN. If you’ve been paying attention, request for Salesforce JWT token and exchange for CDP JWT token is served by Salesforce org metadata service. However, CDP API is served by CDP gateway that has a different instance URL. That is why it is necessary to keep track not only of the JWT tokens, but also the instances.
